Happy Thursday! Welcome to day 6 of the 12 Days of Christmas!!

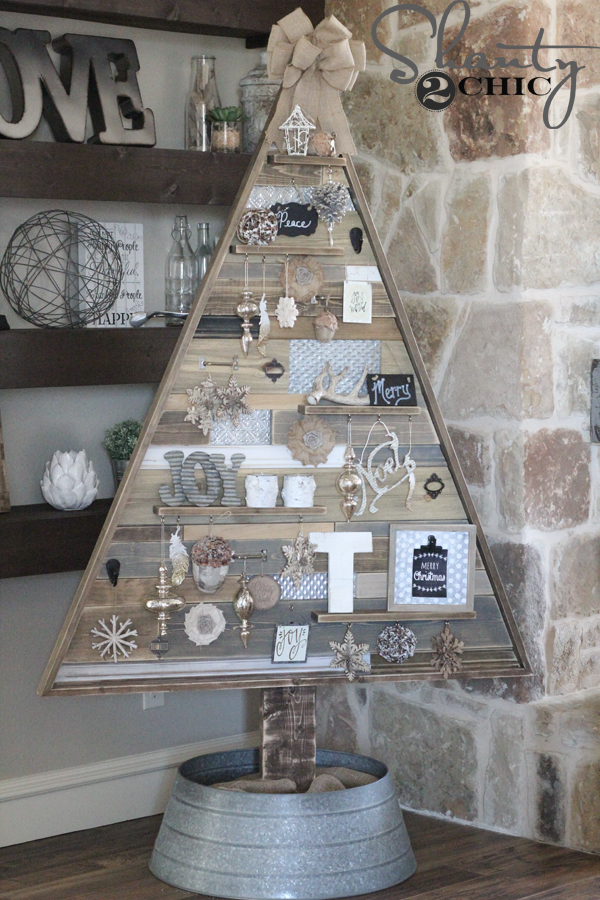
Today I will be sharing a super quick, easy and cute Christmas Card Display! Anybody can make one of these, and it can be easily restyled for any time of year!
Here is how it turned out…

This cost me under $10 to make, and I had it done in under an hour!
So… Here we go!


I also used Gorilla Wood Glue under each stir stick!
Now you are ready for paint!
I gave mine 1 light coat of my OH SO FAV…


I used hot glue to attach my stems at the top corner of my board.


That’s it!!
Want to see it all finished??


What do you think? I am so pleased with it! And… Of course the price makes me love it even more 😉
We have teamed up with some fabulous bloggers to bring you this 12 Days Of Christmas! Make sure to check them all out, and be looking for today’s great giveaway!


A little bit more about the Shanty Sisters…

We are 2 sisters sharing how we transform our homes on a budget! With 8 kiddos between the two of us, we put every naptime to good use ![]() !
!
From building projects like this Pedestal Dining Table for $125

and this $65 farmhouse table…

To transforming things like this $15 mirror made from a Walmart mirror…

And even offering free printables like our latest free alphabet banner!

You can also follow us on Facebook!
And keep up with all of our posts by following us on Pinterest!

Thanks so much for stopping by today!
I would LOVE for you to share this Christmas card display and PIN it below!!
~Whitney


HELLO, I JUST WANTED TO SAY THANK YOU FOR THIS ARTICLE THAT YOU’VE SHARED TO EVERYONE.
STAY SAFE!
HAVE A GREAT DAY TO THE CREATOR OF THIS WONDERFUL ARTICLE, I AM EXTREMELY INSPIRED WHILE HAVING READING THIS, SUPER NICE INFORMATION, THAKS FOR SHARING!
Thanks for making this wonderful blog page here, Keep on sharing buds! A fantastic blog and i’ll come back again for more useful content. Thanks again
This site is good and I found very interesting stuff here. Great job, thanks!! Keep us posted with new updates. its was really valuable.
I appreciate your work. I read your article every thing is clear, Thanks for sharing. I’m impressed with this article, I must say this is one of the best blog!!
I bookmarked more article from this website. Nice blog provided here. Nice article! keep writing this kind of blog. Keep it up, thanks budddy!!
Such a cool project. I love the shabby chic look. It’s so clean. Thanks for the DIY!
That crazy amazing mate! thank you so much for sharing
Thank you for this wonderful tutorial! Two of my favorite words…quick and affordable! Merry Christmas!
This is really a great idea. I found you on Pinterest and would like to link back to your lovely project because I am doing a variation on it.
What is the paint that you used….the link or photo isn’t working.
⭐?⭐?⭐?⭐?⭐?⭐?
⭐?⭐?⭐?⭐?⭐?⭐?
?❤?❤
I built my own using the plans at www. WoodworkPlans.info – highly recommended you check those out too. They are detailed and super easy to read and understand unlike several others I found online. The amount of plans there is mind-boggling… there’s like 16,000 plans or something like that for tons of different projects. Definitely enough to keep me busy with projects for many more years to come haha
Head on over to www. WoodworkPlans.info if you want to learn more – click the pink link above for some more plans! Best of luck on your building adventures!
⭐?⭐?⭐?⭐?⭐?⭐?
What is your oh so favorite paint you speak of?? 🙂
This is adorable! Love it! I just had the awesome thought that something similar to this would be awesome for the playroom to hang my little one’s artwork on! Thanks for the awesome tutorial!
I adore this design! Last night I made this, but I fixed it up so it hung on the wall and I stained it that “American” stain you suggest for other projects. Then I wrote “joy” in cursive on the bottom right, like you did for your wall art with “love” (I believe). Right now I have a 36″ x 48″ version drying that I will be putting over my couch. A little heavy, but I can’t wait. I will be putting jute around that one as well. Thank you for all the great ideas! Easy and inexpensive!!
That is so cute!!
Thank yo Sandra!!