Hey friends! Thanks so much for all of your sweet comments and pins on our Mason Jar Planter Box we made our Meme.
As promised I am back to share a quick, easy and of course cute paint method to get that perfect “shanty” finish!

This is so simple and really fun to do! You will need two paints…. A base coat and a top coat.
For your base coat you can use anything… Acrylic, latex and even spray paint. I used acrylic here because it’s cheap and dries really quickly. Here is the color I used.

Do you like my paper plate very professional paint tray?? 😉

First you want to put a coat of your base color on any surface that you want to peek through. I like to shanty up the edges and corners so that is what I did. You can paint the whole thing if you want it more distressed.

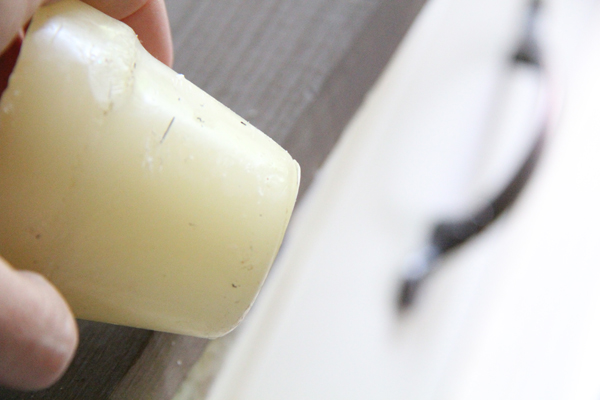
After that dries it’s time for your Vaseline! Yup… Vaseline!
I like to get the tubes of it from the baby section at Target because it’s less messy.

Just rub a little vaseline on any surface you want to show through your top coat. Again I did my corners and edges but you can add more or less depending on your taste! The Vaseline will keep your top coat from sticking.

This is great because it softens your hands in the process ;-)!
After you have applied your vaseline it is time for your top coat! I used latex paint for mine. I do think it distresses the best, but you can also use acrylic. Mine is an Olympic color called Off White… Pretty easy! I put one coat over the entire box. Depending on the color you may want to use two coats.

Now let that dry really good! Once it is dry it’s time for the fun part! I use an 80-grit sanding block to distress mine, and you can also use steel wool. Just rub your corners lightly to reveal the base coat. The more you sand it the more shanty it will look! Just sand it until you are pleased with the look! SO DARN EASY!
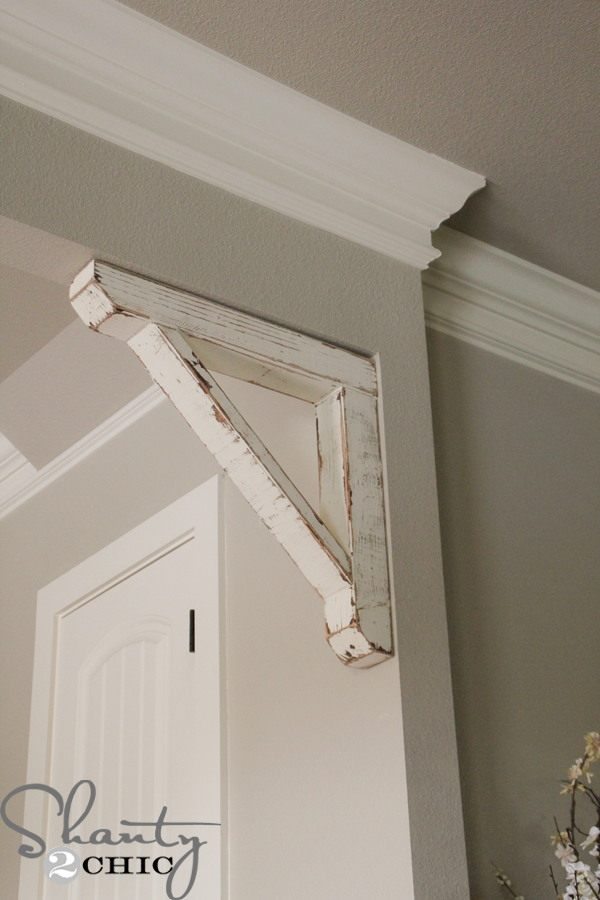
Want to see my results???


What do you think?? I love it! It’s just shanty enough 😉 This works great on furniture as well!
If you missed the whole tutorial on the Mason Jar Planter Box you can click the photo below to check it out!
And as always… We would greatly appreciate you pinning and sharing this tip below! Thanks guys!


Here’s a good chuckle for you… When I tried this I didn’t have any Vaseline, but being a mommy, A&D ointment is a plenty in our household. And it worked SMASHINGLY!! 🙂
Love it!
Thanks so much!! 😉
I absolutely love this, very inspiring
I’d love to try it with like pink or a bright color underneath, I think that’d be cool
Thank you for sharing!
You’re newest follower!!
That’s great Jordan! Glad to have you here! We would love to see pics when you try it yourself!
I’m working on a 100-plus year-old transom window. I’ve removed all the paint I possible could (at least 4 coats) and already it looks good. Even the panes were covered with two coats of paint. Gratefully, that paint was easy to remove. I was, however, going to spackle and paint the window but when I saw your idea, well, I’m going to jump all over it. Thanks for sharing.
If your wood has a knot in it, you will need to use wood sealer or primer before painting, If not, the knot will eventually show through and ruin your project…I learned from experience the hard way.
Best of luck to all crafters. Get busy and get your hands dirty. It’s such fun! Love this site!
Great tip! I love the way it looks
What flowers are used in these jars? I LOVE THEM!!
Those are called asiatic lillies. they are perenials and will multiple. I have all colors in my flower beds and they are beautiful!
Just tried this on a door that I repurposed! Love it!!!!! So much easier and cheaper than Annie Sloan and just as good! Check out The Shed on Facebook for the picture
there are several pages named “The Shed”; which one? or can you email me a pic? jdogjazz@hotmail.com
Love the look! Does the wood remain greasy? How do you get rid of the extra vaseline?
When you sand it, the sticky petroleum feeling will disappear.
I’ve also done this using an old candle. Just rub the candle wax on the item and when you paint it won’t stick to the wax and rubs right off with a paper towel!
Such a cute idea! I’ll have to try this trick on something.
This is such a great tip! Thanks for sharing. I’m painting picture frames right now…..I’ll have to try it.
lexmallabooks.com
GREAT idea! Thank you for sharing it! I love the distress look and this looks like it would save a lot on the sanding process.
Creative and easy makes a great combination.
oooh, what a great tip! I can’t wait to use it! Thanks!!
Leanne @ Because (I think) I Can