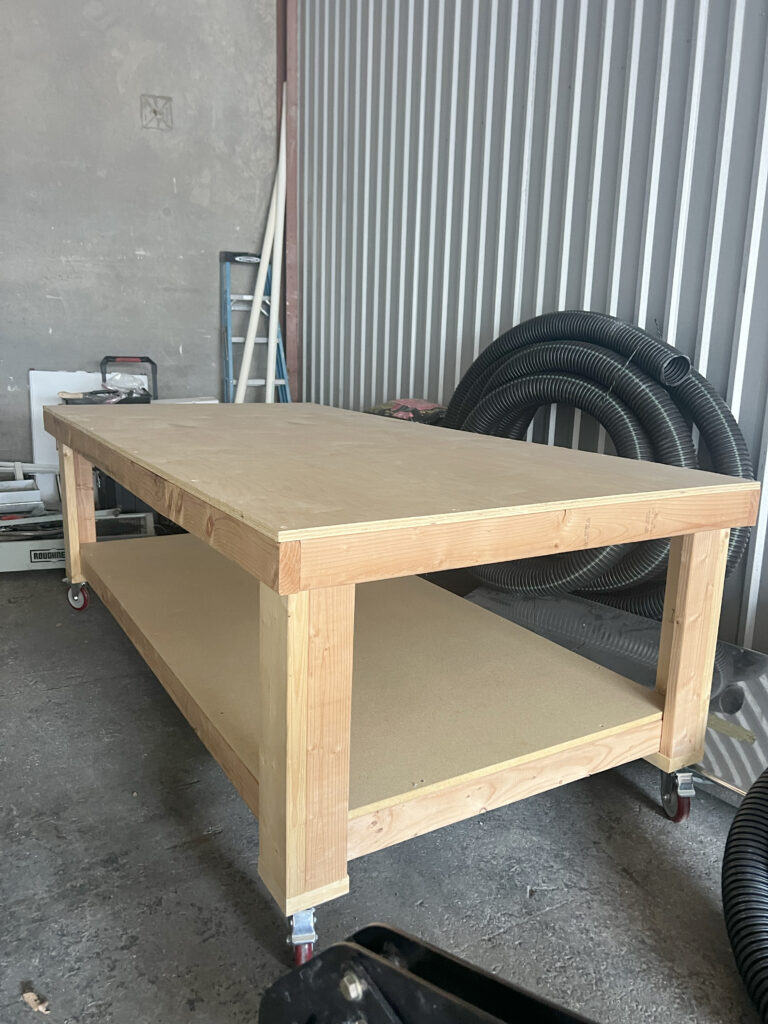
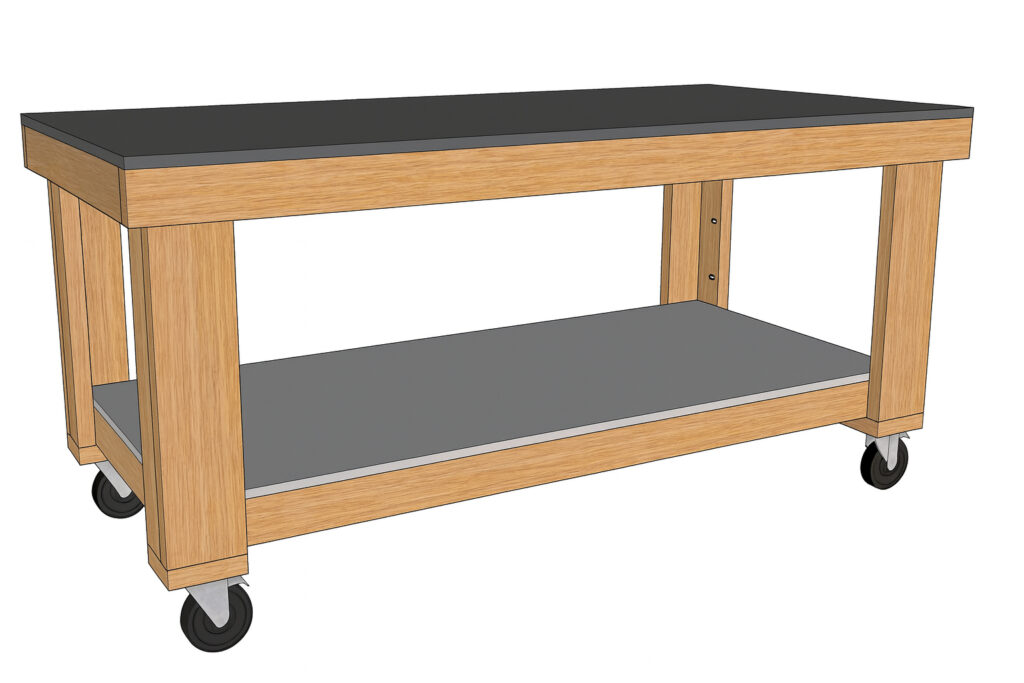
Need more room to spread out? This oversized workbench is our classic Shanty design scaled up to a full 48″ × 96″ (4×8) footprint. It’s sturdy, simple to build, and perfect for garages, school shops, and job-site prep spaces.
A quick backstory
This bench is special to me—I built it for my son and his company to use in their workshop. They needed a heavy-duty surface that could handle daily use and big projects, so I took our workhorse design and upsized it to a 4×8. Seeing it go from sketch to centerpiece in their space makes this mama happy.
Table of Contents
Finished Size + Height Formula
- Footprint: 48″ W × 96″ L
- Typical finished height: 34″–38″ (choose what fits you best)
Cut-to-fit formula for leg length:
Desired finished height − (caster/foot stack) − top thickness.
Example: If you want 36″ overall height, you’re using a ¾″ MDF top and casters that add 6″ total, cut the legs to 36 − 6 − ¾ = 29¼″.
Materials & Tools
Lumber & sheet goods
- 9 – 2×4×8′ boards (frames, stretchers, feet)
- 2 – 2×6×8′ boards (laminated legs)
- 2 sheets – ¾″ MDF 4′×8′ (top + bottom shelf)
Optional: a 3rd sheet if you want a double-thick top or a replaceable hardboard skin
Hardware & supplies
- 4 – heavy-duty locking casters
- 2½″ pocket-hole screws
- 2½″ wood screws
- Wood glue
Tools
- Miter saw, drill/driver
- Kreg Jig (or pocket-hole jig)
- Brad nailer + 2″ brads
- Tape measure, square, clamps, sander
Why We Love the Kreg Jig (Best Pocket Hole Jig for DIY Furniture)
One of the most common questions we hear is: “What is a Kreg Jig, and why do you use it in so many projects?”
A Kreg Jig is a pocket hole jig – a tool that drills angled pocket holes so you can join two boards with hidden screws. This creates super-strong, clean joints that hold up much better than countersinking a standard wood screw. It also makes building faster and easier, even if you’re brand new to woodworking.

When we first started building furniture, learning to use a Kreg Jig was a complete game-changer. It gave our projects professional strength and cleaner lines while making the process simple and beginner-friendly.
For this oversized DIY 4×8 workbench, I used the Kreg Jig 720 PRO, and it was the perfect tool to handle such a heavy-duty project. If you already own an older model, the 720 PRO is definitely worth upgrading to – it’s more efficient, user-friendly, and makes your builds even stronger.
👉 You can grab the Kreg Jig 720 PRO on Amazon, and don’t forget to check out our How to Use a Kreg Jig video tutorial for a step-by-step walkthrough.
Build Overview (Step-by-Step)
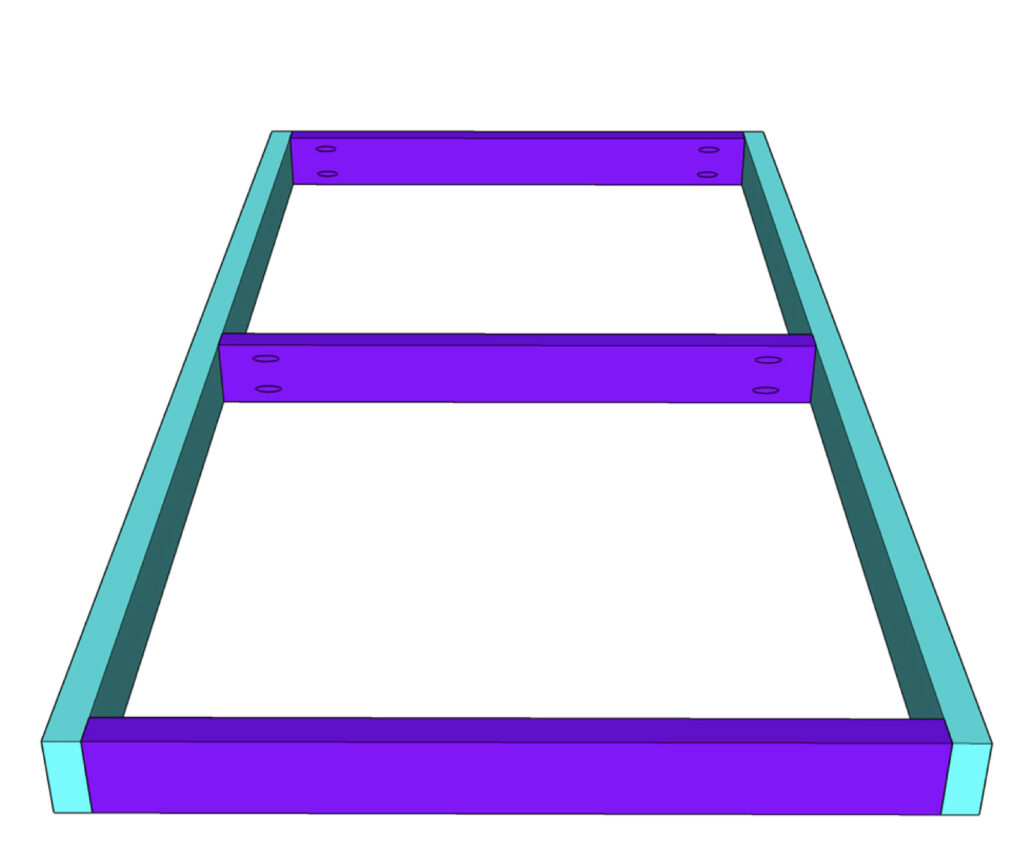
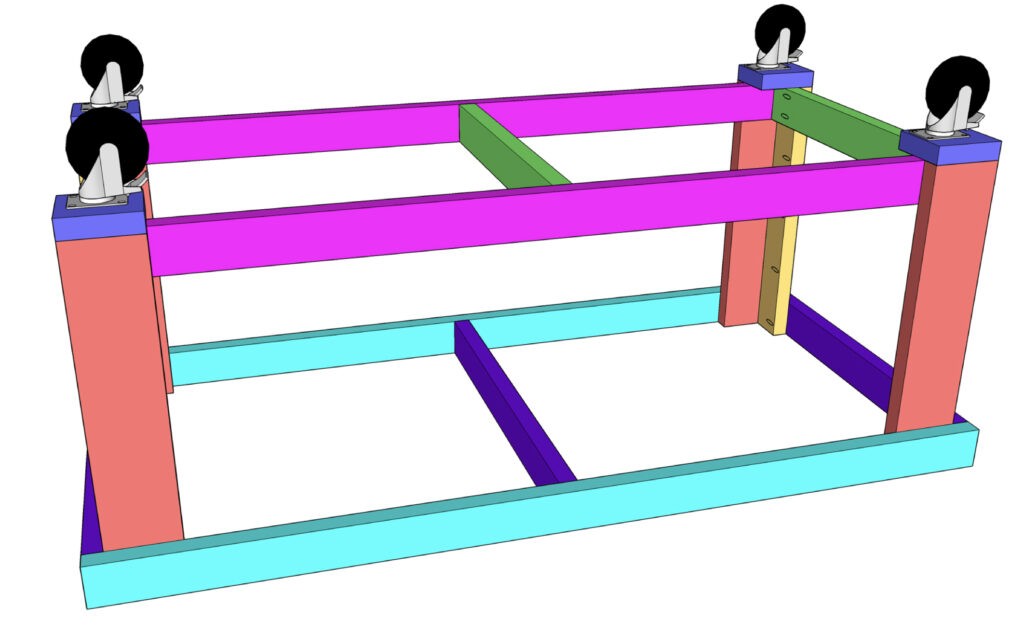
1) Build the frames
Once all boards are cut, drill 1½″ pocket holes in the short frame pieces. Assemble two rectangular frames (top and bottom) by joining shorts to longs with 2½″ pocket-hole screws and wood glue.
Pro tip: On a 48″ width, your short pieces are typically 45″ when the long 2×4s run full-length and shorts fit between them.

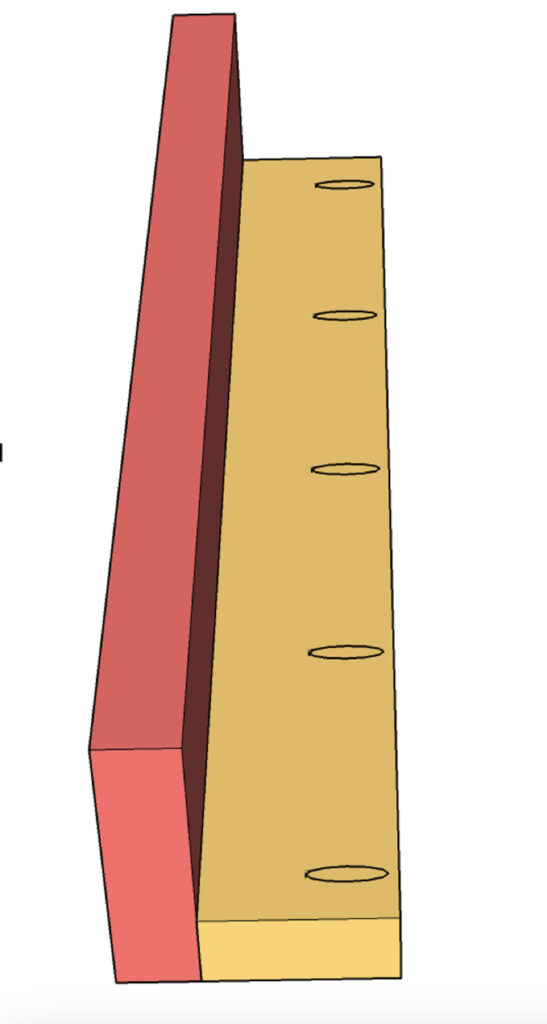
2) Laminate the legs
Drill 1½″ pocket holes in each 2×6 leg board and attach a 2×4 to each with 2½″ pocket-hole screws and glue. Repeat for all four to create strong laminated legs.
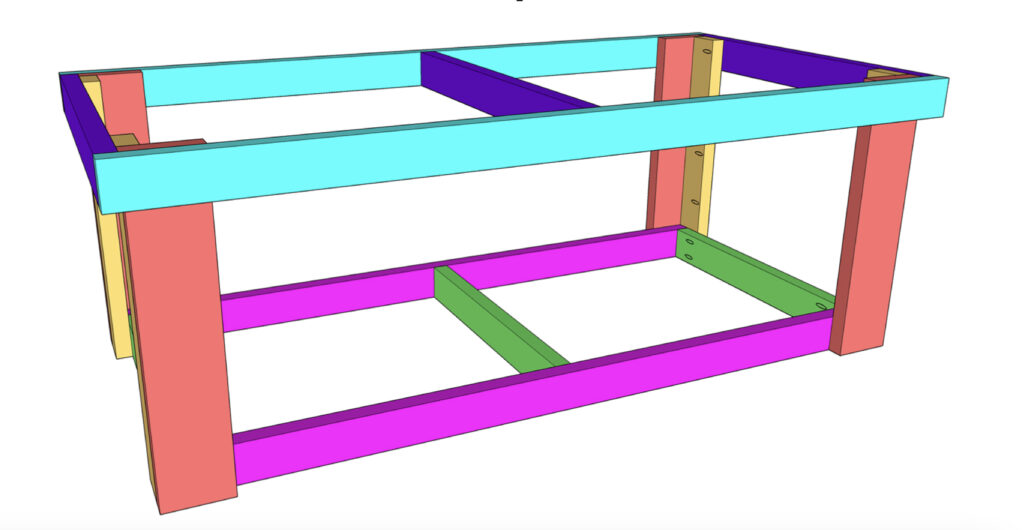
3) Attach legs to the bottom frame
Stand the bottom frame upright. Position a leg at each outside corner. From the inside of the frame, drive 2½″ wood screws with glue into each leg. The bottom of every leg should sit flush with the bottom of the frame.

4) Add the top frame
Flip the assembly and slide the top frame down over the legs. Secure with 2½″ wood screws and glue, driving through the legs into the frame. Make sure the top of each leg is flush with the top edge of the frame so everything stays square.
5) Add feet (base blocks)
Attach the feet (short 2× blocks) to the underside of the bottom frame using 2½″ wood screws and glue. These spread the load and give the casters a solid mount.

6) Install casters
Center a locking caster on each foot and secure per the manufacturer’s pattern. Locking casters keep the bench mobile when you need it and rock-solid when you don’t.
7) Add shelves & top
Apply glue along the frame edges, then set the bottom shelf and top work surface (¾″ MDF). Fasten with 2″ brad nailsto hold everything tight while the glue cures.
Upgrade options: Double up the top for extra stiffness, or skin with ¼″ hardboard you can replace later.

8) Finish
Break edges with 120–150-grit, then sand to 180. Paint, seal, or oil the MDF. For shop furniture, I like two coats of polyurethane or water-based poly + a light coat of paste wax for a slick, wipe-clean surface.
Build Notes & Pro Tips
- Stiffness on a 4×8: Add one or two 2×4 center stretchers to the frames if you’ll store heavy tools or assemble doors/cabinets on top.
- Square is king: Dry-fit frames and check square (diagonals equal) before driving screws.
- Height fit: Set a clamp on your favorite tool (miter saw, planer) to match bench height so outfeed lines up.
- No casters? Substitute levelers or rubber feet and adjust leg length using the formula.
FAQ (quick answers that help SEO)
Can I use plywood instead of MDF? Yes—¾″ plywood is lighter and more moisture-resistant. MDF is flatter and great for a smooth work surface.
How much weight will it hold? With glued pocket-hole frames, laminated legs, and center stretchers, it’s designed for heavy shop use. Actual capacity depends on materials/hardware; add stretchers if you store very heavy tools.
Can I change the size? Absolutely—use the same method for 3×6, 4×6, or 3×8. Keep the short-piece math: interior width = overall width − 3″ (for the two 2×4 thicknesses).
DIY 4×8 Workbench (48″×96″) – Free Plans
Tools
- – Brad nails (2″)
- – Drill/driver
- – Kreg Jig (720 PRO recommended)
- Miter Saw
- Brad Nailer
- Sander
Supply List
- – 9 – 2×4×8 boards
- – 2 – 2×6×8 boards
- – 2 sheets – ¾″ MDF 4′×8′ (top + bottom shelf)
- – 4 – 5″ locking casters
- – 2½″ pocket-hole screws
- – 2½″ wood screws
Instructions
- Build the bottom frame: After cutting your boards, drill 1½″ pocket holes into the short pieces. Attach them to the long pieces with 2½″ pocket-hole screws and wood glue to create the bottom frame.

- Build the top frame: Repeat the same process to create the top frame. Drill 1½″ pocket holes in the short pieces and attach with 2½″ pocket-hole screws and glue.
- Assemble the legs: Drill 1½″ pocket holes into the 2×6 leg boards. Attach them to the 2×4 leg boards with 2½″ pocket-hole screws and glue. Repeat for all four legs.

- Attach legs to the bottom frame: Position each laminated leg at the outside corners of the bottom frame. From the inside of the frame, secure with 2½″ wood screws and glue. Make sure the bottoms are flush.

- Add the top frame: Flip the bench over and slide the top frame onto the legs. Attach with 2½″ wood screws and glue, driving through the legs into the frame. Keep the tops flush.

- Add feet: Attach 5″ 2×4 feet blocks to the bottom of the frame with 2½″ wood screws and glue. These give a solid base for the casters.

- Install casters: Center and attach a locking caster on each foot using the hardware provided. This makes your workbench mobile and sturdy.
- Add shelves and top: Apply wood glue to the frame edges, then lay the MDF panels on top and bottom. Secure with 2″ brad nails.


Notes
– Standard finished height is ~34–38″. Adjust leg length using this formula: desired height − caster height − top thickness.
– For extra strength on a 4×8 build, consider adding center stretchers to reduce sag.
Get the Free Plans
- Printable PDF: Grab it here!
- Cut list & diagram: Included in the PDF for quick shopping and layout.
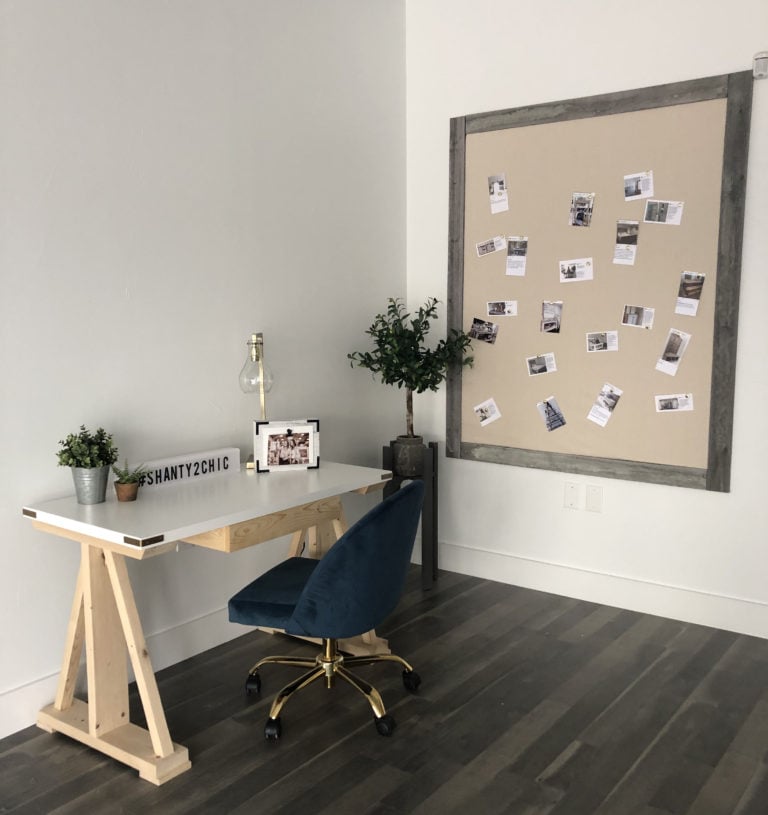
If you build this bench, tag us @shanty2chic—we love sharing reader projects!


This is a fantastic build for anyone who spends time working with wood or assembling projects. A sturdy 4×8 workbench like this can really become the backbone of a workshop, and the clear plans make it much easier for builders to replicate the design. The balance between strength, workspace size, and practical storage is especially well thought out.
From a broader interior and woodworking industry perspective, workbenches like this highlight the importance of durable materials and solid joinery when creating functional workspaces. Well-built workshop furniture plays a big role in enabling precise craftsmanship and efficient project workflows. We’ve been observing similar material and workshop product trends across the interior industry as well: https://plywoodbazar.com/