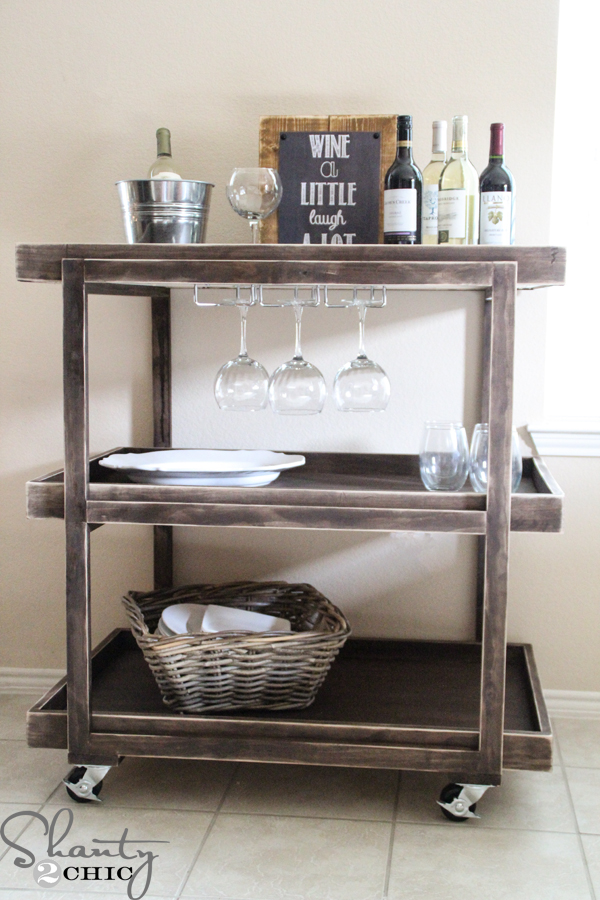
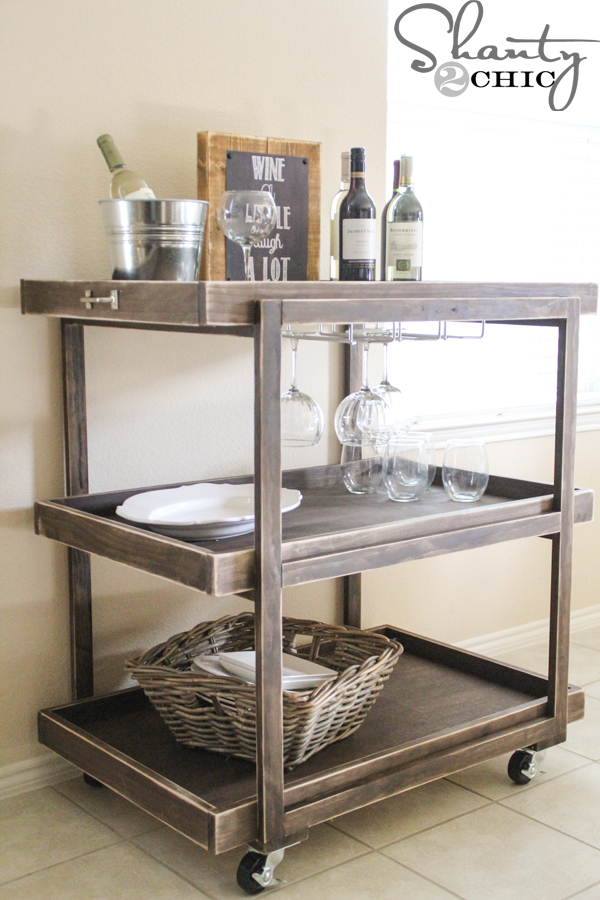
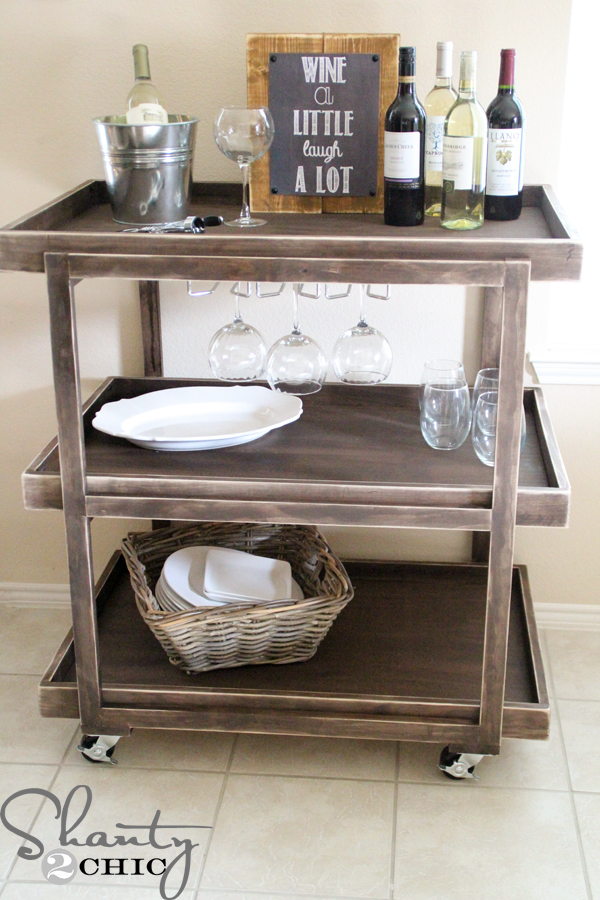
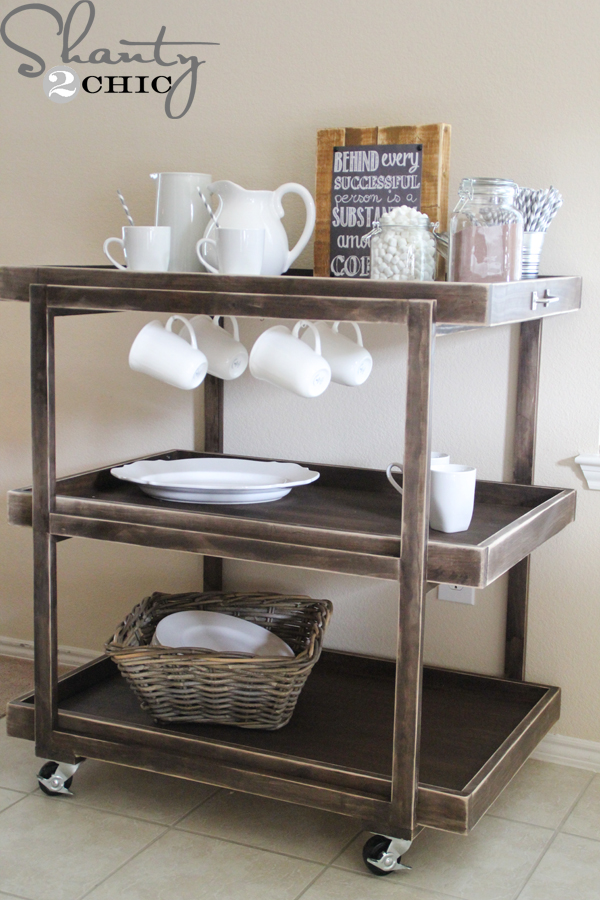
Hey there! I am so excited to share this goodie with you guys today! We have had some serious love for a Bar Cart at Crate and Barrel but of course the $800 price tag was just too pricey for my wallet so, I designed my own knock-off DIY Bar Cart for about $150 including the hardware!!
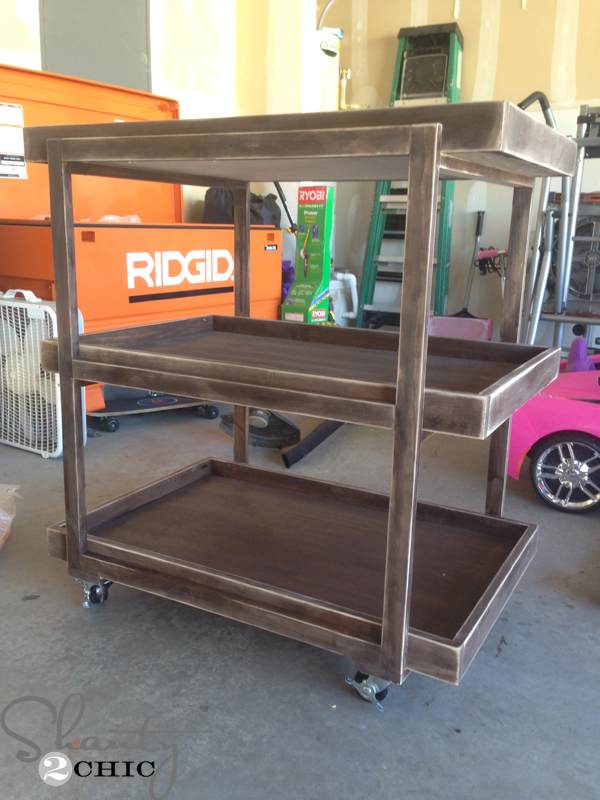
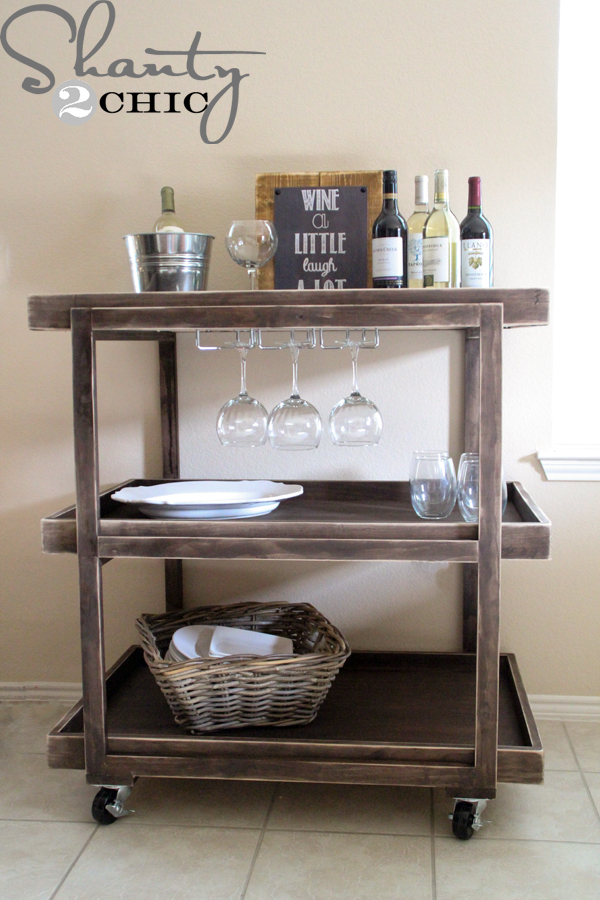 What do you think? She’s a beauty right? And, just in time for holiday entertaining!!
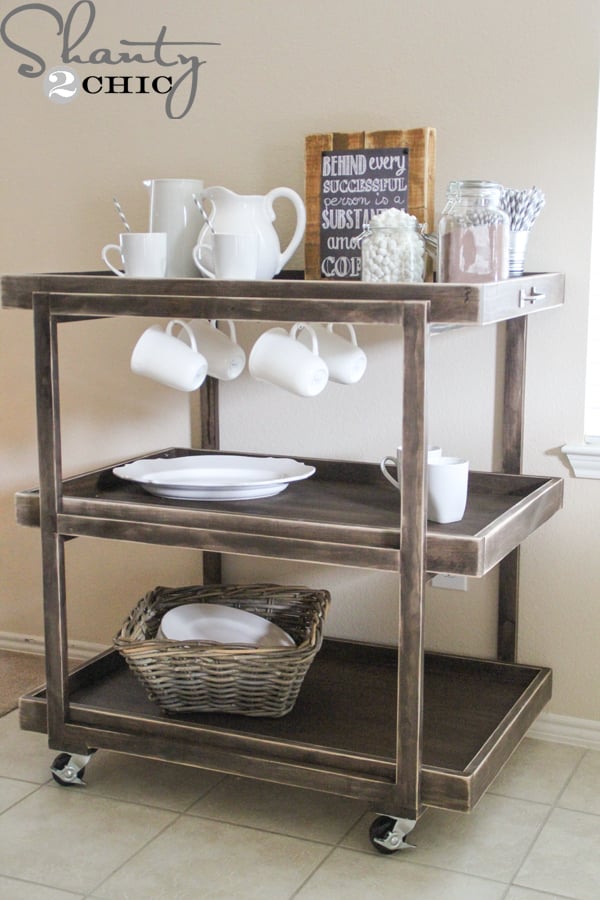
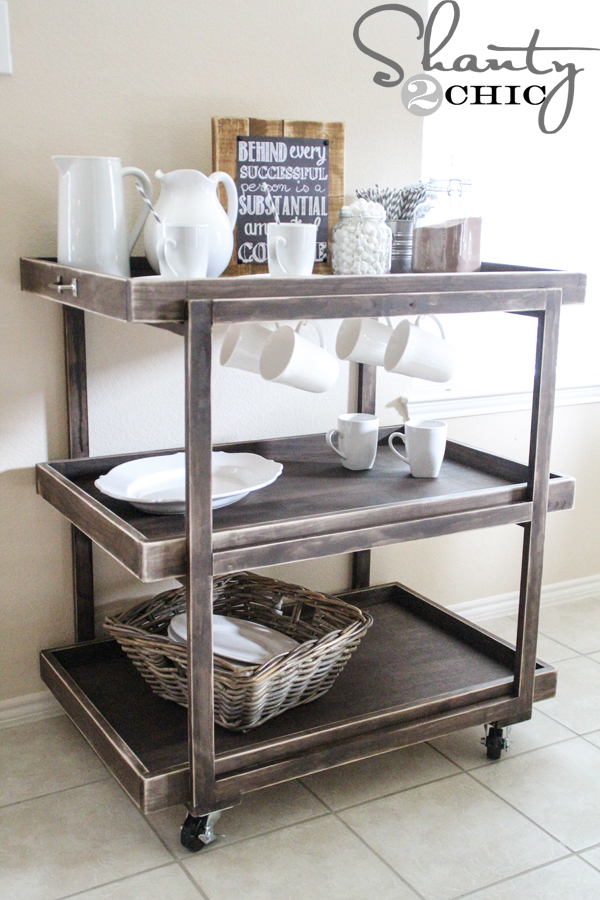
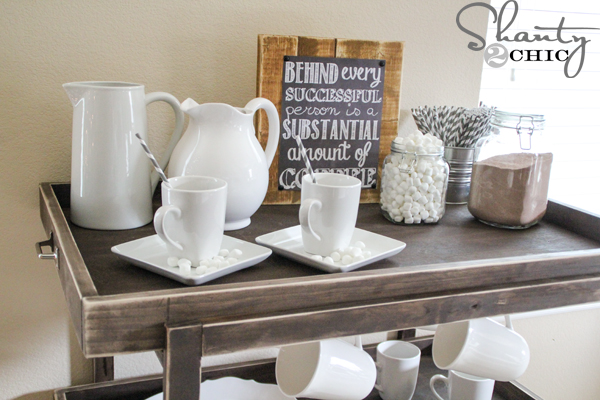
I also had fun with another spin on this! Who wouldn’t love to serve coffee and hot chocolate to your guests on this cutie!
This DIY Bar Cart is super easy to build…. I mean EASY! Here’s how I did it 🙂
Let’s start with a shopping list:
3 – 1×2’s @ 8ft.
1 – 1×2 @ 10 ft.
4 – 1×3 @ 8 ft.
1 – 1×4 @ 6 ft.
1 – 4’x8′ sheet of 3/4″ Purebond Plywood (I picked birch because it’s the cheapest) *Have your hardware store rip this (long ways) at 21 1/2″ and you can make the cross cuts at home. Or, you can have them make all of the cuts – 3 pieces at 21 1/2″ x 34″!
4 – 2 1/2″ locking casters
2 – pulls
Now, let’s build!!
***Remember, not all boards are created equal. The measurements I am sharing are the measurements I used. We always suggest cutting and measuring as you build so that you get a perfect fit!***
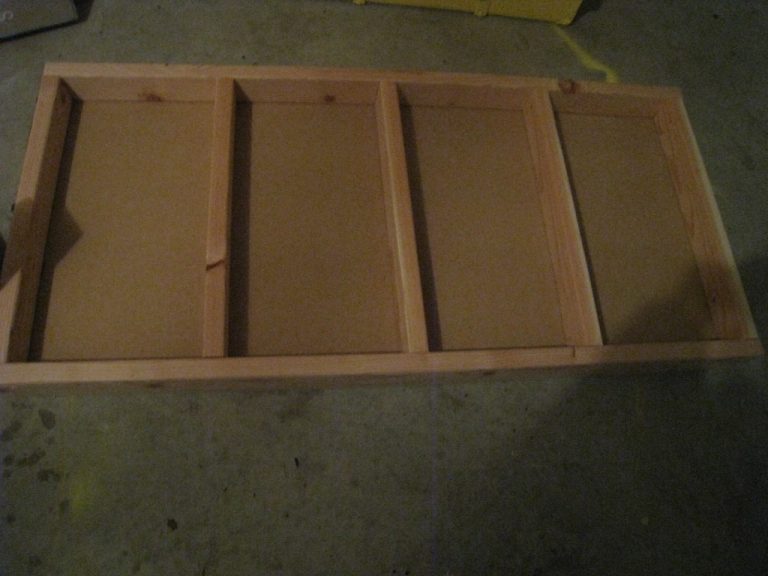
We are going to start by building the frames for the cart. First, cut 4 – 1×2’s at 33″ and 6 – 1×2’s at 26 1/4″
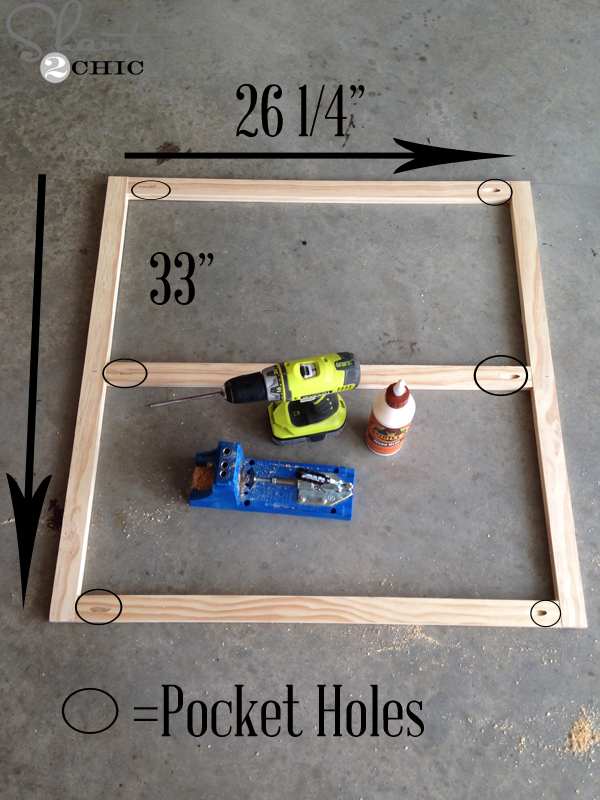 You can see where I drilled my 3/4″ pocket holes with my Kreg Jig and I attached three short boards between two long boards. I attached one board flush with the top of the two boards and 1 board flush with the bottom of the two boards. The one in the middle, I attached at 15 3/4″ from the top of the long boards. I attached with 1 1/4″ pocket hole screws and wood glue.
 Now, just make a second frame.
Now for the rails (the boards that will support the trays)!
Cut 4 – 1×2’s at 23″ and drill 1 3/4″ pocket hole at both ends of each board.
 Now, attach these boards with 1 1/4″ pocket hole screws. You can see that I attached them right below where the boards were attached on the frames. Just do this at the top and middle of the frames. (I attached these with the pocket holes facing down so that they will be hidden).
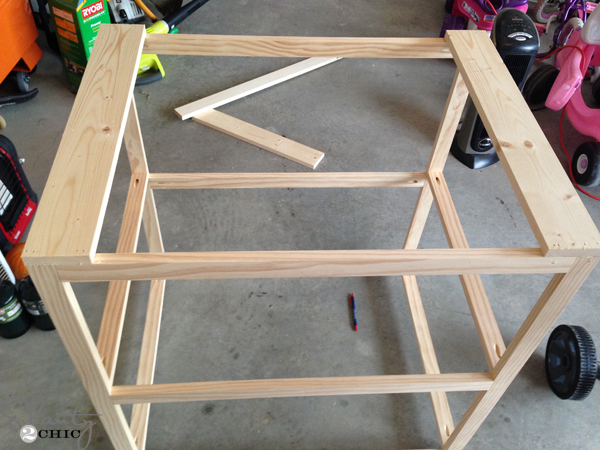
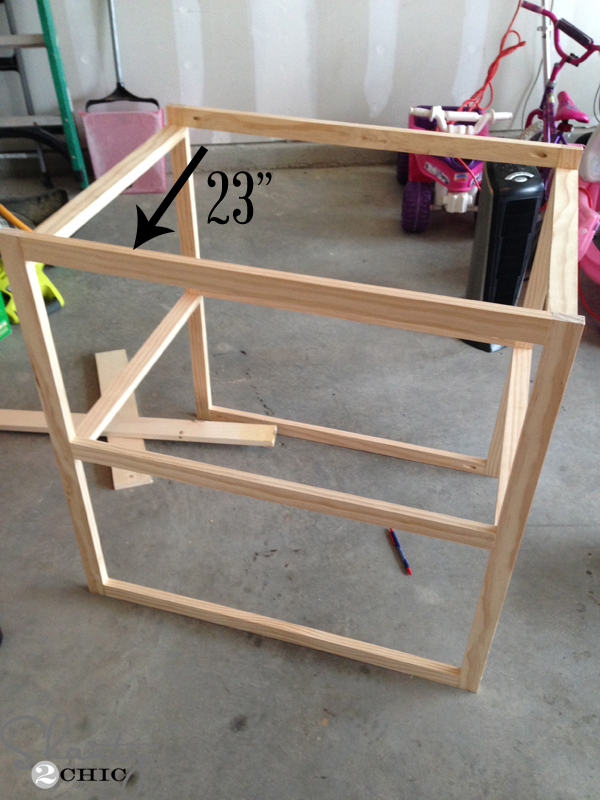 This is what it looks like at this point! The two frames that we built first at the front and back and the 4 rails running between them.
Here is why we left the rails off the bottom of the cart.
 Here you will cut 2 – 1×4’s @ 24 1/2″.
 attach them to the bottom of the frame (flush with the 1×2’s) with 1 1/4″ nails and wood glue. I used my Ryobi Airstrike Nailer for this part 🙂
 Here she is upside down!
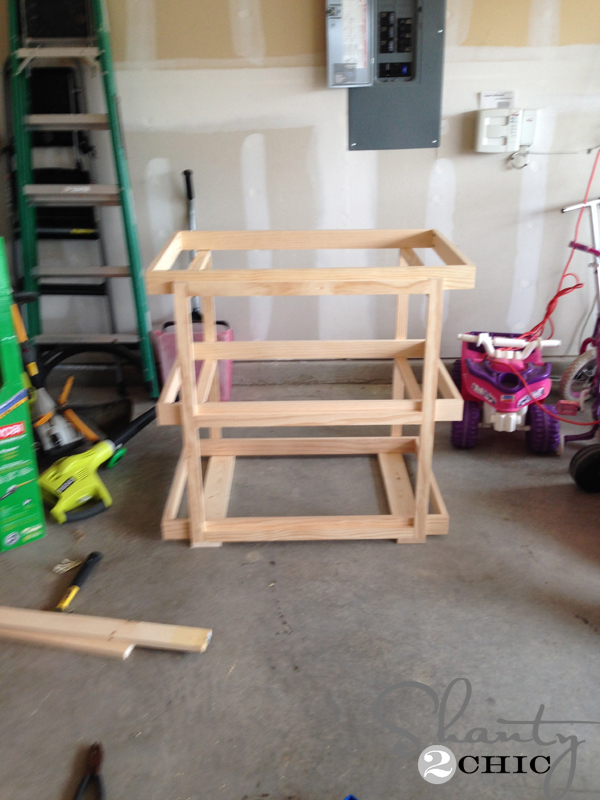
That’s it for the cart! Let’s build the trays 🙂
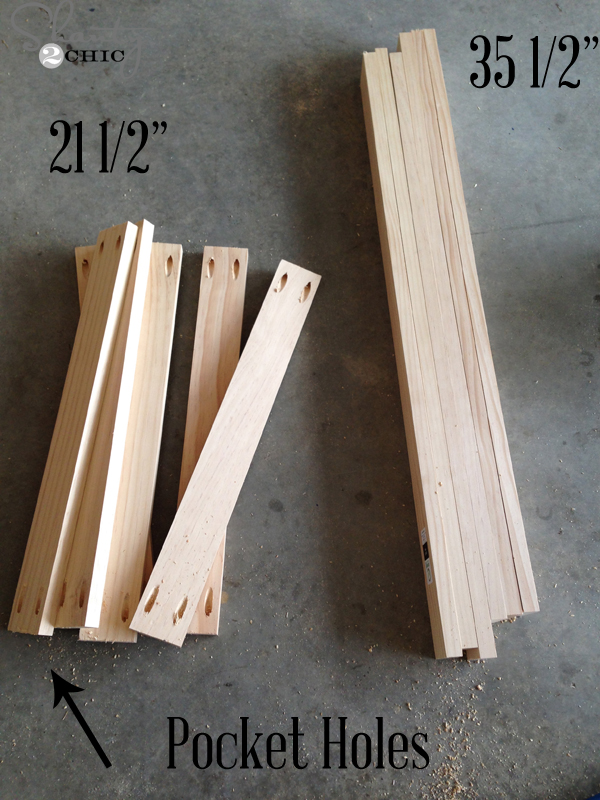 Cut 6 -1×3’s at 21 1/2″ and 6 – 1×3’s at 35 1/2″. Drill 3/4″ pocket hole screws into both ends of each short 1×3.
 Attach 2 short boards between 2 long boards to form 3 frames for each tray. Use 1 1/4″ pocket hole screws and wood glue. Here is a great spot to stop and make sure these frames fit in your cart. It’s easier to make adjustments at this point than it will be once the bottoms are in.
Now, measure the space between each tray frame to make sure that your bottoms will fit.
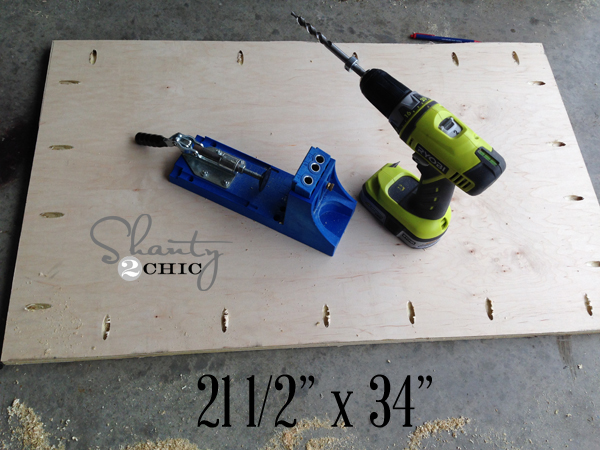 The plywood will be cut at 21 1/2″ x 34″. Then just drill 3/4″ pocket holes on each side. I did 4 on the sort sides and 6 on the long sides.
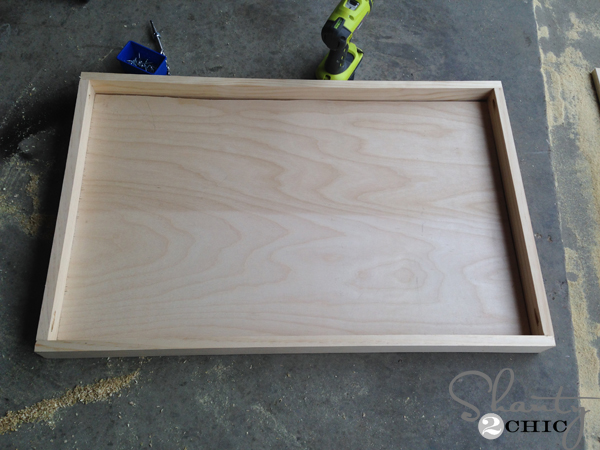 Next, just attach with 1 1/4″ pocket hole screws!
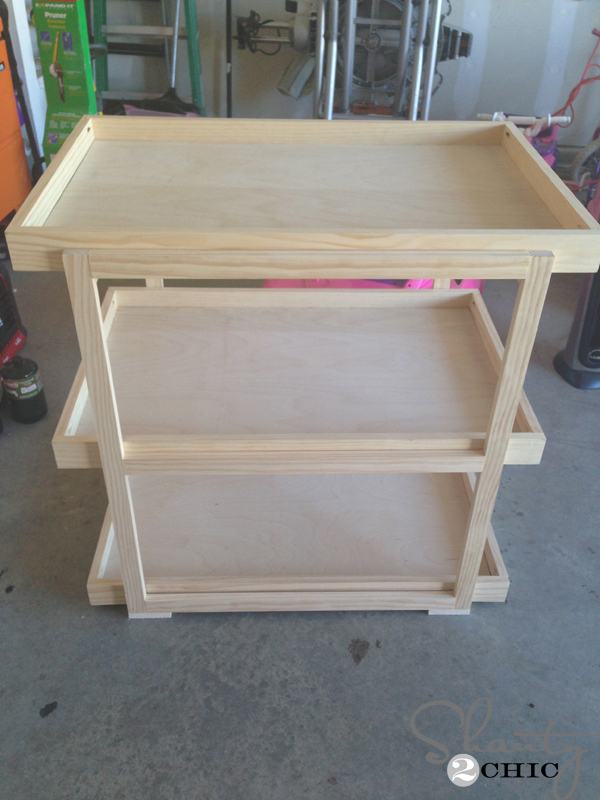 Lookin’ good! Let’s dress her up 🙂
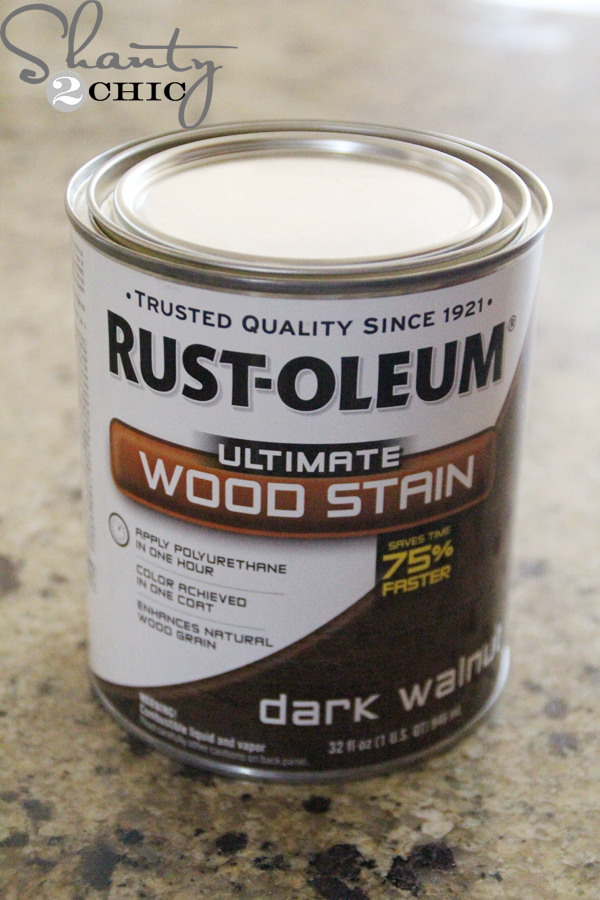 I decided to go with an old favorite, Rust-Oleum Dark Walnut Stain for this baby! I just wiped one coat on with a foam brush, waited 5 minutes and followed up by wiping the stain with a clean cloth. Don’t wipe the stain away, just use the cloth to blend it!
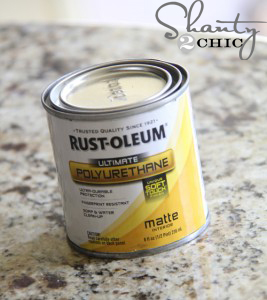 Once the stain was good and dry, I used a bristle brush to apply two coats of Rust-Oleum Polyurethane in Matte finish. This cart is going to be around liquids so this is a MUST to protect our beautiful finish 🙂
We want this to be able to move around the house with us while we are entertaining so…
 I purchased 4 – 2 1/2″ locking casters for the cart. The locking feature is key so that there aren’t any accidents 😉
 Attach the casters flush with the 1×4’s at the bottom of the cart!
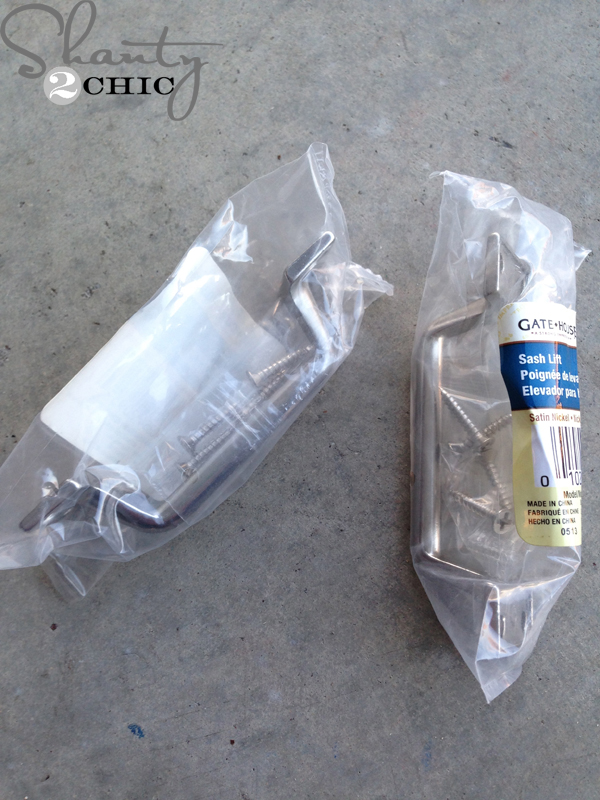 I thought pulls would be a cute addition to the cart and they would make it easier to cart around so I picked these cuties out for about $2 each! I just attached them to the top tray.
Now a little more FUN!
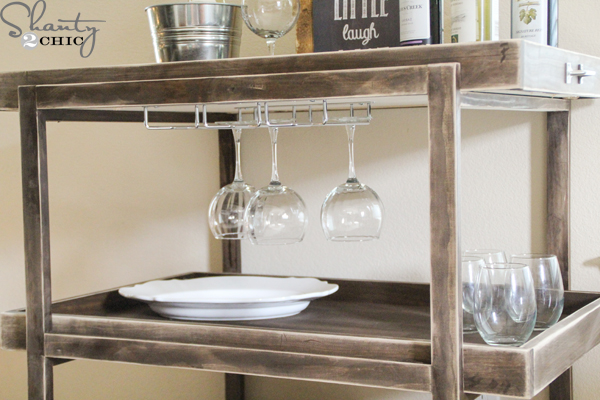
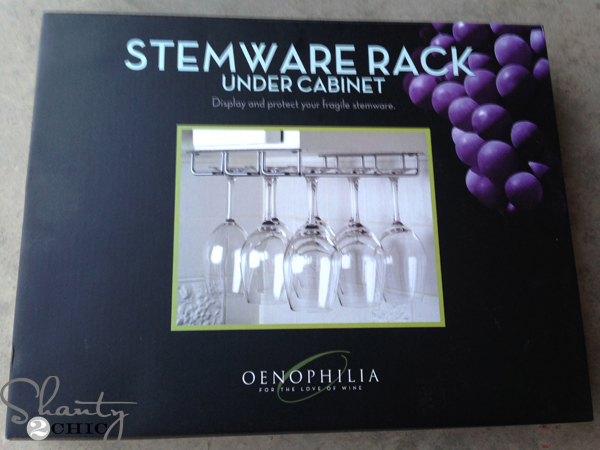 I purchased this stemware rack on Amazon for about $12. The one I purchased is in the box below.
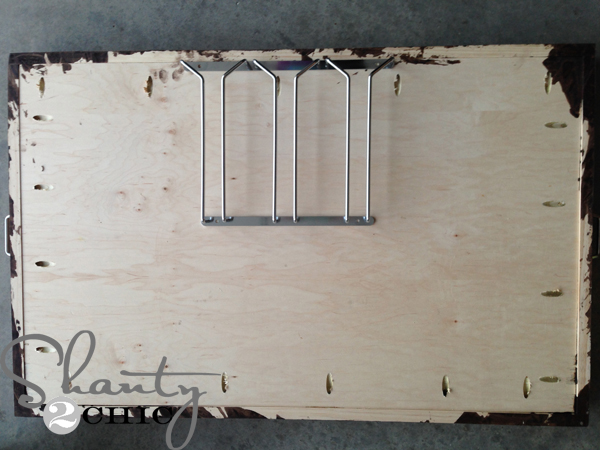
It’s super easy to install! I just attached mine under the top tray. I marked off the middle point of the tray and set it back behind the 1×3 frame.
For the beverage cart, I installed cup hooks for coffee mugs!
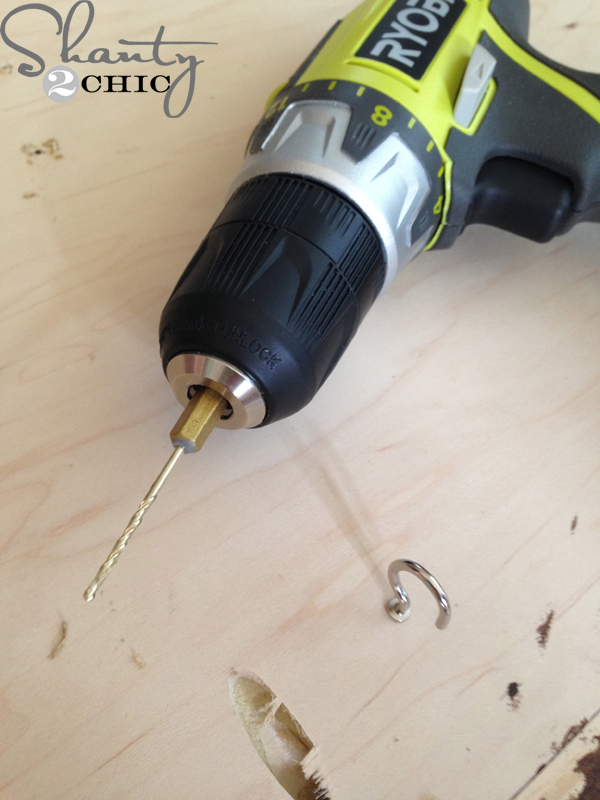 I predrilled holes for the cup hooks
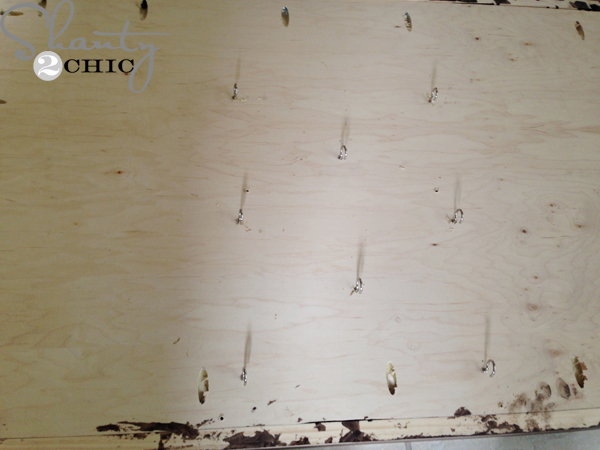
and just placed about 8 under the first tray. You could just install the stemware rack on one side of the tray and the cup hooks on the other side so that it is an easy switch! I will probably go back and do that later 😉
 To secure the trays, I drilled 1 1/4″ wood screws through the rails into the bottom of each tray. (I just used 2 screws per rail).
That’s it! Now it’s time for some serious entertaining 🙂
 Do you like the cute printables in the pictures??? Come back soon because I will be sharing them with all of you for FREE 🙂
I hope you love my DIY Bar Cart as much as I do!
We always appreciate your shares and pins!
Thanks for stopping by 🙂
Ashley

I absolutely love this DIY bar cart idea! The step-by-step instructions are super clear, and I can’t wait to try it out. The combination of wood and metal looks so chic. Thanks for sharing such a creative project!
I absolutely love the DIY bar cart idea from Shanty 2 Chic! The design is so sleek, and I can’t wait to try it out in my own space. Thanks for the detailed instructions and inspiration!
I absolutely love this DIY bar cart project! The design is so chic and the step-by-step instructions make it feel achievable. I can’t wait to try this at home and add some personality to my space. Thanks for sharing such a great idea!
I absolutely love this DIY bar cart idea! The design is both stylish and functional. I can’t wait to try this project myself. Thanks for the detailed instructions and inspiration!
I love this DIY bar cart idea! The design is both stylish and functional. Can’t wait to try it out in my living room. Thanks, Shanty 2 Chic, for the inspiration!
I absolutely love this DIY Bar Cart idea! The step-by-step instructions are so clear, and I can’t wait to try this out in my own space. The rustic charm really adds character, and I appreciate the tips on customization. Thanks, Shanty 2 Chic, for another inspiring project!
I absolutely love this DIY bar cart idea! The step-by-step instructions are clear, and the design is so stylish. Can’t wait to try this out and add some personal touches. Thanks for the inspiration!
I absolutely love this DIY bar cart! The design is both stylish and functional, and the step-by-step instructions are super easy to follow. Can’t wait to try this project myself and add a personal touch to my home. Thanks for sharing such a wonderful idea!
I absolutely love this DIY bar cart! The design is so chic and perfect for entertaining. I can’t wait to try it out in my own home. Thanks for the detailed instructions and inspiration!
I absolutely love the DIY bar cart idea from Shanty 2 Chic! The design is both stylish and functional. I can’t wait to gather the materials and start my own project. Thanks for the inspiration!
I absolutely love this DIY bar cart idea! The design is so elegant and the tutorials are easy to follow. Can’t wait to try it out and add my personal touch. Thanks for sharing!
I absolutely love this DIY bar cart idea! The design is so stylish and it looks like a fun project to tackle. I can’t wait to try it out myself and add a personal touch to my home. Thanks for the fantastic tutorial!
This DIY bar cart project is absolutely stunning! I love how you’ve incorporated both style and functionality. The step-by-step instructions are super clear, making it feel achievable. Can’t wait to try this out for my next gathering—thanks for the inspiration!
I absolutely love this DIY bar cart idea! The design is so chic and stylish, and I can’t wait to try it out for my own home. Thanks for the detailed instructions and inspiration!
I absolutely love this DIY bar cart idea! The design is both stylish and functional. Can’t wait to try it out and add my own personal touch! Thank you, Shanty 2 Chic, for the wonderful inspiration!