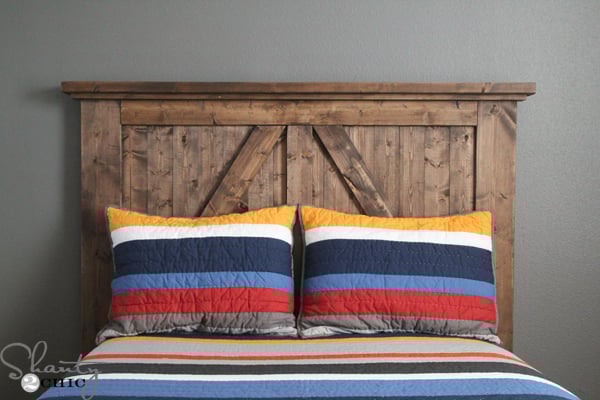
Learn how to build this DIY Headboard for $60 with free plans and a few basic tools! This DIY Barn Door Headboard will add character to any bedroom. I’m back to share this super cute full-sized headboard that I built for my kid’s room.
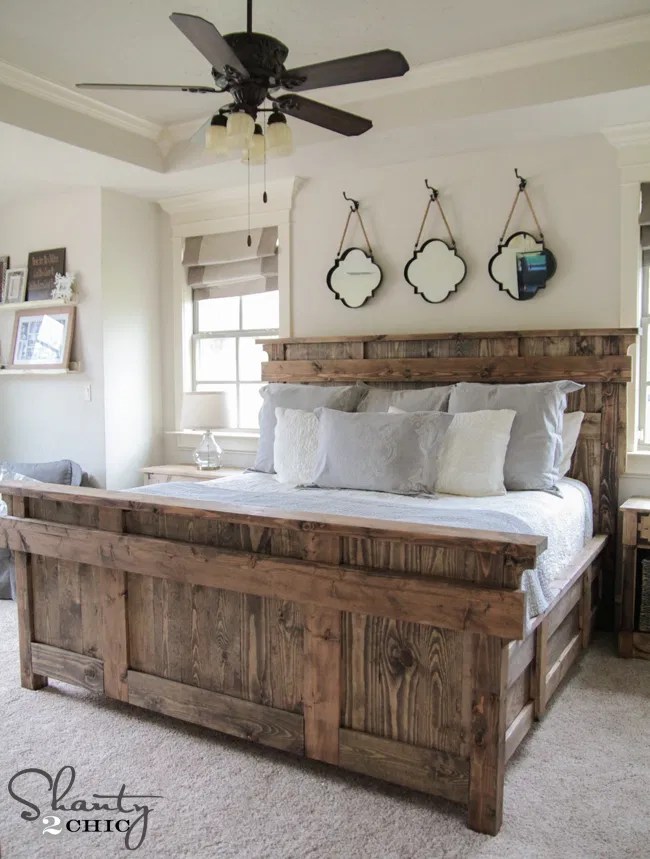
If you missed the tutorial for the platform bed frame on wheels, you can check it out HERE! You can find the bedding HERE at Pottery Barn!
Headboards can be a bit statement piece in a bedroom. This wood headboard is a very easy DIY and quick build so it’s great for beginners as well! Total cost in lumber is about $60!!! Here’s the instructions for how I built mine!
Table of Contents
How to Build a DIY Headboard
Supplies
- 2 – 2x6x8
- 7 – 1x4x8
- 3 – 2x4x8
- 1 – 1x3x8
- 1 1/4″ Pocket Hole Screws
- 2 1/2″ Pocket Hole Screws
- 1 1/4″ Brad Nails
- Wood Glue
- Tape Measure
Tools
- Miter Saw
- Kreg Jig
- Drill
- Brad Nailer
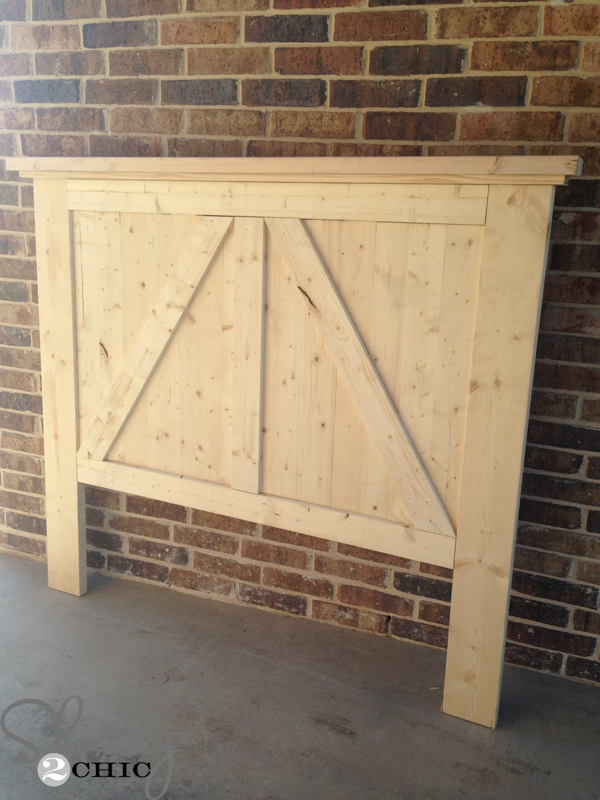
Step 1: Build the Frame of the DIY Headboard

This is one of my first projects to do in my new workshop, eeeek!!! It’s still a work in progress but it’s nice to have space for my saw and shop vac 🙂
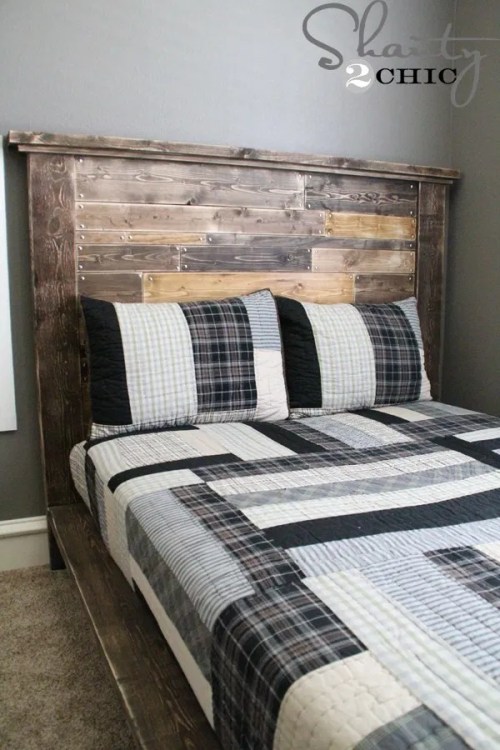
Step 2: Adding the Headboard Planks
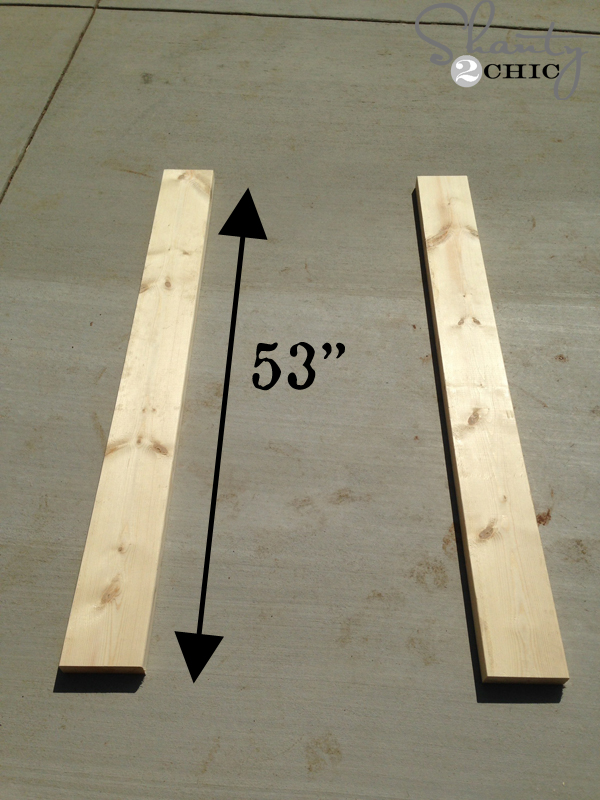
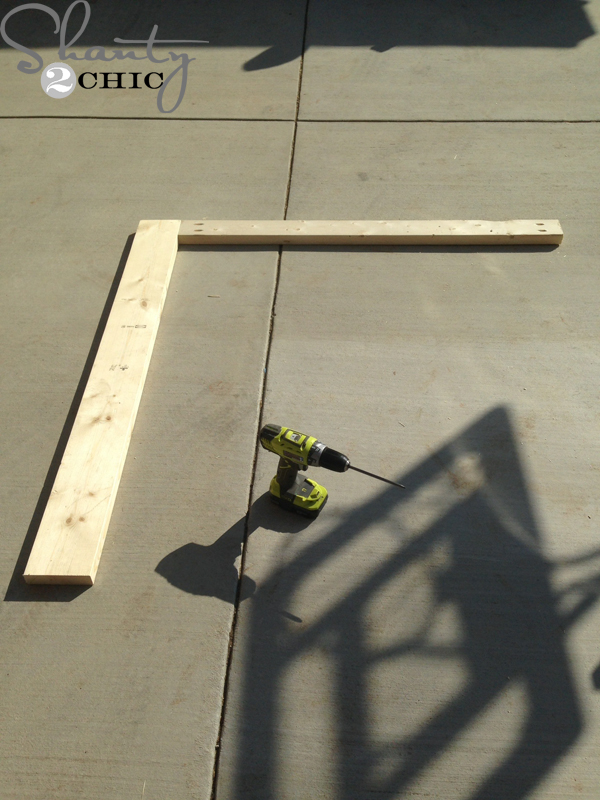
started by cutting 2 2×6 boards @53″. These will be the end posts of the headboard. I purchased all of my lumber hardware store.
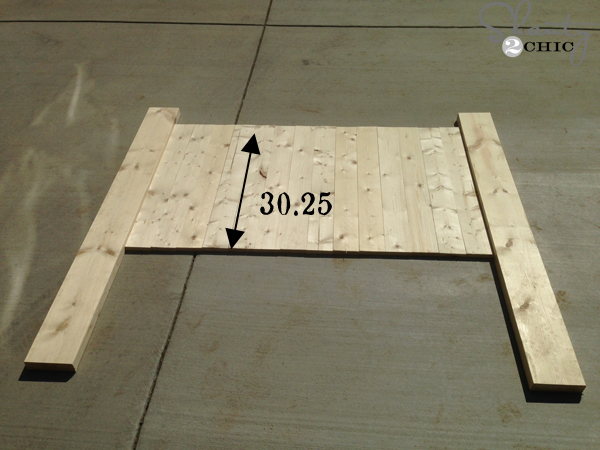
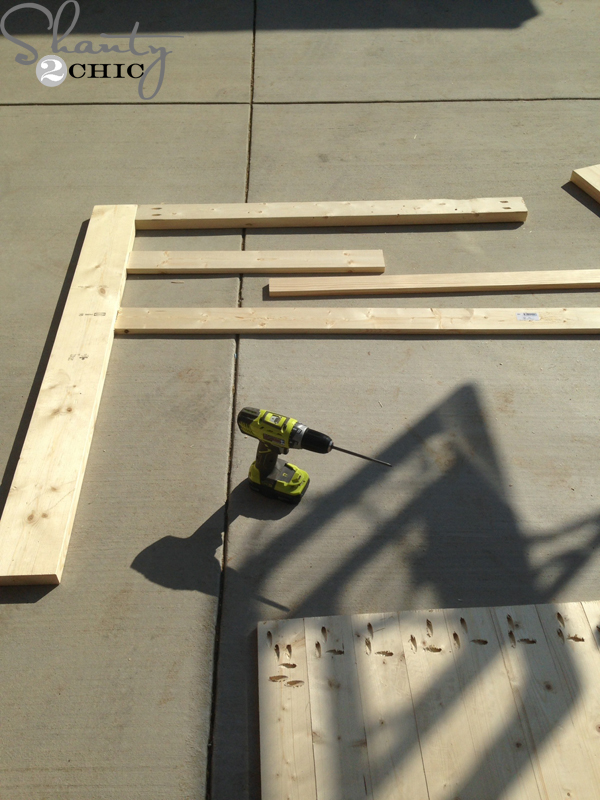
Then, I cut 14 1×4’s at 30 1/4″.
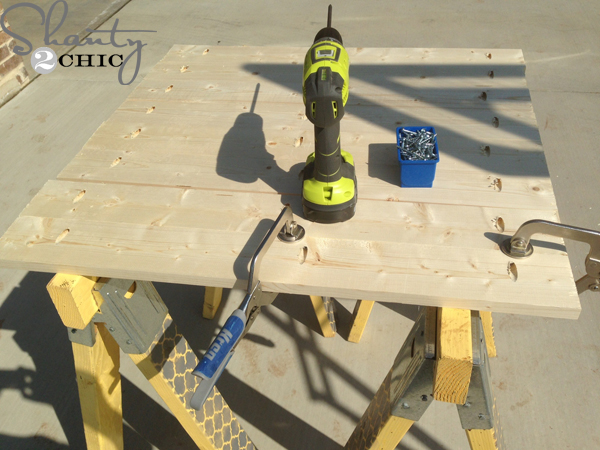
Next, I drilled 3/4″ Kreg Jig pocket holes down the length of each board and one at each end of the boards, facing out (so they can drill into the 2×6 and 2×4 frame). I clamped the joints together and attached them with 1 1/4″ pocket hole screws.
Next, I cut 2 2×4’s at 49 1/2″ (cut this measurement to fit the length of your planked 1×4’s). These will the be the top and bottom trim around the planks. I started by attaching the top piece to one 2×6 board using my Kreg Jig and 1 1 1/4″ pocket holes with 2 1/2″ pocket hole screws and wood glue. Make this piece flush with the top of the 2×6.
To make the planks easy to attach to the frame, I laid scrap 1×4 boards down and placed the planks on top of them. This will help keep the planks flush with the back of the frame.
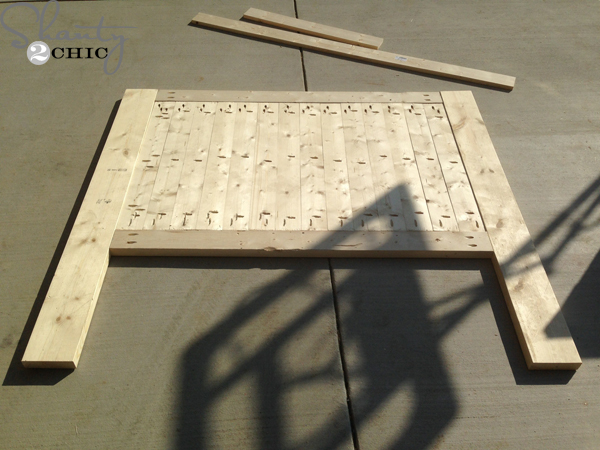
Once you attach the planks to the side and top pieces of the frame, add the bottom 2×4 and side 2×6. You can see my pocket holes above. Notice the holes around the perimeter of the planks. I should have thought ahead and drilled those holes into the planks before assembling the piece but live and learn. It’s easier to drill into 1 board than a huge planked piece 😉
Step 3: Attaching the Trim to the Wood Headboard

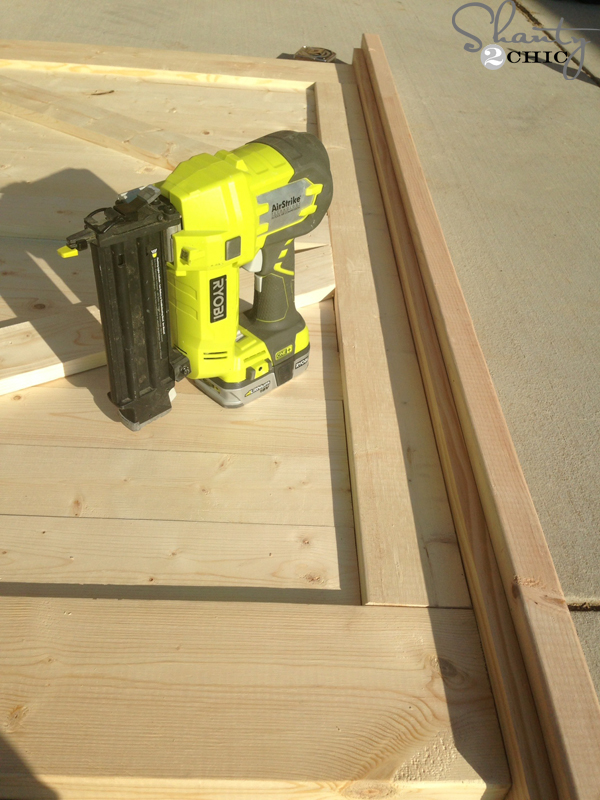
Now for the barn door trim 🙂 I cut 1 1×4 piece at 30 1/4″ and 2 pieces at 35 1/4″ long point to short point, not parallel and both ends cut at a 31.6 degree angle. (This is the hard stop measurement set on the miter saws for a 90 degree crown molding. To attach them, I used wood glue and Ryobi nail gun with 1 1/4″ finish nails. I placed the straight board down the center of the headboard and the other two pieces will fit corner to corner.

For the final pieces on the headboard, I cut 1 1×3″ 62 1/4″ and 1 2×4@ 64 1/4″.
I used wood glue and my Ryobi Airstrike nailer to attach the 1×3 board to the top of the headboard, leaving a 1″ overhang on both ends and flush with the back of the frame. I then added the 2×4 with 2 1/2″ wood screws and wood glue.
Step 4: Finishing the DIY Barn Door Headboard
I chose to stain my wood headboard but you an finish it anyway you want! Spray paint, gel stain and latex paint are all great finish idea!
Wahoo!!!! Time to stain 🙂
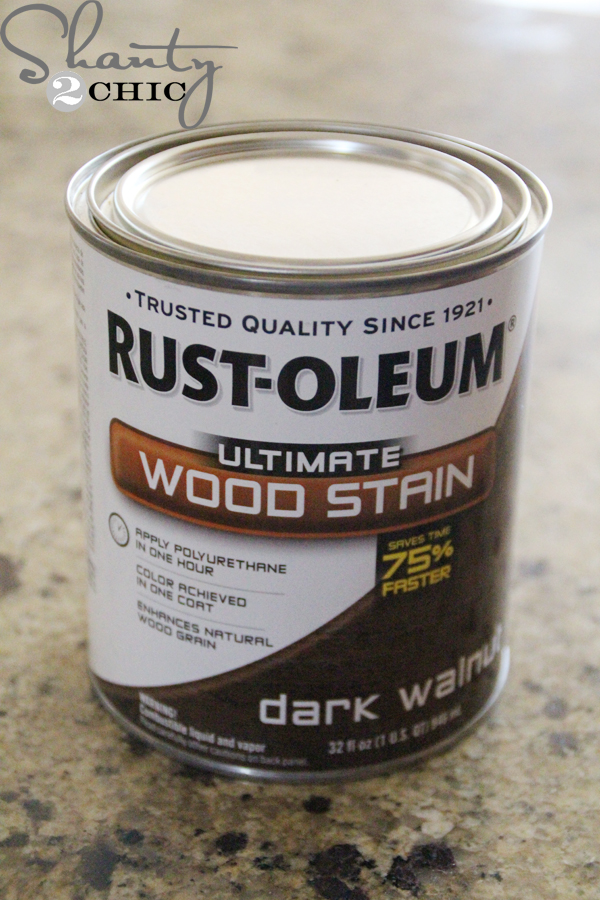
For the finish, I used Rust-Oleum Dark Walnut stain!
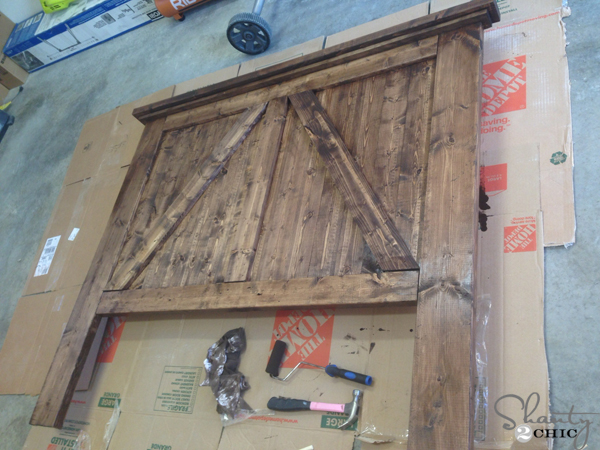
Just apply one coat, let it dry for about 5 minutes and wipe it with a clean cloth to even the stain throughout. I love how this stain gives the headboard an old door, weathered look.
And, here is the end result!
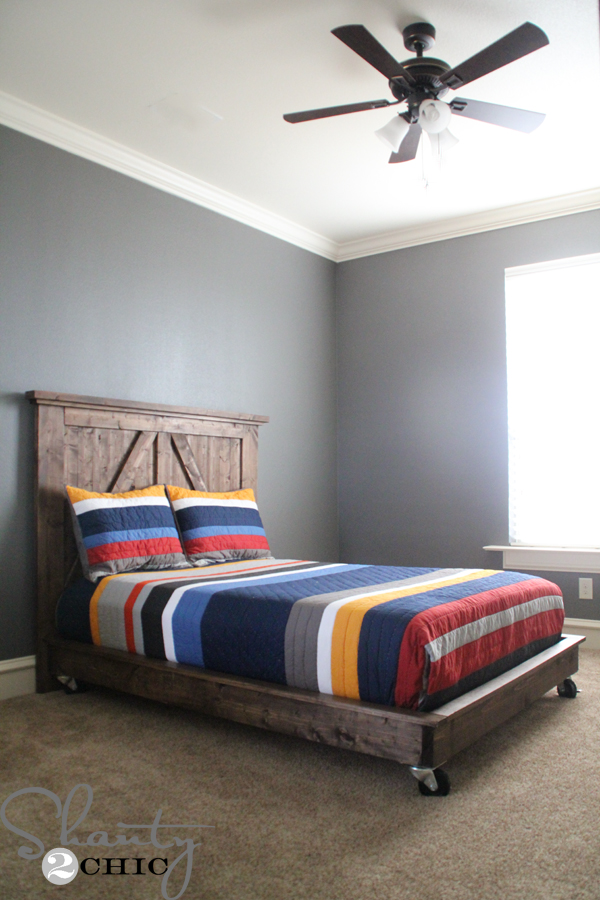
To attach it to the platform frame, I used 3 1/s” wood screws and drove them from the back of the headboard into the frame. Super EASY!!!
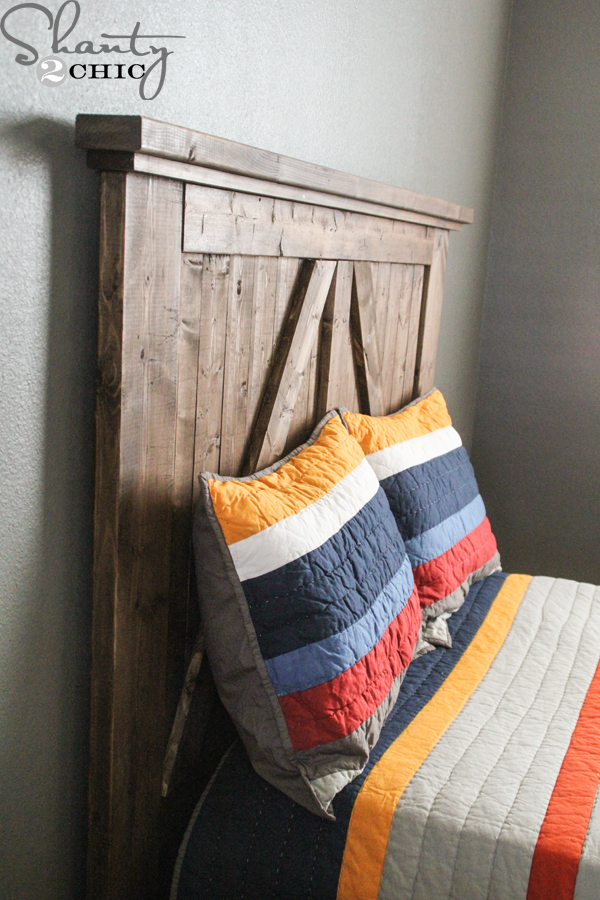
I am soooo thrilled with the way my son’s new headboard turned out 🙂 I can’t wait to get started on the rest of his bedroom furniture and decor but, I need to get busy on the other kids beds first 😉 You can find the quilt and pillow shams HERE at Pottery Barn!
What do you think? Love it? This style makes the perfect headboard for any room, it’s such a focal point! We always appreciate your social shares and Pinterest Pins when you love our pieces!
Modification Measurments
These plans are for a full headboard. To modify the dimensions to fit your mattress size, you will only need to change the measurements to fit the width of your bed. Here are the different mattress sizes. Just adjust the horizontal boards and add more planks.
- Twin Size Mattress – Subtract 15″ from the width.
- Queen Size Mattress – Add 7″ to the width and 5″ to the length
- King Size Mattress – Add 23″ to the width and 5″ to the length.
- California King Size Mattress. – Add 19″ to the width and 9″ to the length.
Thanks so much for stopping by!
~Ashley
Check Out Our Other DIY Headboard Ideas and Tutorials


Hi,
Do you have these plans for a King or Queen size bed??
Do you have the plans and material list for a queen size headboard?
Did you ever put a polyurethane coat over the stain?
Yes you can,
Does anyone know what kind of wood (pine, cedar, etc) was used for this? Recommendations? I want to do this, but keep hearing about lumbers warping in shape.
I am definitely not an expert, but looks to me like it’s probably pine. I don’t know much about warping, but maybe try the better lumber at the store (ex: Lowes has regular and Top Choice and the TC is supposed to be better cuts with fewer knots, bends, etc).
Could you send me the plans for the frame please! I think I might try this for my son’e double bed. Also do you have plans for a dresser and night table?
Please email the plans for building the hole bed (porkyroper@yahoo.com
Love this bed! What color are the walls? I love how this all goes together nicely!
I love the way this turned out SO much! As always, thank you for the plans!
Hi Amy,
your bed looks amazing!! i want to build this bed for my teenager son. what kind of wood did you use? and once you set your mattress on top: is it above the bed frame or is the mattress gets a little inside the platform frame?
Thanks in advance,
Gaby
Hey Gaby! I actually just used whitewood (pine) from HD. Stained with Minwax’s dark walnut. As for the frame, since I already had my boxspring, I just built it around it, and my mattress sits on top 🙂 So it has that “floating” look to it- but I didn’t have the need to build slats. Thank you for the compliment!! Let me know if you have any other questions!
thank you for your answer!! does the frame covers the whole boxspring or half? I will not use a boxspring but I do want the mattress to be at leas 1/3 inside the frame
Hi, is it possible to get a plan for a twin sized bed? Thank you so much!
I am really curious where you got your wood for $60?? we priced everything according to the sizes and cuts and it was over $100 at both Lowes and Home depot =(
Do you have measurements for a king size headboard and platform? If so, could you please email them to me at coozkey83@yahoo.com
How did you make the platoform piece, with the wheels?? Love this whole look and would love it for my son!
Thanks Nicole. There is a link to the platform plans.
Thanks!
Hello! Wondering if you have a supplies list and cut list for the head board finding it hard as a beginner to know what length & width of wood planks to buy
Thanks
I would like to build the frame also any plans
Can you give me the supply list and cut list for the twin headboard, please?
Is there a plan for king size?
Yes, I need plans for a King size also…did you find any?
Love it and adore it. We think you guys are awesome and are so glad we found your site; 2 years ago. Cant wait to transform the kids rooms. HIS Best ! T & N
Where did you get the stain?
How did you attach the headboard to the frame? I want to do something that’s not permanent. Something that’ll be more assemble/disassemble friendly. I think I’m going to do this in a king.
I just used 3 1/2″ wood screws from the back of the headboard into the platform bed 🙂