Step-by-step woodworking plans to build a Restoration Hardware inspired dining table. Affordable, stylish, and beginner-friendly DIY project!
Oh HEY guys! For those of you that follow us on Instagram, you have seen the progress of this baby I am sharing today. I am in LOVE… With a table. Not ashamed.
I loved my old dining set, but have always wanted to build one myself for my fam. With 5 kiddos under the age of 11, we live a casual lifestyle, and I avoid cushions if at all possible. Casual doesn’t have to be simple and boring though! So, I enlisted the help of my sweet, furniture planning guru, Miss Ana White to help me come up with this BEAUTIFUL and beefy DIY farmhouse dining table…
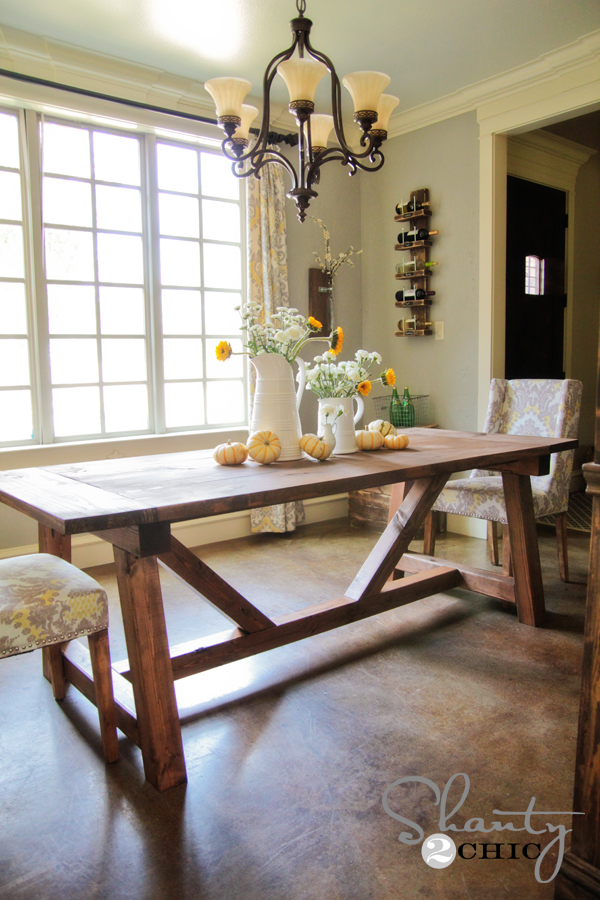
Isn’t is the bomb?? Too legit to quit! Restoration Hardware wants $3000 for it… I made it for $100 in wood.
I am going to share lots of tips and tricks on building this right here, and you can see the full set of free plans for the table on Ana’s site!
Let’s get started!
I knew I wanted this table to be big and beefy, so I was immediately drawn to using 4×4’s for the base. These are beautiful and cheap at the same time. There are some things you need to remember though. Because of their thickness, some saws won’t be able to cut them. A 12″ miter saw should do the trick perfectly.
I was so excited to finally get to bust open my Kreg HD Jig![]() !
!
I’ve actually had it staring at me in a box for months because I was too intimidated to open it up. I avoid learning new things, and then once I see how easy they are, I want to hit myself for not doing them sooner.
So, basically the Kreg HD Jig![]() is a larger version of the Kreg Jig. It’s perfect for working with big projects like this one, since you won’t be able to fit these 4×4’s into the Kreg Jig. Here is what it looks like and how I clamped it on to my boards.
is a larger version of the Kreg Jig. It’s perfect for working with big projects like this one, since you won’t be able to fit these 4×4’s into the Kreg Jig. Here is what it looks like and how I clamped it on to my boards.
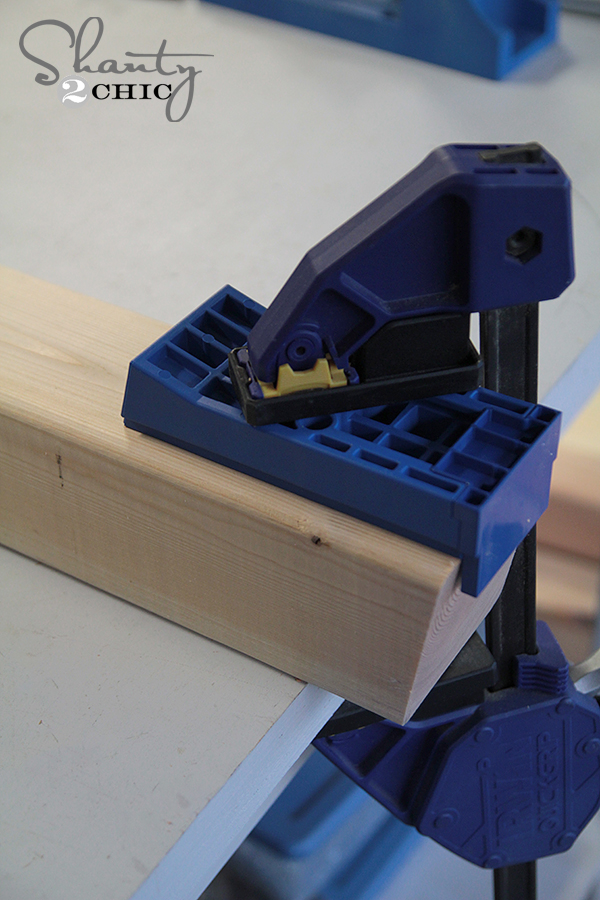
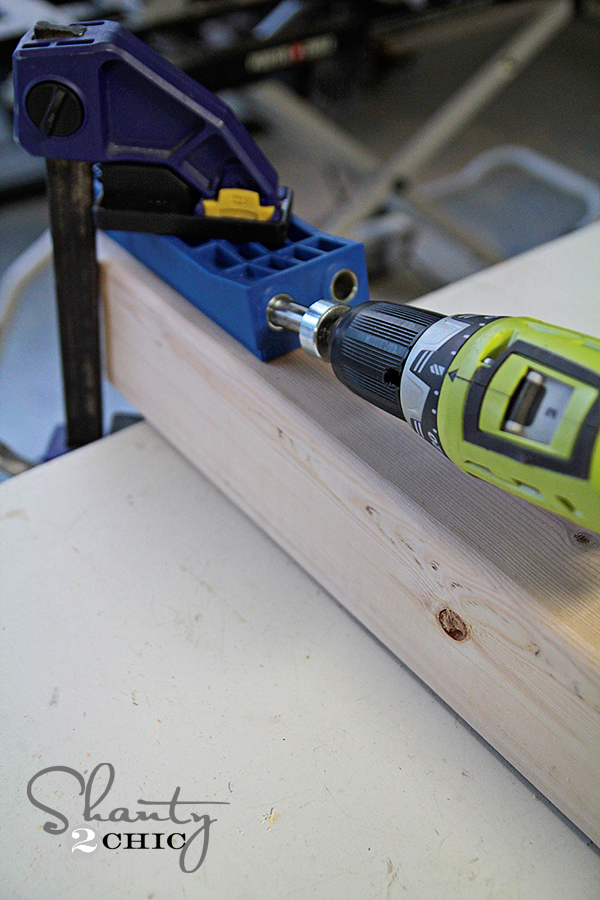
I used my Ryobi 18V drill to make the pocket holes. These pocket holes are bigger and thicker than the ones made with the regular Kreg Jig.
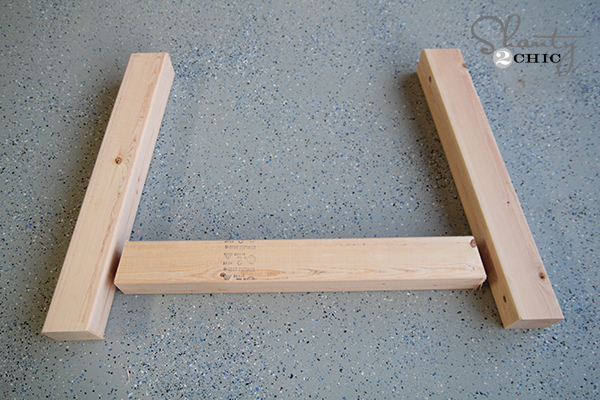
I took lots of photos of where I put my pocket holes on the base because sometimes figuring out the best places to put them is the biggest battle. You have lots of options, but here is where I decided to put mine…
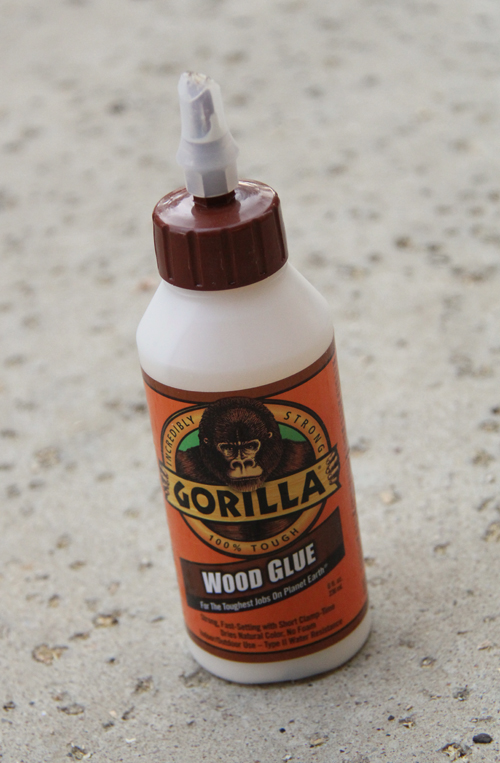
I also used Gorilla Wood Glue between all of my joints!
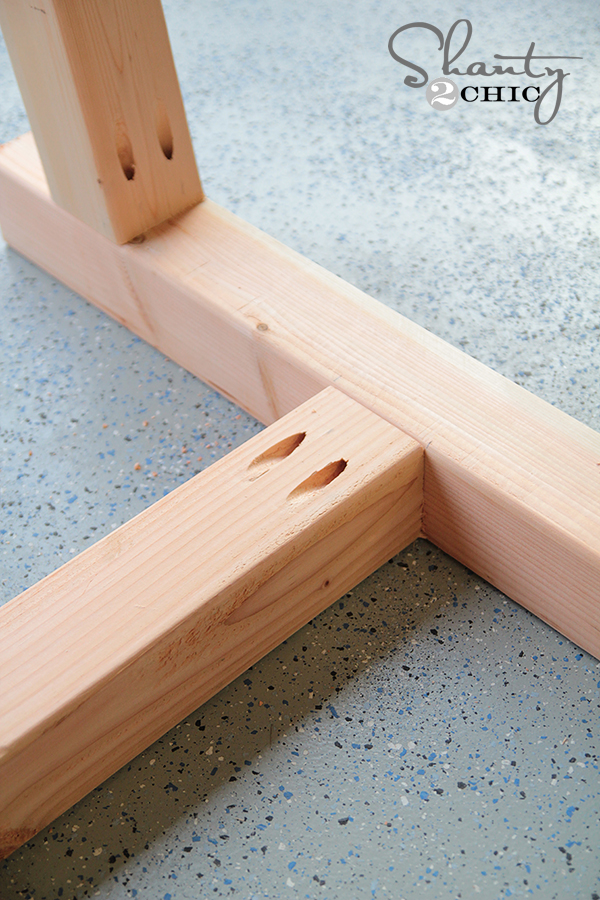
This is a shot of the top of the base turned upside down on the ground. I put the pocket holes where they would stay very hidden.
 And this is the bottom of the base…

That is a shot of the 2×4 runners that will go just beneath the table top.
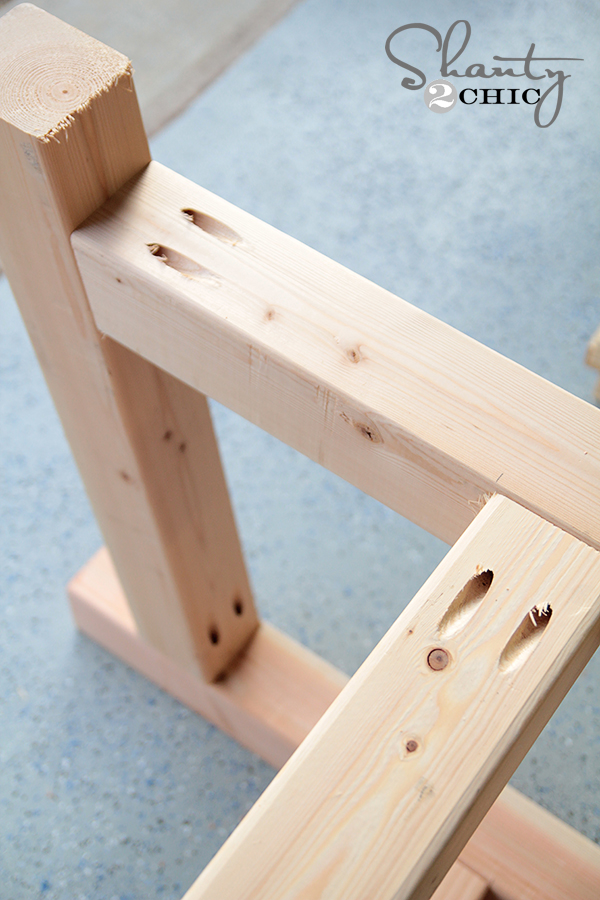
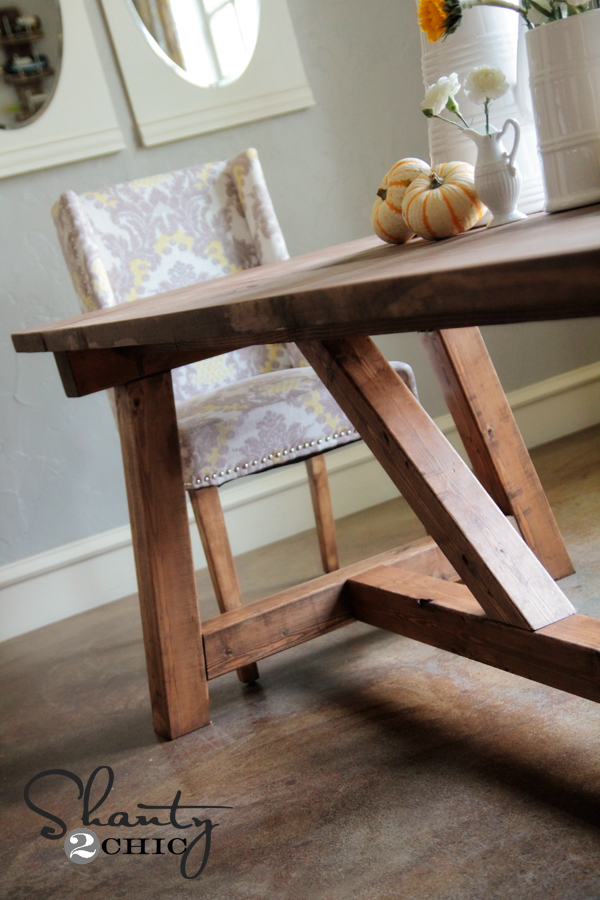
Now for the diagonal pieces… Sometimes these can be a booger to clamp. In fact, I spent a good 10 minutes trying to hold one in place and then I finally had a light bulb moment and pulled out my Gorilla Tape. That stuff worked like a charm! I know it’s not the most beautiful clamping job, but hey… It held those pieces perfectly and cost a whole lot less than all of my clamps. We will call this part Shanty Clamping 😉

On this part, I just used 3″ wood screws through the diagonal pieces and into the straight pieces. You can see where my screws are in these pics…
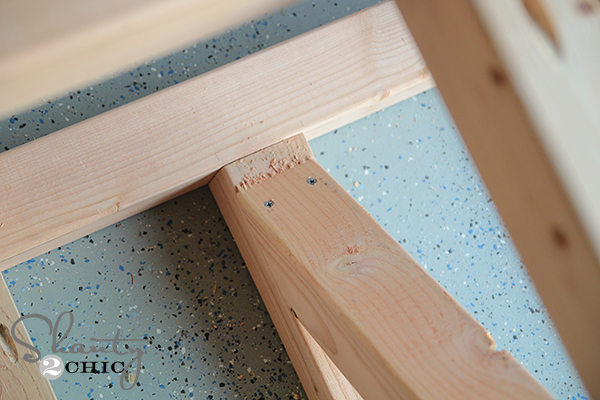
I used 4″ screws on this part and went through the bottom runner and into the diagonal part.
Don’t clamp. Use the tape. Trust me.

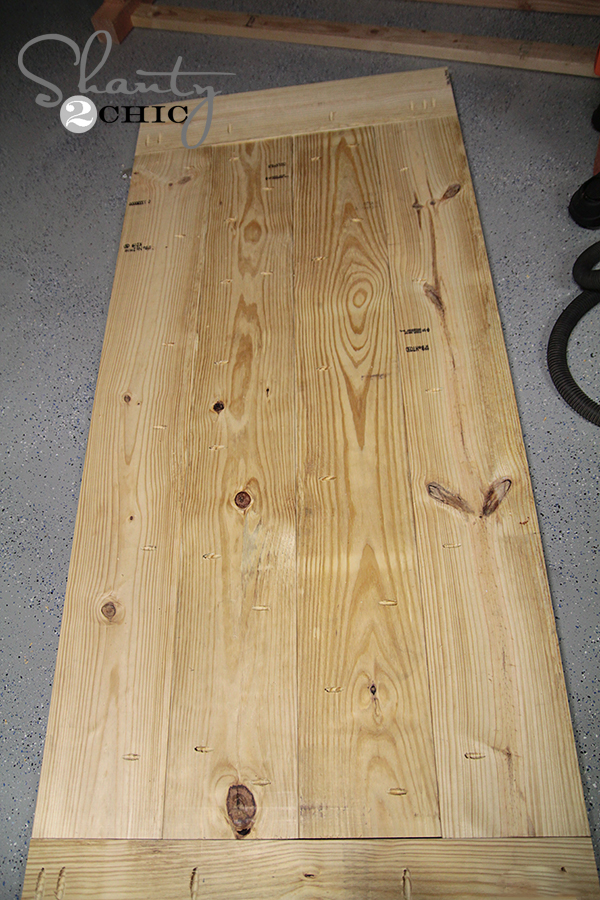
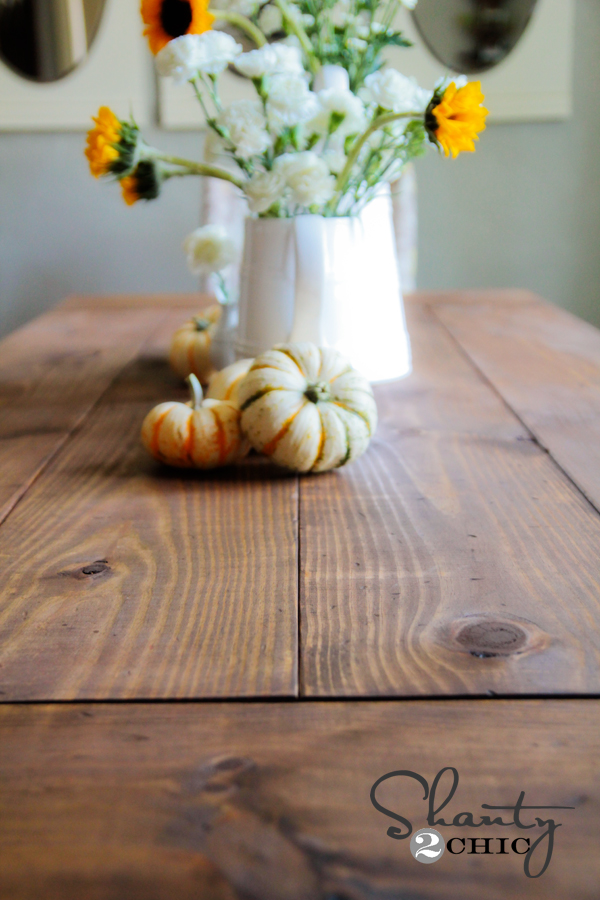
And finally the table top. Oh the darn table top. This is actually a breeze to put together with a Kreg Jig IF you can find nice boards. I seriously made 4 trips to different hardware stores to find boards straight enough to work with. I actually ended up settling on 10 footers just to get good boards that would work. Oh well!
You can see how I put pocket holes up and down the boards to connect them. I clearly didn’t measure at all on this part… Just used the old eyeball method!
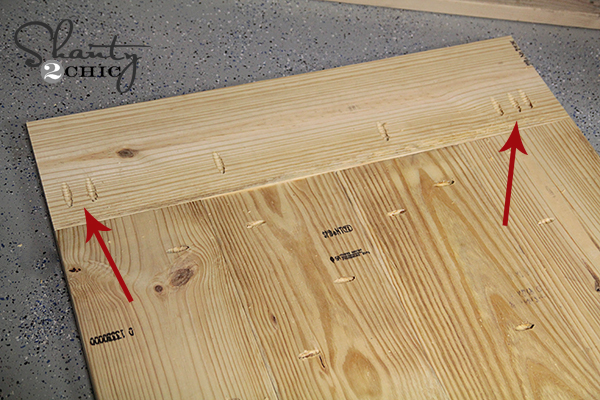
Because my wood was acting up a bit, you can see where I used multiple pocket holes on the breadboard… I won. It’s not going anywhere now.
I attached the base of the table to the top by using 2 1/2″ wood screws through the 2×4 runners. I also used a few 4″ screws through the 4×4 base just for added strength.
And now for the finish! Woohoo!
I decided to match the finish of the table to the Restoration Hardware sideboard and hutch I made for my dining room HERE.
I used Rustoleum Ultimate Wood Stain in Dark Walnut! You can find it at Lowe’s, but do know that the packaging has changed a bit.
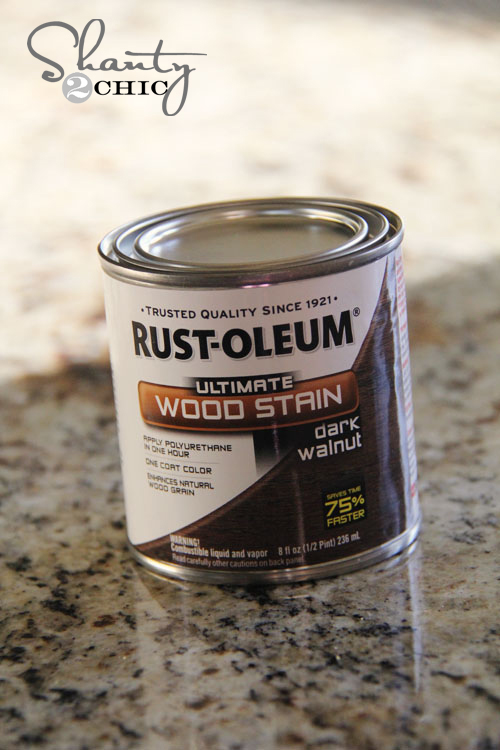
This stuff is so great! It only requires 1 coat and it dries in under an hour. I have used many stains, and this brand is BY FAR my very favorite!
Once it dried, I put 2 coats of Rustoleum Ultimate Polyurethane in Satin on it to protect the finish. This goes on white and dries clear. It doesn’t stink and it dries fast!

That’s it for the finish!
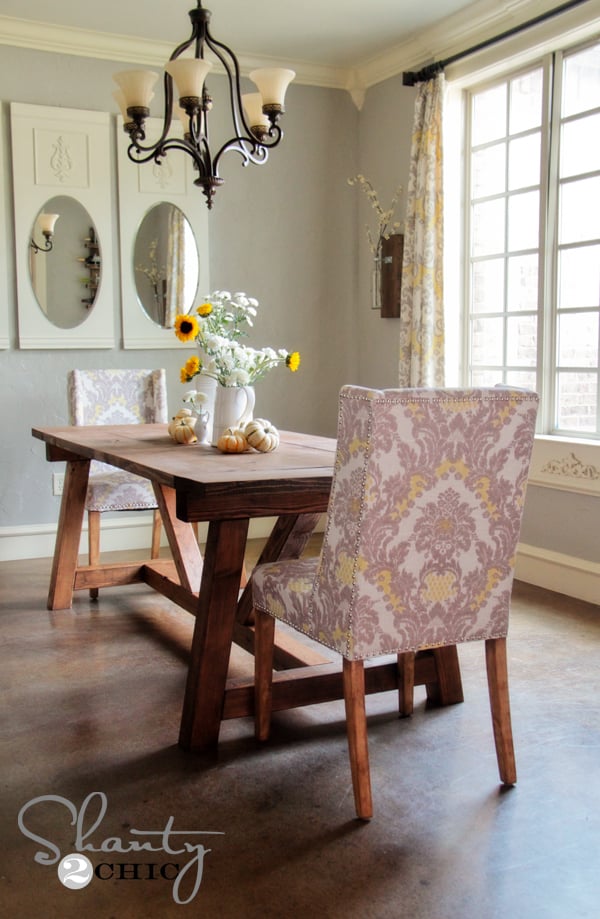
I am in the middle of making the cutest benches to match this table. I LOVE a dining table with benches for my family. The kids can’t ruin them, and they are rustic and beautiful at the same time. I knew I wanted to dress the table up a bit with some end chairs, so I went to my very favorite store to find those!
![]()
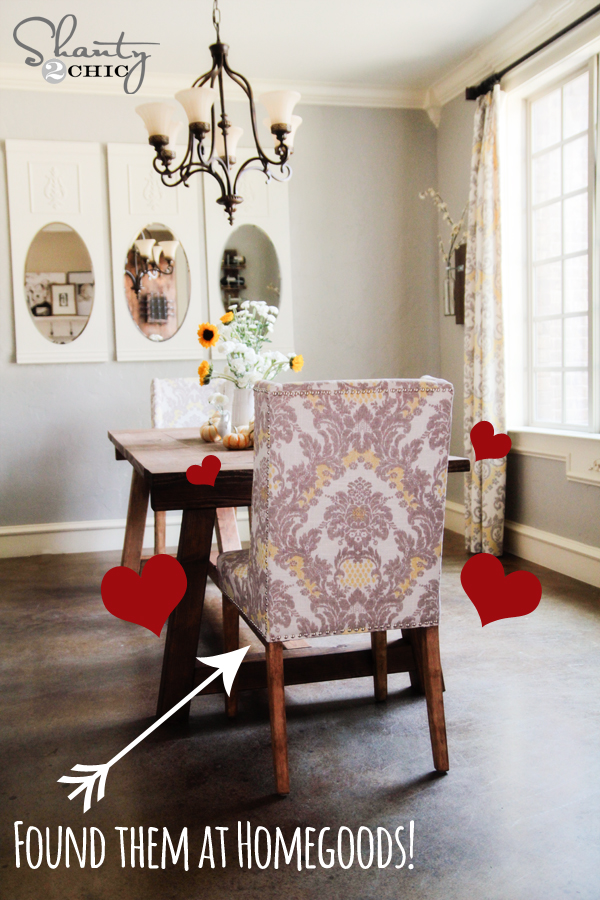
I love them! Ironically, they match my window panels I made perfectly. It was a match made in dining room heaven… Or Homegoods! Aren’t they perfect??
And here are a few more shots!
I hope you love it as much as I do!!
I would LOVE for you to share this and PIN it with your peeps below!
Thank you so much for stopping by, and let me know if you have any questions at all. Thanks again 🙂
~Whitney

For those of you thinking of copying this table, DON’T DO IT. As an
experienced woodworker I can say 100% that whomever build this has no
idea what they are doing. Literally everything done here is wrong.
This table may look good now, but it will most definitely not last. You
can copy the looks, but not the construction methods used here.
– Pocket screws and butt joints are not appropriate joinery for a table
of this size. They are way too weak. Glue on endgrain is absolutely
useless and adds no structural value. The table will fall apart
eventually. Mortise and tenon joinery is what should have been used
instead. It’s not difficult but it will take a lot more time than
pocket screws.
– Wood moves with seasonal changes in humidity, on a
flat sawn board that’s mostly across the width. You have to allow for
it otherwise you will have issues. With the breadboard ends you have a
cross-grain situation, the top will move, the bread boards will not. By
screwing the beardboards on like what was done you’d constricted the
wood from moving which will result in cracking/warping etc. Breadboards
exist to prevent the top from warping. The proper way to add them is
tongue and groove, with glue in a few inches in the middle and elongated
screw holes/screws the rest of the way.
– Pine is one of the the
worst woods out there for finishing. It you just build this and slap
some stain on it it will look terrible as it absorbs stain unevenly and
blotches. You can’t sand that out, it’s in the wood. Two coats of poly
is not enough. There are several better options for coloring and
finishing pine, do your homework first.
Thanks for your expertise Matt! We have been building furniture for years now and can tell you that they do hold up very well. But, you are also entitled to your opinion and you are free to build as you choose 🙂 We will continue to build the way we do, save money, time and have pretty furniture to show for it 🙂 Have a great day!
Not to dredge up old comments, but Matt is right here. I have a table that my grandfather made using some of these techniques, and where they were used the table is falling apart. Of course, the table is also about 40 years old! Realistically, you’ll probably see this falling apart in 10-20 years, but for $100 that’s still pretty good!
Thanks for sharing your project details. Now that it’s been a year, how is your table faring? Did Matt ‘s prediction already come true or is your table still doing well? I’m considering my options.
Mine cracked after 3 months.
Sweet. Can you teach us how to do it better? This blog IS us doing our homework. What should we do differently while not breaking the budget?
I built this table in June/July 2014. As stated by Matt, my wood has moved (I used Douglass Fir). The breadboards, which were even with the width of the table, now protrude out on both sides. Its as if the length of the breadboard increased while the table width remained the same. How can I fix this? I’m afraid if I cut it off, the wood will shrink back and then have a smaller width than the table on the breadboards.
I have the same issue, as well as one of the long boards splitting along the whole length. Would love to do this a better way because we love the look of the breadboard ends.
bummer, yeah, she really needs to let people know about this problem in the plans. The more humidity in your area, the bigger the problem will be. You can reduce the expansion and contraction of the wood by finishing both sides of the top VERY well, but it won’t solve the problem. The best way to do it is to use a tongue and groove joint for the breadboards.
Joe, the breadboards didn’t get longer, the main table top is contracting. Wood always expands and contracts across the grain (so, width wise). Right now, it has contracted (because it is winter). The main table top will start to expand as soon as the weather warms up and the humidity rises. At that point, it may expand so much, it will rip apart because it is not allowed to move past the point where it is “locked” into the breadboard.
Did you finish both sides with several coats of polyurethane? Finishing both sides will help reduce movement by as much as possible, because it will reduce the amount of moisture the wood is taking in and releasing… but it won’t solve the problem permanently. To do that, you will need to unscrew the breadboards, remove them, cut a tongue and groove and reinstall them correctly.
You know the time has come to remove the breadboards when you see the main table top is even slightly wider than the breadboards. I mean, even 1/16″ of an inch beyond them is a big red flag that they are pulling HARD and they will keep going until something gives (either a board cracks or a joint opens up).
Jen, thank you so much for the reply. I will make the tongue and groove joint between the breadboard and main table. How long do you recommend the tongue be? 1 inch?
Also, do I need to fix the joints between the four planks making up the table top as well? Or can I leave them joined with pocket screws? I’m assuming I can leave them since as you said, the wood contracts and expands across the grain.
Hm, I left you a long reply yesterday but it isn’t showing up yet, hopefully soon!
I want to use this frame for a concrete table top I am making and I was nervous about the screw and glue construction. I love the look. Any suggestions on a jig to cut the mortise and tenon joints for a first time table maker?
Do you own a router, Frank? I used a router to cut many mortise and tenon joints before finally purchasing a mortising machine. Happy to walk you through the process if you like.
Hi Jen,
I’m building this table and want to make sure I’m doing all of the joinery the right way. I have a router and want to cut mortise and tenon joints – could you go through the process? I’ve done a good bit of research, but some advice as it pertains to this specific project would be incredibly helpful. Thanks!
I also agree with Matt…I was just looking at this (absolutely GORGEOUS) table and as I glanced through the photos, I was cringing at most (ok, all) of the construction methods. However (and, this is a BIG however), this blog isn’t written for those with fine woodworking skills. If the author needed to go from store to store to buy straight lumber instead of milling her own using a jointer and planer, then she probably isn’t a contributing member at FWW. So, I would say she is doing just fine for her followers 🙂
A through mortise and tenon for the trestle would be worlds better than two kreg screws, sure! That said, your average DIYer doesn’t know what a through mortise and tenon is, let alone how to cut one (I have been woodworking for many, many years, and mine still need work!).
All that said, there are a few tips that those building this table can follow to at least help them along, without asking them to become professional woodworkers to get there.
To everyone who wants to know if she used treated lumber – DO NOT USE TREATED LUMBER, the author didn’t and neither should you! Treated lumber is for OUTSIDE only, and should only be used for projects your skin and food won’t be touching. It stands up well to the elements, but it is 100% toxic!
A breadboard end that is SCREWED on (someone fix the hole in my heart) will absolutely fail for the reasons other people stated. You would be better off not doing the breadboards so the top can expand and contract. This will lead to many fewer cracks in your table top…or worse…straight up broken joints with screws showing.
If you love the look of breadboards (who doesn’t!?) research methods for joining them in a way that won’t cause the top of the table to crack. You can cut a tongue and groove joint with a router and edge guide…or you can just make the breadboards aesthetic by attaching them with dowels. They won’t do what they are designed to do like that, but neither will these, so it’s a wash and at least you won’t be actively causing problems.
Tape is not a clamp. Not ever. You are not getting enough clamping force with them. Not. Even. Close. Lots of good ideas on the internet for clamping crazy angles though 🙂
Try to avoid using wood with a cathedral grain pattern (her second from the right in the photo that has the “wood acting up” caption). Cathedral grain = the board is going to cup like CRAZY (google “wood grain board stability” and “cathedral grain face grain cupping”). So, that coupled with poor joinery = joint/board failure for sure.
Pine does accept stain poorly…use a pre-stain conditioner first to help eliminate that problem as best as you can.
I’m going to be building two of these tables and benches in the next couple weeks, my question is about the wood. I live in the Pacific Northwest and can access all the wood at pretty inexpensive prices. But the $100-150 price tag has me scratching my head a bit. I can get all the lumber at that price, with the exception of the 4×4 IF they need to be kiln dried. Kiln dried 4×4 are going for over $3.00 a liniar foot.
So..Round about question. Is everyone who builds these using green lumber? My concern about that is that when it dries it could twist and crack.
All the other lumber is readily available kiln dried and inexpensive…Except for the 4×4’s.
Do NOT use green wood!!!! You NEED kiln dried! For the reasons you stated 🙂 It will check, crack, warp, twist and go all kinds of crazy on you!
Quick question – did you use Rustoleum Ultimate polyurethane in SATIN or MATTE? You said you used satin but the picture you show is matte. Just want to make sure I get it right as we are finishing up this weekend! Thanks!!
I just built this and stained the table using the exact same stain.. however, I think I left the stain on far too long and now my table looks horrible. Is there any way to remedy the mistake? Can i completely re-sand the project and start over or will the stain penetrate the wood too far to sand? Thanks!
you can sand and start over! use a pre-stain conditioner before staining pine…you might not have done anything wrong. pine takes stain horribly, can turn out very blotchy!
Awesome job on the table! Can’t wait to build one! one thing I find works for clamping odd angles, is to use a few scrap wood blocks and hot glue them to the pieces I need to clamp, and then put the clamps on the blocks or next to them. Once done the blocks can be knocked off with a hammer and the glue scraped off with a chisel. Also, you can clamp using a rope and the blocks. Wrap the rope around the boards and then twist the rope with a strong dowel, etc.
Hello!
I love this table! I will be attempting to make it soon. It’s so cute! On another note, I LOVE the paint color in this room. Would you mind sharing what it is? 🙂
Would be an awesome desk for my new office. You did an amazing job. Any chance you post a list of materials? That would be awesome. Thanks so much.
We just made the table, but the hub decided to widen and slightly lengthen the plans. We couldn’t find 4x4s down here in SC out of pine, but Berlin G Myers (for anyone in the Charleston area) had other (more expensive) wood. We chose poplar, which is very porous and so I treated it twice with wood conditioner before staining. It looks phenomenal! Thank you so much for posting this – we love our new table!!!
I like the size of your table. Whats the size?
I just saw this Molly!! LOVE!!!
Wow this is beautiful!! Just curious — did you have the wood milled, it looks very precise which usually means custom milled by yourself or a mill, versus buying dimensional lumber from a big box store. Second — I’ve made some furniture using poplar but always have to either just clear coat it (after a shellac-ing), or paint it — I’ve tried 9 ways to Sunday to stain poplar from Lowes and it just doesn’t take the stain. Tried conditioners, gels, etc but it just looks splotchy. I’m wondering what your exact process was here, and wondering how your table is holding up 3 years in.
Simply adorable. I wonder if I made it myself. Choosing a best quality material is essential and you would make it more innovative by adding your own creative ideas. Thanks Shanty 2 chic. Just a lovable post.
this table is beautiful! and i am sying to make it. like, this weekend. lol BUT i need to know what type of wood you used?! treated, untreated?? pine, cedar? we have looked all over for untreated and no one has it! 🙁 is this something we MUST use?? please reply! im making this so we can have a thanksgiving dinner at our new home. 🙂
Hi Christina, never use treated wood for projects that will come into contact with food. In fact, I don’t use treated wood for anything that will remain indoors. Though they stopped using arsenic years ago, there are still harsh chemicals that they pressure treat the wood with that you wouldn’t want to be breathing in on a daily basis. Leave the treated wood for decks and patios.
A table of this size should be made of something semi-hard. You don’t have to go all the way to oak, but pine would certainly be the softest I would use. Ash, cedar, etc. may be a bit too soft to bear the day to day abuse a table like this would get.
depending on where you live, its hard to find untreated pine, and pine will warp for you, cedar is a good choice, it will be darker than the pine table top. douglass fur, it more than cedar, it will stain up the same color as your pine table top, ideal is western cedar, good look, look up jamison rogue engineer, he made a kitchen table out of western cedar. if you live near a place that cells cypress is a pretty look. i live in knoxville tenn, i am boing to go with douglass fur, my 4×4 will cost me 50.00 each, but it will look good. hope this will help you.
Cannot find 4X4 in untreated pine. I finally have my husband’s help making this, and no Home Depot or Lowes has them! :((((( I am in Dallas, TX
The HD in Grand Prairie off of carrier has the untreated 4×4 in both pine and cedar. i was just there this past weekend
Well after calling about 20 different lumberyards in the DFW I finally found 4 x 4 x 8 untreated pine!!! The business is called “Mid South lumber” 2506 W E Roberts Dr
Grand Prairie, TX 75051-1038
My husband and I built a 5 foot version of this table for our beach cottage. Our dining space has wooden vaulted ceilings and exposed beams. This table’s design suits the space well, and is large enough to meet our needs. Thanks for the plans and construction advice. We had no problems converting them to the size we needed and enjoyed using the Kreg HD jig.
Do you have the measurements and plans for your 5 footer?! Thats more the size i’m looking for, i’m a little building (Special) so any help is appreciated!
Excellent job!!! Didn’t see the angle the legs splayed out??? Could you let me know?
???? I built my own using the plans at www. WoodworkPlans.info – highly recommended you check those out too. They are detailed and super easy to read and understand unlike several others I found online. The amount of plans there is mind-boggling… there’s like 16,000 plans or something like that for tons of different projects. Definitely enough to keep me busy with projects for many more years to come haha
Head on over to www. WoodworkPlans.info if you want to learn more – click the pink link above for some more plans! Best of luck on your building adventures! ✌✌✌✌✌✌✌✌✌✌✌
☁☁☁☁☁☁☁☁☁
☁☁??☁??☁☁
☁???????☁
☁???????☁
☁???????☁
☁☁?????☁☁
☁☁☁???☁☁☁
☁☁☁☁?☁☁☁☁
☁☁☁☁☁☁☁☁☁
Don’t buy it, it’s a scam.
I would also love to see you plans for the 5 foot variation if you have them. It is exactly what I want to do.
Hi, when building the table top are you using the Kreg HD to make the pocket holes or do you need the smaller Kreg jig? Also, are using regular 2 1/2 inch wood screws not the HD screws, correct? Thanks!
What did you end up doing? I just bought the HD.
I really like the kreg5….Id defiantly use this for the table top!
Hello my first project my question is are you using the 2 1/2 in screws for 4x4s. Doesn’t seem like there strong enough. Also when you are drilling you jig holes on a angle cut. Do you drill at the angle of the end cut or angle of the board
????????
?????
???
I used the plans at www. WoodworkPlans.info for this project because they are much better – highly recommended you check those out too – it’s just a much better plan. They are detailed and super easy to read and understand unlike several others I found online. The amount of plans there is mind-boggling… there’s like 16,000 plans or something like that for tons of different projects. Definitely enough to keep me busy with projects for many more years to come haha
?
???
?????
????????
Thanks for talking about your new HD Kreg Jig! I have the regular KJ and now I think I need this one too! Beautiful table!!
I love love love this beautiful table! I have to know where you found the white ceramic pitchers, though!! *I don’t have any questions about the table because you already answered all of them. 🙂 This table is going on my list of projects for sure! Thank you!!