Step-by-step woodworking plans to build a Restoration Hardware inspired dining table. Affordable, stylish, and beginner-friendly DIY project!
Oh HEY guys! For those of you that follow us on Instagram, you have seen the progress of this baby I am sharing today. I am in LOVE… With a table. Not ashamed.
I loved my old dining set, but have always wanted to build one myself for my fam. With 5 kiddos under the age of 11, we live a casual lifestyle, and I avoid cushions if at all possible. Casual doesn’t have to be simple and boring though! So, I enlisted the help of my sweet, furniture planning guru, Miss Ana White to help me come up with this BEAUTIFUL and beefy DIY farmhouse dining table…
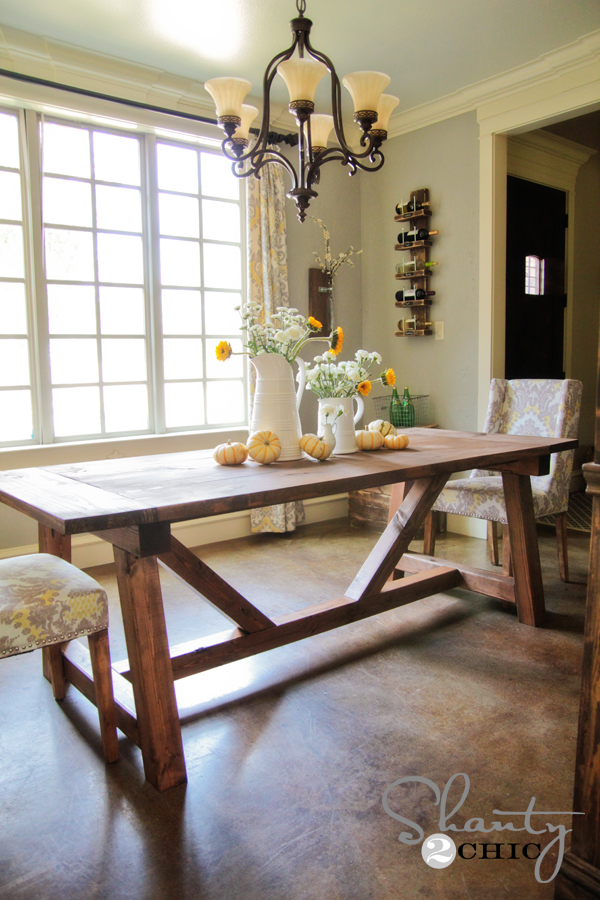
Isn’t is the bomb?? Too legit to quit! Restoration Hardware wants $3000 for it… I made it for $100 in wood.
I am going to share lots of tips and tricks on building this right here, and you can see the full set of free plans for the table on Ana’s site!
Let’s get started!
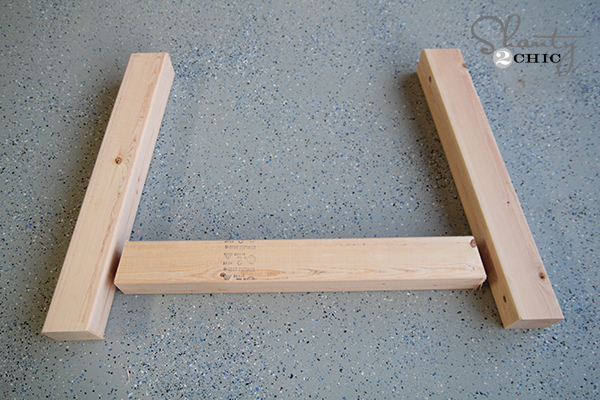
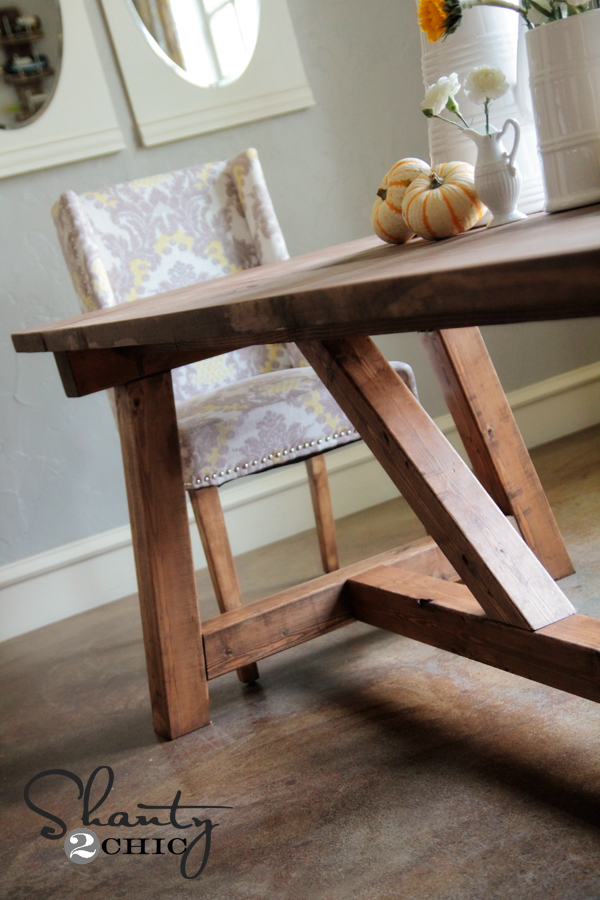
I knew I wanted this table to be big and beefy, so I was immediately drawn to using 4×4’s for the base. These are beautiful and cheap at the same time. There are some things you need to remember though. Because of their thickness, some saws won’t be able to cut them. A 12″ miter saw should do the trick perfectly.
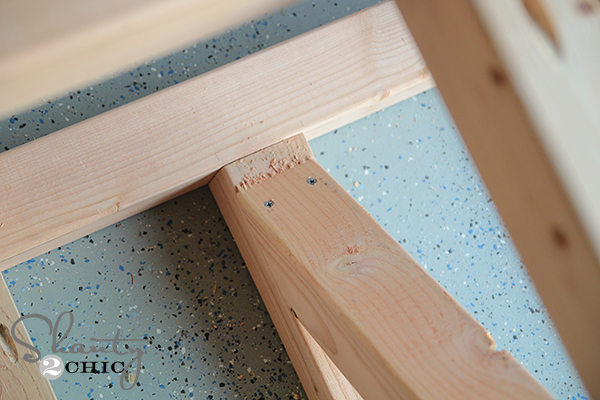
I was so excited to finally get to bust open my Kreg HD Jig![]() !
!
I’ve actually had it staring at me in a box for months because I was too intimidated to open it up. I avoid learning new things, and then once I see how easy they are, I want to hit myself for not doing them sooner.
So, basically the Kreg HD Jig![]() is a larger version of the Kreg Jig. It’s perfect for working with big projects like this one, since you won’t be able to fit these 4×4’s into the Kreg Jig. Here is what it looks like and how I clamped it on to my boards.
is a larger version of the Kreg Jig. It’s perfect for working with big projects like this one, since you won’t be able to fit these 4×4’s into the Kreg Jig. Here is what it looks like and how I clamped it on to my boards.
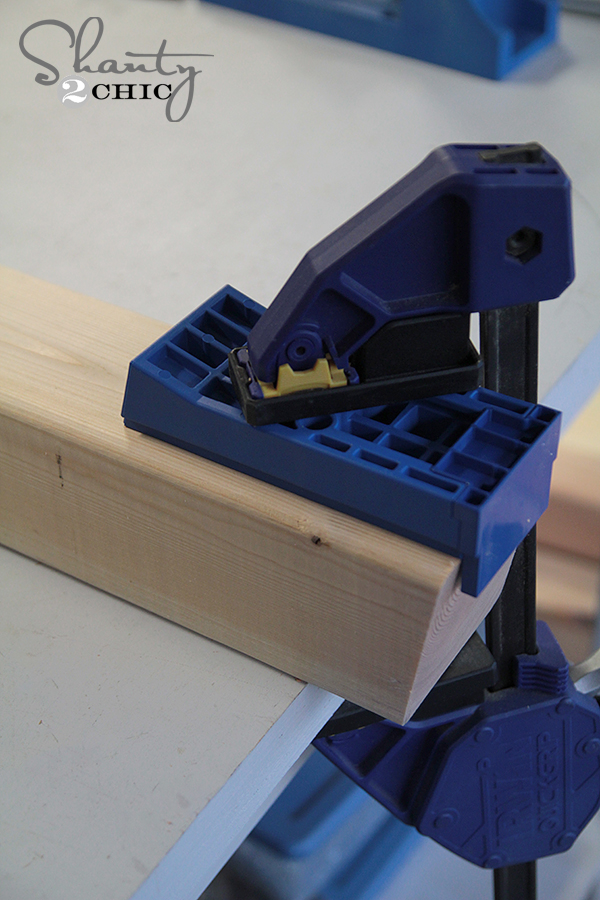
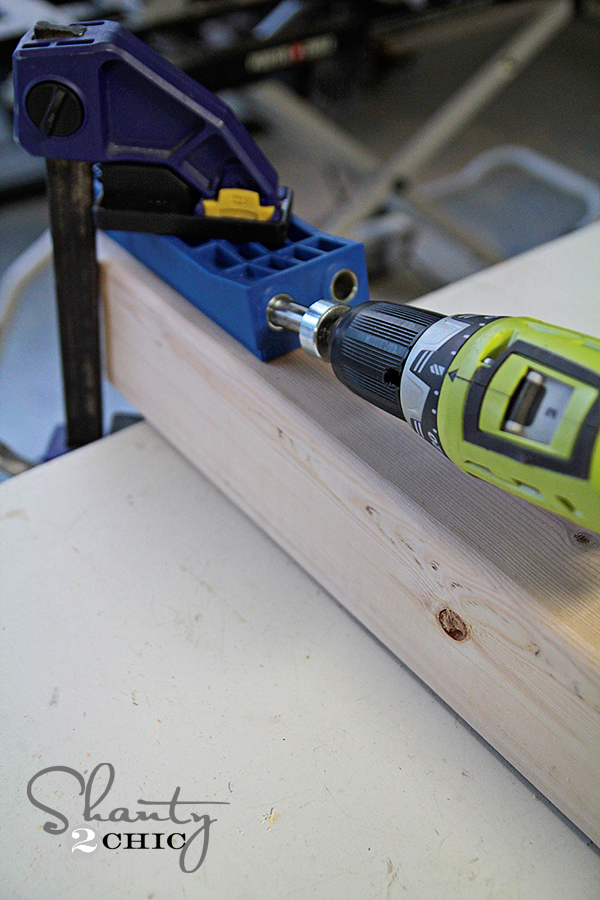
I used my Ryobi 18V drill to make the pocket holes. These pocket holes are bigger and thicker than the ones made with the regular Kreg Jig.
I took lots of photos of where I put my pocket holes on the base because sometimes figuring out the best places to put them is the biggest battle. You have lots of options, but here is where I decided to put mine…
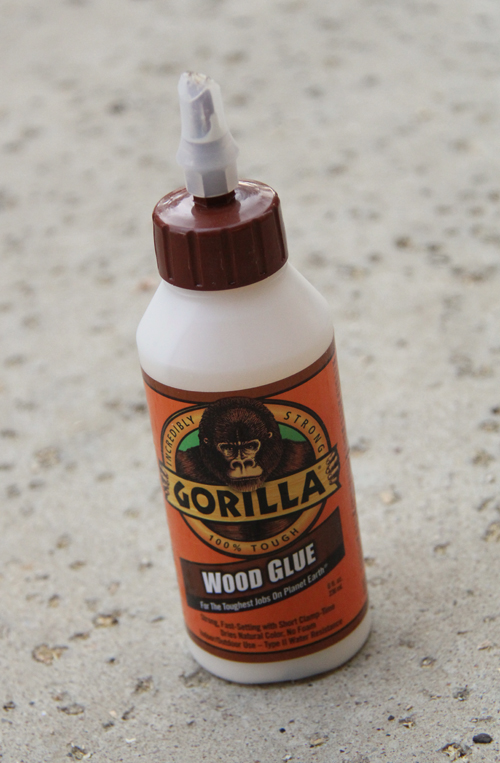
I also used Gorilla Wood Glue between all of my joints!
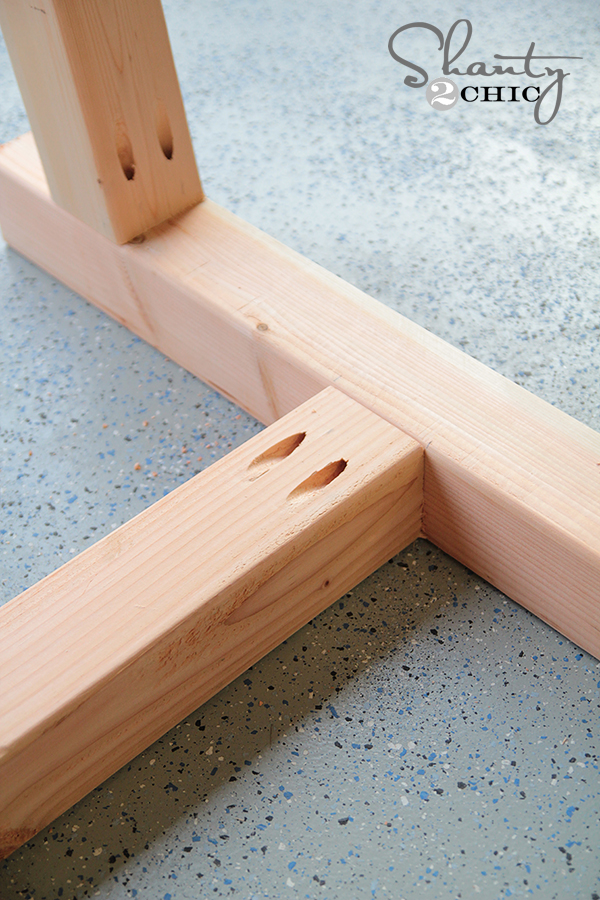
This is a shot of the top of the base turned upside down on the ground. I put the pocket holes where they would stay very hidden.
 And this is the bottom of the base…

That is a shot of the 2×4 runners that will go just beneath the table top.
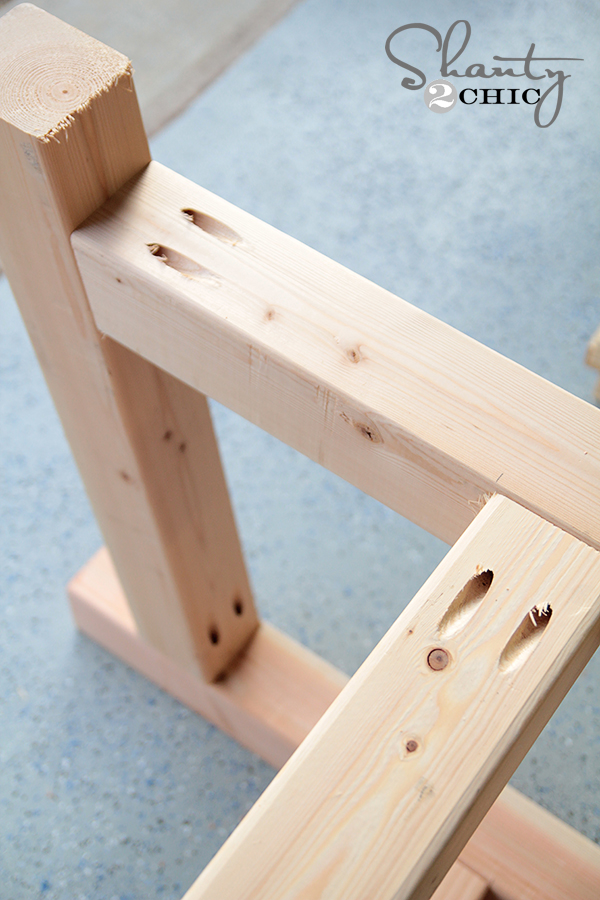
Now for the diagonal pieces… Sometimes these can be a booger to clamp. In fact, I spent a good 10 minutes trying to hold one in place and then I finally had a light bulb moment and pulled out my Gorilla Tape. That stuff worked like a charm! I know it’s not the most beautiful clamping job, but hey… It held those pieces perfectly and cost a whole lot less than all of my clamps. We will call this part Shanty Clamping 😉

On this part, I just used 3″ wood screws through the diagonal pieces and into the straight pieces. You can see where my screws are in these pics…
I used 4″ screws on this part and went through the bottom runner and into the diagonal part.
Don’t clamp. Use the tape. Trust me.

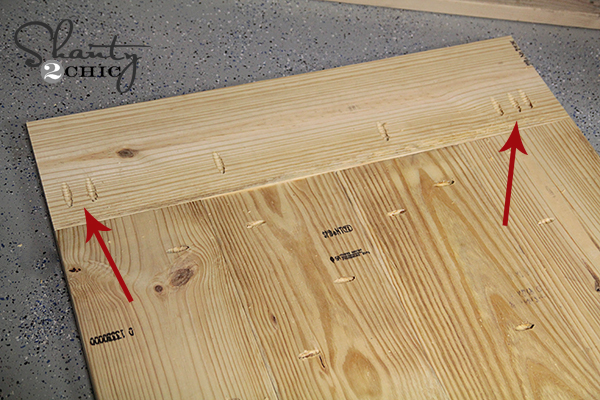
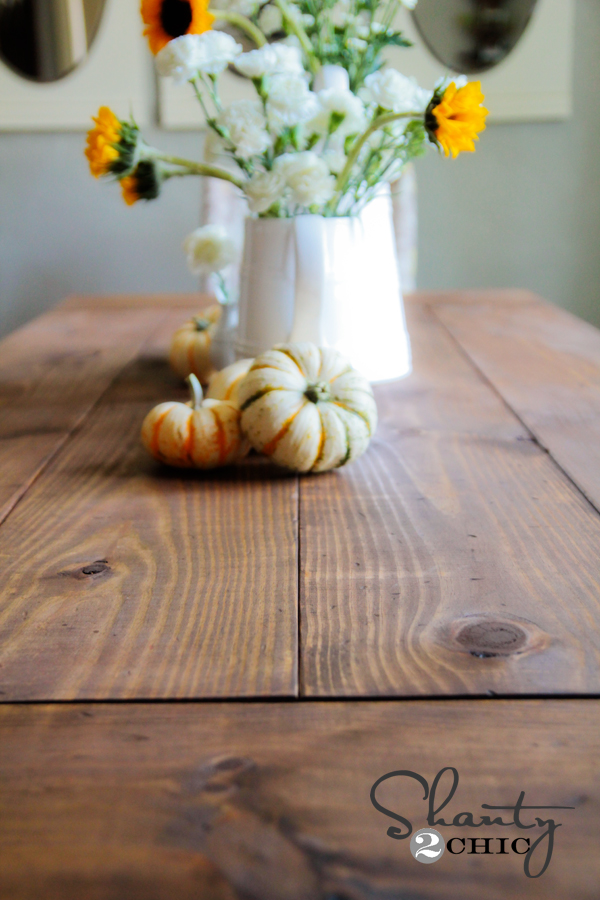
And finally the table top. Oh the darn table top. This is actually a breeze to put together with a Kreg Jig IF you can find nice boards. I seriously made 4 trips to different hardware stores to find boards straight enough to work with. I actually ended up settling on 10 footers just to get good boards that would work. Oh well!
You can see how I put pocket holes up and down the boards to connect them. I clearly didn’t measure at all on this part… Just used the old eyeball method!
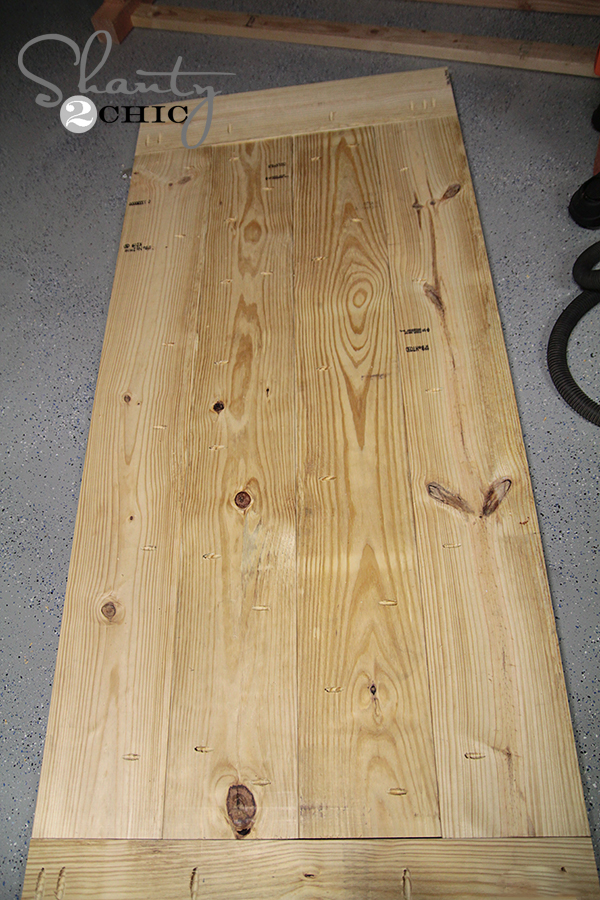
Because my wood was acting up a bit, you can see where I used multiple pocket holes on the breadboard… I won. It’s not going anywhere now.
I attached the base of the table to the top by using 2 1/2″ wood screws through the 2×4 runners. I also used a few 4″ screws through the 4×4 base just for added strength.
And now for the finish! Woohoo!
I decided to match the finish of the table to the Restoration Hardware sideboard and hutch I made for my dining room HERE.
I used Rustoleum Ultimate Wood Stain in Dark Walnut! You can find it at Lowe’s, but do know that the packaging has changed a bit.
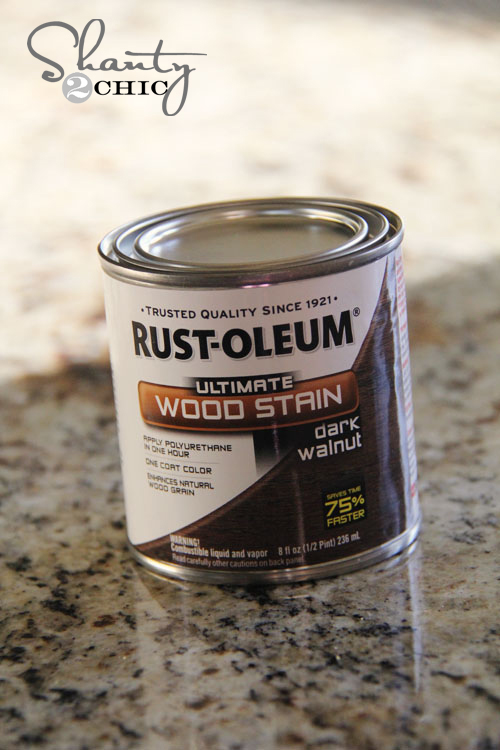
This stuff is so great! It only requires 1 coat and it dries in under an hour. I have used many stains, and this brand is BY FAR my very favorite!
Once it dried, I put 2 coats of Rustoleum Ultimate Polyurethane in Satin on it to protect the finish. This goes on white and dries clear. It doesn’t stink and it dries fast!

That’s it for the finish!
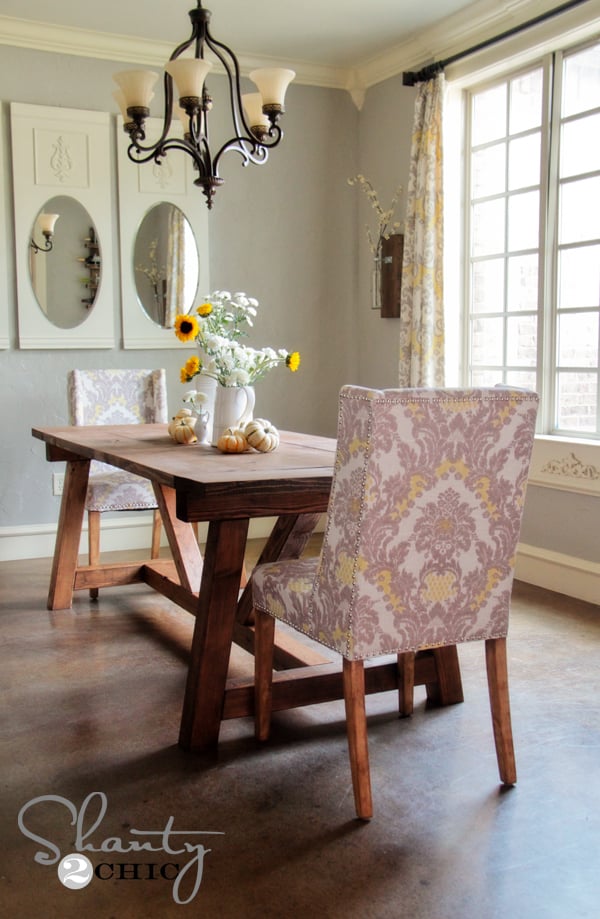
I am in the middle of making the cutest benches to match this table. I LOVE a dining table with benches for my family. The kids can’t ruin them, and they are rustic and beautiful at the same time. I knew I wanted to dress the table up a bit with some end chairs, so I went to my very favorite store to find those!
![]()
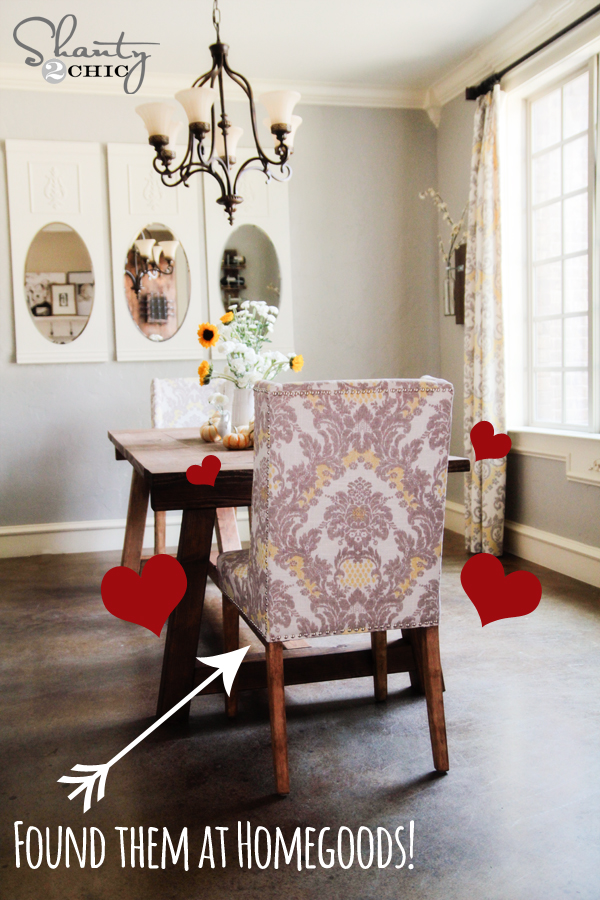
I love them! Ironically, they match my window panels I made perfectly. It was a match made in dining room heaven… Or Homegoods! Aren’t they perfect??
And here are a few more shots!
I hope you love it as much as I do!!
I would LOVE for you to share this and PIN it with your peeps below!
Thank you so much for stopping by, and let me know if you have any questions at all. Thanks again 🙂
~Whitney


Love the Table, i’m building it for a friend, but she wants it 45 wide and 12 feet long, if i widden the base and extend it to 9.5 to 10 ft between the to legs do you think it will be sturdy enough. also i’m not going to do a breadboard end, i’m just going to use 45’s on the outside boards. what do you think
You could always add a third “leg” base to the center of the table if you feel it needs added support.
This goes out to all of the critics !! I’m not quite sure why anyone would get on here and talk trash about Shanty2chic pocket hole techniques . I have built plenty of stuff using this method and its solid as a rock.. If you are so great at doing woodwork ‘CRITICS’ ,spend hours on in making you a blog to help everyone out!! Shanty you guys do a great job and do not let someone convince you otherwise.. My advice to anyone hating, build before you knock it. Much Love!!!
Did you apply any wood conditioner prior to staining?
Hi! So I am in search for a new table because I painted mine and sealed the top with polyurethane and am not happy with it. It is just funky, even though I followed all the steps. Food get’s stuck to it so easily and it’s just not what I had imagined with little kids. So, here’s my question, have you found this table and chairs easy to clean? Or will I just have the same problem with mine now? Thanks!
Caitlin, what brand poly did you use? Our tables are very smooth after we poly and we wipe with winded and a cloth to clean…
What’s the size of the table top?
Love the table. Its just what I was looking for. I plan on making a concrete top for it though and making it a little longer. Any suggestions on going longer or adding an additional support in the middle?
I want to do this project, but I am wondering what type of wood did you use. I have been looking at hardwood and it is no where near your $100 price range.
she used pine…awful but very economical choice. In walnut, cherry or soft maple, this would run anywhere from $250 to $400 in our area, depending on the week I check prices
The whole idea of the blog is to be frugal. If you have any wood to pick from pine is obviously not your first choice, but you don’t need to be so derisive in your comments. Enjoy the blog for what it is.
I guess I didn’t feel like I was being derisive. I’ve never dissed the author, big fan of their work. I didn’t say the author was awful, I said PINE is awful. The poster didn’t see how she could get away with $100 budget, I let her know about a better choice and what it would cost. Lighten up 🙂
Jen, appreciate the knowledge you have shared here. Went through the entire thread to view all of your comments. Tried clicking on your profile so I could follow your comments but it is private. Anyway you could share? Thanks.
I maintain a private profile, but I mostly comment on scientific articles, for woodworking talk, find me on LumberJocks (screen name is Jenine)
Hello, did you make a specific bench to go with this table? Is there a link you could provide? It looks beautiful!
What grit of sandpaper did you use to remove the stamp from the lumber company? I ran over it with 60 and it only faded it a bit. Any thoughts?
Hey! I’m curious about your Kreg Jig-ing. I have the smaller R3 Kreg Jig, up to 1 1/2 inches. I’m sure that will work for the table top, but any thoughts about the frame? I don’t have access to a Kreg HD…
Hello. We are planning on building this table and we are having a hard time locating the wood that is needed for the table. We have been to a few lumber yards and they both said this lumber is very difficult to come by. Is this true? If so is there other wood that you would suggest? Thanks!
I’m sorry about that. We are in Texas and have learned this is true based on location. I would stack 2×4 in place of 4×4. It will give you the chunky look. Just attach them together her with wood screws and glue. Hope this helps!
I live in NJ, and could only find untreated 2×4 and 4×4 in Douglas Fir. I was able to find a place to custom mill the pine into 2×4, and they glued it to make 4×4. It tripled the cost of wood for me, but it was worth it. You could glue 1x4s together if you are careful.
2×4 here runs about $3.50 for an 8 ft board. 4×4 runs $13 for an 8 ft board so depending on location you could save money using 2×4.
Wow, wood is so cheap there! In Canada we pay 23.00 + 12% tax for one 4×4 8′ ft Length.
Is the 25 3/8″ dimension for the leg correct? Comparing the picture of the completed project and the picture of the cut legs, it seems the finished legs are quite a bit longer. I ask because I am doing this project now. Lined the legs up with a 4×4 and 2×4 on top. Seems like a really short table.
Hi, I would really like to build this table but I live in a rural town in the northeast about 3 hours from a HD or lowes. My local lumber yards carry all the wood in Douglas fur – do you think this would work? I know some people used fur for the 4×4’s but what about for the table top? Any ideas?
I made an “art studio” version of this table for my wife. 30″ tall by 30″ deep by 60″ wide. All supplies where available at Lowes in Palm Bay Florida. We used Minwax Weathered Oak stain. Other than buying a Kreg R3 Junior for about $40, the material costs where about $120.
Hi, I was wondering what kind of poly you used? In your description you said you used Satin but in the picture of the poly it says matte. I love the table, my husband and I just built one and I am getting ready to go buy the stain and finish! Thanks!
Hi Carrie,
I’m sorry for the mistake! I used matte 🙂