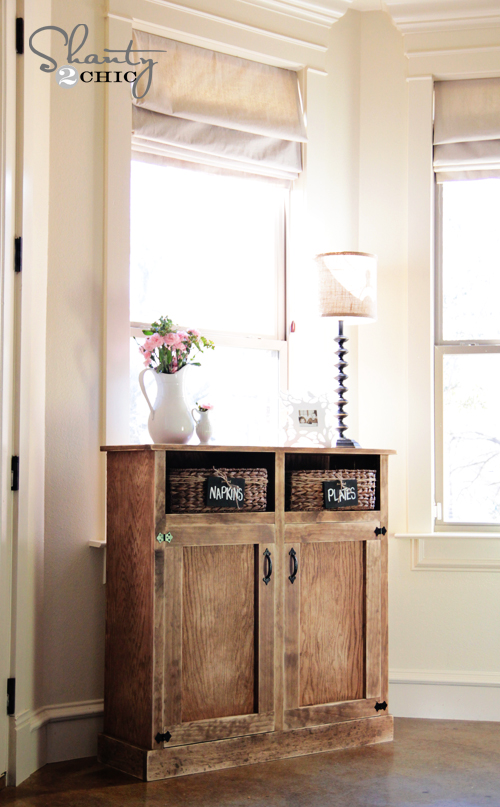
Happy Wednesday!! I am so excited to share my latest furniture build with you guys! I feel like I put my building “big girl pants” on for this one. I typically come up with the idea, and then enlist the help of my good friend Miss Ana White to make me plans. This is my first piece of furniture to design without plans from scratch. Don’t worry! We are still sharing plans with you guys 🙂 I sent her all my specs when I was finished, and she made the plans for you… Perfect teamwork! So… As always, I will be sharing some shanty tips and tricks here, and you can check out the full set of plans on Ana’s site! I have been wanting a console table for my kitchen for sometime. I wanted a little height in this area of my kitchen, and I think my new console table fits the bill! Here is how it turned out…
Now… Before we get started I wanted to ask you guys for a small favor! Ash and I have the huge opportunity to represent the Reynolds brand for the next year as ‘real moms’ sharing time saving tips and tricks from our kitchens to yours. We started our blog a few years ago with that same passion… Let’s show other girls like us that they don’t have to spend hundreds of dollars or tons of hours to make their homes beautiful! That is our motivation, and we love to encourage all of you! We run our kitchens the same way. With 8 kiddos between the two of us, mealtime can be hectic… Ok. Huge understatement. 😉 We rely on the help of Reynolds products to make mealtime EASY. You guys know that’s what we are all about!
That’s why we are so excited to be a finalist in the Reynolds Real Moms contest. We aren’t chefs or foodies, but we are 2 mommies who love running our kitchens efficiently and making our families food that we made ourselves without spending hours doing it!
So this is where you guys come in!

We are so excited about this contest, and you guys are the only reason we have made it this far! This is such a huge opportunity for us, and we hope that you will stand behind us and ‘VOTE SHANTY‘! You always show up for us when we ask, and we appreciate your support SO much!
Now… Let’s build some cute stuff!
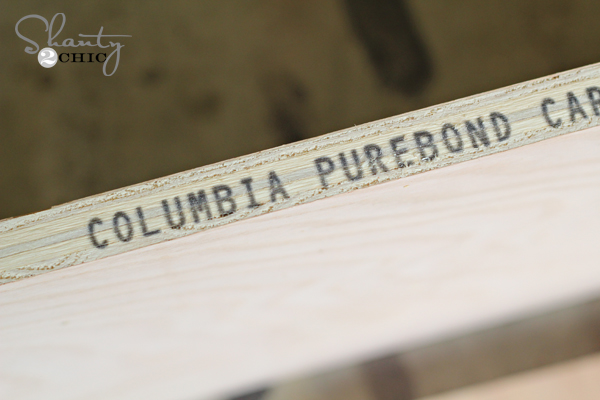
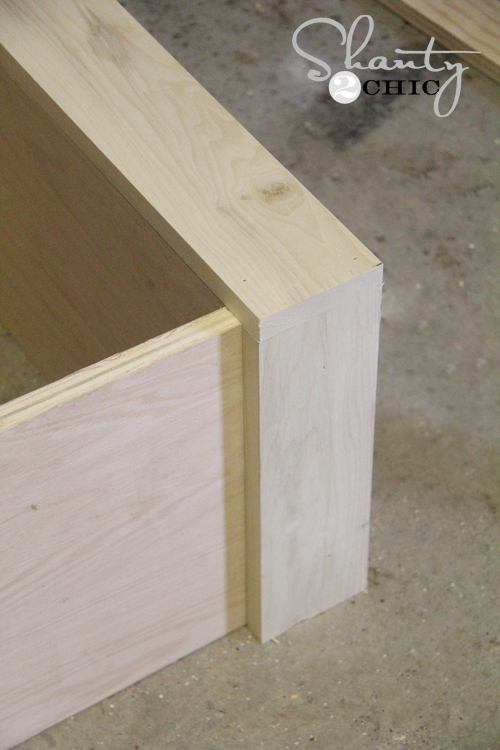
This plan calls for 1×12″ boards. Rather than going with pine or white wood, I opted to use PureBond. You can see why we love PureBond Plywood in this video here. I just had the nice guy at Home Depot cut it down into four 11.5″ boards. This is cheaper than the pine boards, and will make your table so much prettier in the end! I used 3/4″ Oak PureBond for my table!

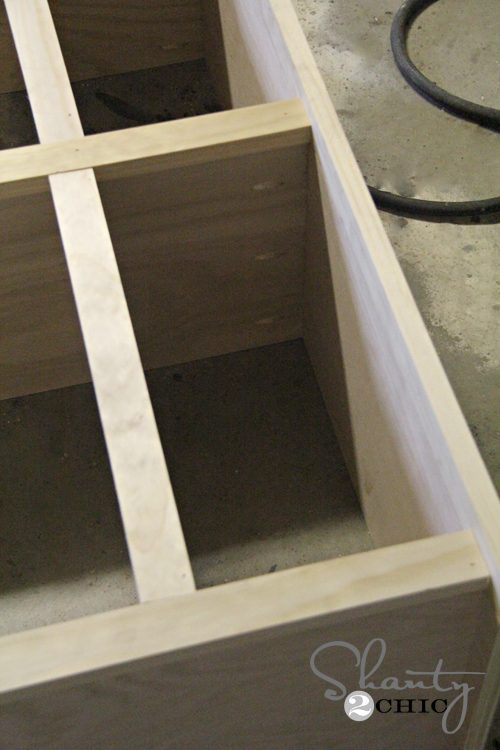
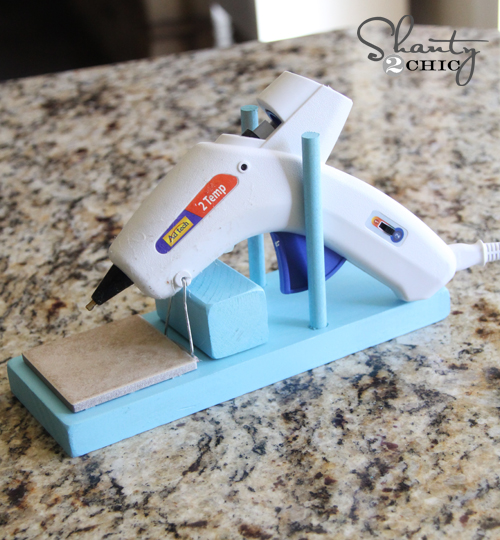
I used my Kreg Jig to build the whole thing… Of course!

Rather than using nails visible wood screws, you can use the Kreg Jig to create pocket holes like this one…
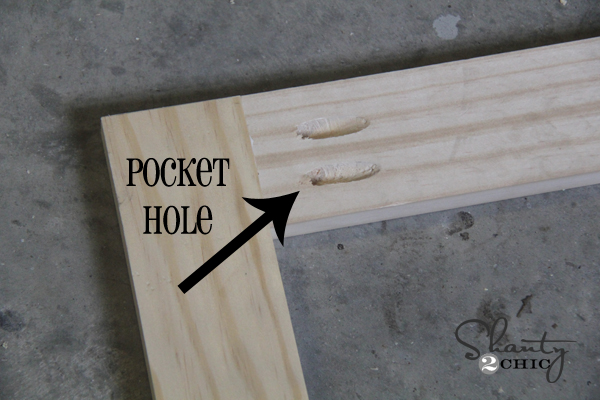
After you have all of your pocket holes made, you use Kreg’s pocket hole screws to attach it all together. It seems a bit intimidating at first. Where do I put my pocket holes? How is adding a step making this easier? But… After you use it a few times you will NOT go back. The system makes your pieces professional, sturdy and SO much easier to attach and build. Win win.
Here is where I put my pocket holes for this table…

For the front of the table and the door trim I used pine boards. Make sure you pick straight ones! It will make your life much easier. 🙂
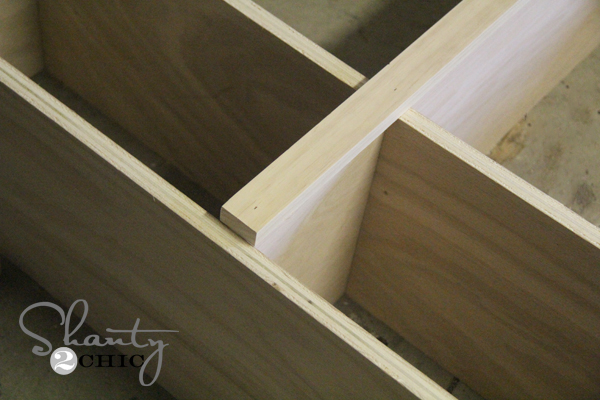
The Kreg Jig makes the doors super easy! You build a frame like this one…
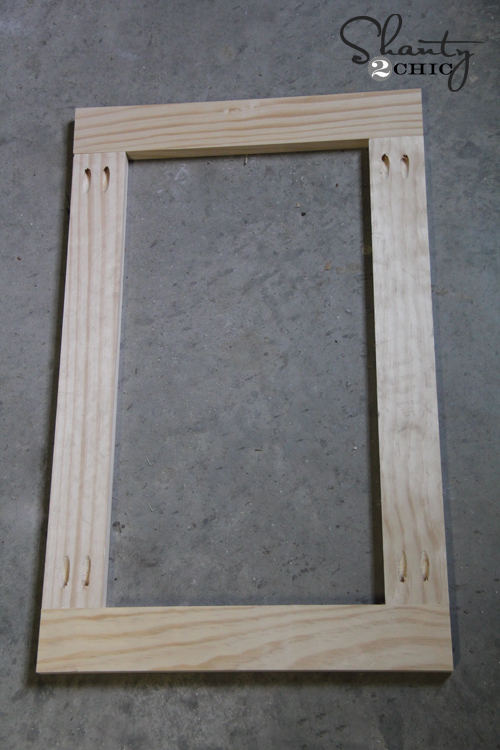
And then attach a piece of 1/4″ PureBond to the back of it using glue and staples or brads. Simple!
For the finish…
I love the finish I just did on my new coffee table and decided to do the same here, but with a different color.
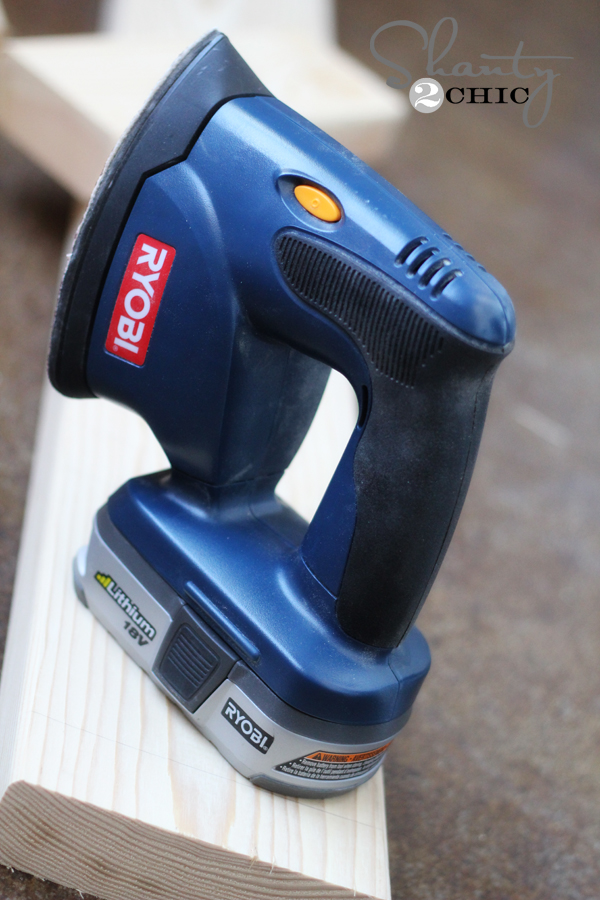
I used Rust-Oleum Ultimate Wood Stain in Dark Walnut. Once it was totally dry I used one of my favorite tools to sand it down. This part is SO easy. Actually it’t almost therapeutic with the Corner Cat. Add this tool to your list guys… It shares the same powerful 18V Lith-Ion battery that our drill uses and weighs very little. I use this on every wood project I do now… Love.
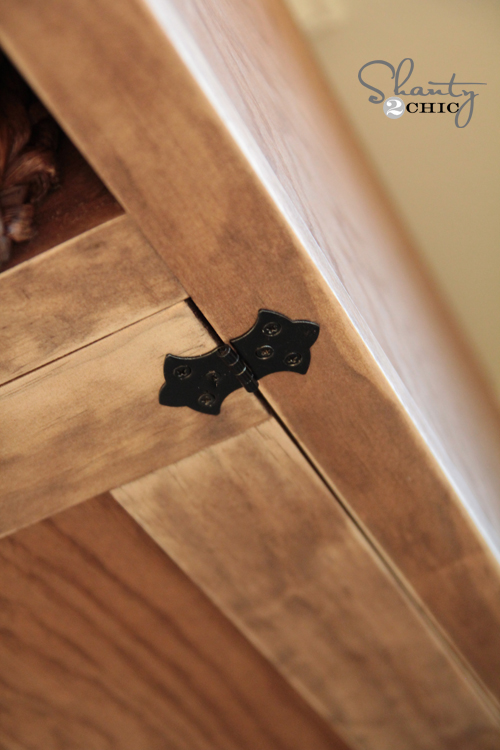
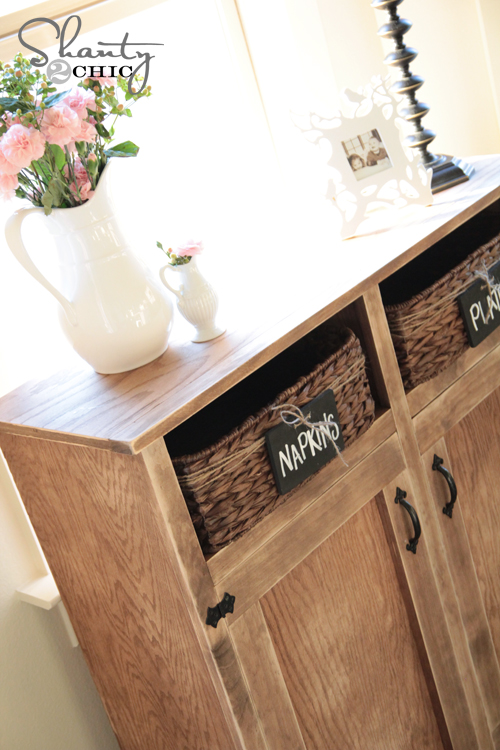
For my hardware I used these great hinges I found at Home Depot. I used some Rust-Oleum black spray paint on them and they fit the piece perfectly. I found the pulls at Hobby Lobby for $1.50 a piece.
The baskets are from Home Goods and I added my own chalkboard tags to them to ‘shanty’ them up a bit.

That’s it! Here it is all finished up!
What do you think??
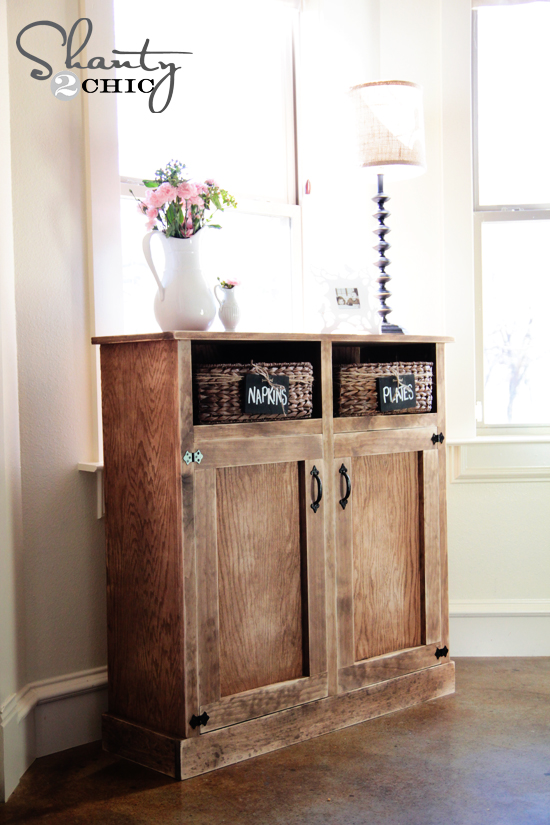
I hope you LOVE it as much as I do!
Make sure to check out the full set of plans over at Ana’s site! Thank you so much for stopping by! Have an awesome day and PIN away! Yes… That was totally corny. 😉
~Whitney


So you sanded after you stained? I am building a vanity and hoping to get this same distressed coloring on my counter top.
Has anyone figured out the stain color used? I did not see it in the plans.
?
?
✌?✌
?
? I built my own using the plans at www. WoodworkPlans.info – highly recommended you check those out too. They are detailed and super easy to read and understand unlike several others I found online. The amount of plans there is mind-boggling… there’s like 16,000 plans or something like that for tons of different projects. Definitely enough to keep me busy with projects for many more years to come haha
www. WoodworkPlans.info ????????
This weekend I took the plans from the SHANTY OPEN SHELF CONSOLE and modified it to become a wine cabinet. This wine cabinet is being donated to a local children’s charity (United Services for Children) for their big auction night on August 17th here in St Charles Missouri. We hope the piece brings their school the much needed funds. Thank you Ana for providing a plan I could modify in a weekend to get this piece completed! You are awesome!!! Shanty to Chic thank you for promoting this wonderful piece!
AMAZING!! I will be sharing this during the week with our readers Linda! It’s perfection!
Thank you for your complements. It was fun to re-do the plans (which I will share on Ana’s site or yours at your request) to make this piece. Thank you for sharing with all of us.
I am using this plan to make a wine console by modifying the other door to wine bottle and stem wear holder. When I complete it – I will publish you a photo – Love this little gem 🙂
We just finished a bathroom remodel and we were really short on storage space. I saw this and KNEW it would be perfect. My beautiful husband was in total agreement so he built it. It’s beautiful. It’s the first “real” piece of furniture he’s ever made and I just want to cry when I see it. I put my hair dryer & curling iron in the baskets and one side of the bottom cabinet is a clothes hamper. And since we are using it for that he used peg board for the back so it has “breathing” room. I can’t tell you enough how much I really love this piece. Thank you for sharing it. P.S. And he was VERY excited to get a new toy…..a Kreg Jig!
What are the dimensions of this? Its adorable!!
Really awesome! I noticed we use some of the same products – isn’t Gorilla Wood Glue the bomb?? (And, of course, Purebond – my fave!)
Cher @ Designs by Studio C
Love it! Are there one type of screws to use that are better than others?
What style or level Kreg Jig did you use? Looks like you use it for most of your projects.
so the pure bond takes the stain pretty well, I thought it was only paintable. thank you
Another great project! A question…are you using pre-made trim, or cutting your own from pine boards?
I absolutely adore this, I need this… hope I can get the plans to pull up soon 🙂
Love, love, love this and I also have a spot in my kitchen that this would fit just perfect. But, I tried to click a few of the links to go to anna whites page to see the full plans but it takes to me to a page to create a user account with Anna White.