Building a DIY twin platform bed is a straightforward and rewarding project that requires basic woodworking skills and tools. This plan is easily modified to fit any size bed and can be joined to almost any headboard as well.

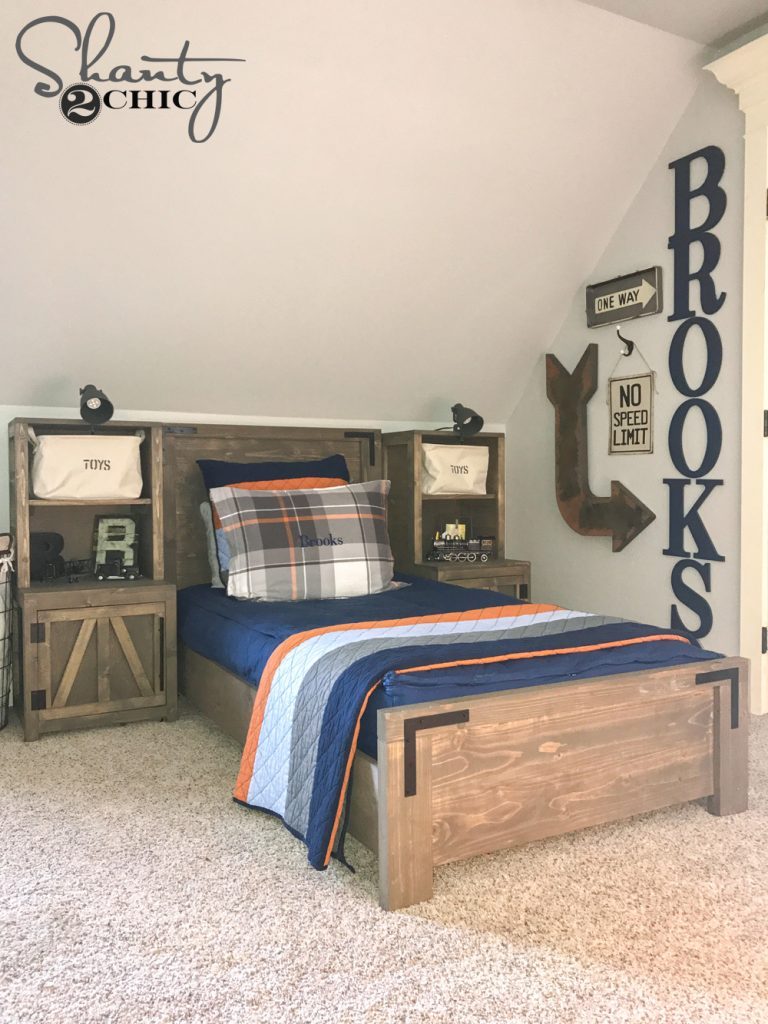
This year brought a lot of change for my family, including moving to a different home. One of the tasks I had moving was getting each of the kids a bedroom set up at my new house. Today I am sharing the twin platform bed we built for one of my boys, and make sure you check out the matching free plans for the headboard or I have also added them to this post. This bed is designed for a twin mattress, but is very easily customized to other sizes. You can download and print the free plans with dimensions, cut list and instructions at the bottom of this post.
Table of Contents
Kreg Jig
One question we get asked consistently is… “What is a Kreg Jig?” A Kreg Jig is a pocket hole jig that helps create pocket holes, allowing you to build with super strong joints. It makes joining two boards faster and gives you stronger and cleaner joints than countersinking a wood screw. We discovered them shortly after we started building furniture and it was a HUGE game changer for our furniture building! We were so impressed with how user-friendly they are and the strong joints it gave our builds! For this DIY Twin Platform Bed, I used my Kreg Jig 720 PRO and I LOVE IT! You guys will love it too… definitely worth the upgrade for those of you that already own a different model. You can find the Kreg 720 Pro it on Amazon! You can also check out our How to Use a Kreg Jig Video on how to use it!

Ripping the boards
Before adding any pocket holes, I ripped my 2×4 boards down to 3″ wide each. I like to make my cross cuts first with my miter saw, and then rip those smaller cuts with the table saw. We use our table saw to rip the round edges off of the framing boards we build with. This is an optional step but we like to do it to make the pieces of furniture look more expensive and not built with framing lumber. It really helps on a build like this table. Ripping them down gives the stacked boards a solid clean look, like it’s one piece. You can watch How to Give Framing Lumber a Straight Edge video to see how we rip our boards.
Step 1 – Assembling the Sides of the Twin Bed
The first step in building this platform bed is to create the sides of the twin bed frame. The sides are built using 2 x 6 boards that we ripped to 5” wide each. I like to make my cross cuts on my miter saw first, and then rip those shorter pieces on the table saw. Drill 1.5” pocket holes along one side of one of each board and also on both ends of each board. Attach the boards together with 2.5” pocket hole wood screws. Make sure your pocket holes are facing up because this is how you will attach the trim piece in a next step. You want both boards flush at each end.


STEP 2 – Attach trim to the side pieces
The next step is attaching the trim on top of the sides. This is a 2 x 6 board ripped to 2” wide. Attach the trim evenly along the top of the headboard using 2.5” pocket hole screws and wood glue.


Step 3 – Attach the cleats to the sides
The next step is attaching the cleats to each side that you just built. These are 2 x 6 boards that I ripped to 2” wide each. Attach the cleats 3.5” from the top of the trim piece using wood glue and 2” wood screws through the cleat and into the inside of the bed sides. You can adjust where you line these boards up based on how high you want your mattress to sit.


STEP 4 – Build the footboard
The end or footboard is built using 2 x 6 boards that we ripped to 5” wide each. The end is built exactly long by side pieces, but you won’t add pocket holes on the ends of the boards. Add 1.5” pocket holes along one side of one of each board. Attach the boards together with 2.5” pocket hole wood screws. Make sure your pocket holes are facing up because this is how you will attach the trim piece in a next step. You want both boards flush at each end.

Step 5 – Attach trim to end piece
The next step is attaching the trim on top of the sides. This is a 2 x 6 board ripped to 2” wide. Attach the trim evenly along the top of the headboard using 2.5” pocket hole screws and wood glue.

Stain the bed before assembling
At this point, it is best to stain or paint the bed before moving it into the room to assemble it. I will tell you how I stained mine at the end of this post. Next, I will tell you how to assemble the bed, but you definitely want to wait until you get it into the room to do this part.
Step 6 – Attach the sides to the end
To assemble the bed, you will attach both sides to the end piece using 2.5” Kreg screws. You don’t want to use wood glue on this part so that you are able to disassemble and move the bed if you ever need to.


Step 7 – Attach the slats to the cleats
Once both sides are attached to the end, place the slats for the mattress on top of the cleats and attach them using 2” wood screws into the top of each cleat. You also don’t want to use wood glue on this part. You don’t have to be exact with the placement of your mattress slats, just place them evenly to support the mattress. You can also add as many slats as you need to make it more sturdy and provide extra support.

Headboard Assembly
Be sure to check out the free plans and video on how to build the DIY twin headboard HERE!

The finish
At this point you are ready to sand and finish the bed. Before staining the bed, I used my sander to lightly sand the entire headboard. I like to start with 120 grit sandpaper and then move to 220 grit to get a smooth finish.
I used three different Varathane stain colors to create this. I started with an empty tub from the hardware store. These are super inexpensive. You can also use any empty container you have at home! I mixed two parts of Natural stain, one part of Golden Oak, and a splash of Weathered Gray. This gave me the perfect finish that I was looking for. You just put all of that into the bucket and stir it up just a bit and you’re ready to go!
Make sure to sand all the surfaces with medium and fine sandpaper to get an even, beautiful finish. I like to use my Ryobi Corner Cat for this! An orbital sander also works great!
I often get asked what protective coat I like to use on top. Check out my favorite polyurethane!


DIY Twin Bed Free Plans

DIY Twin Platform Bed
Instructions
- The first step in building this platform bed is to create the sides. The sides are built using 2 x 6 boards that we ripped to 5” wide each. I like to make my cross cuts on my miter saw first, and then rip those shorter pieces on the table saw. Add 1.5” pocket holes along one side of one of each board and also on both ends of each board. Attach the boards together with 2.5” pocket hole wood screws. Make sure your pocket holes are facing up because this is how you will attach the trim piece in a next step. You want both boards flush at each end.

- The next step is attaching the trim on top of the sides. This is a 2 x 6 board ripped to 2” wide. Attach the trim evenly along the top of the headboard using 2.5” pocket hole screws and wood glue.

- The next step is attaching the cleats to each side that you just built. These are 2 x 6 boards that I ripped to 2” wide each. Attach the cleats 3.5” from the top of the trim piece using wood glue and 2” wood screws through the cleat and into the inside of the bed sides. You can adjust where you line these boards up based on how high you want your mattress to sit.
- The end is built using 2 x 6 boards that we ripped to 5” wide each. The end is built exactly long by side pieces, but you won't add pocket holes on the ends of the boards. Add 1.5” pocket holes along one side of one of each board. Attach the boards together with 2.5” pocket hole wood screws. Make sure your pocket holes are facing up because this is how you will attach the trim piece in a next step. You want both boards flush at each end.

- The next step is attaching the trim on top of the sides. This is a 2 x 6 board ripped to 2” wide. Attach the trim evenly along the top of the headboard using 2.5” pocket hole screws and wood glue.
- To assemble the bed, you will attach both sides to the end piece using 2.5” Kreg screws. You don’t want to use wood glue on this part so that you are able to disassemble and move the bed if you ever need to.

- Once both sides are attached to the end, place the slats for the mattress on top of the cleats and attach them using 2” wood screws into the top of each cleat. You also don’t want to use wood glue on this part. You don’t have to be exact with the placement of your mattress slats, just place them evenly to support the mattress.


Rather than the slats to support the mattress, if you use a piece of 3/4” plywood, you can add a couple of small holes to the footboard end, and two hinges at the headboard end for liftable storage. 😉