Hey everyone! To keep up with all of our Christmas posts make sure to FOLLOW us on Instagram!
I hope you all had a great Thanksgiving! We did for sure! I am always trying to think of thrifty, unique and thoughtful gifts to make my family and friends each year. I love making custom pieces that they wouldn’t receive from anyone else. This year I decided to make my niece and nephew name signs for their room. I decided that this would be our teacher gifts this year as well, only I will use their last names!
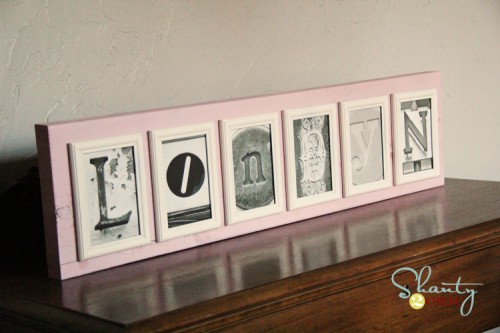
Today I am showing you the sign I made my for niece Londyn.
I found a GREAT flickr photo site on Pinterest. It is an amazing source for letter photos. There are literally hundreds of each letter. You can see that site HERE! You simply download for FREE and print from your own printer… Pretty darn cheap and easy! I found her letters and got started on the rest.
I bought 6 4×6 frames at the Dollar Tree for a buck a piece.

I removed all the plastic and glass from the frames like this…

I gave them all a coat of my very favorite…
You can get it at Home Depot.
I used Heirloom White for the frames…
 Here they are drying…

While those were drying, I started on my wood.
I used a 2×10 for my sign. This is heavy and will sit alone on a table without support. If you are wanting to hang yours on a wall, you could also use a 1×10.
I paid $4.50 for an 8ft board and made 2 signs from it.
I cut a 36″ piece and painted it Sweet Pea.
 While that was drying I finished up my frames. I added the glass back into each frame and also added my new FREE letter photos. Once I attached the back I gently pulled the support piece off the back of each frame. That was quite easy to do on dollar store frames 😉

Then, I added a bit of hot glue to the corners of each frame and attached them to my new pink board.

The result…


What do you think?
I am so excited to also make these for the kiddos teachers. I am planning on staining the boards and going with a neutral frame color so they can use them anywhere.
If you are making a longer name, I would suggest going with 3×5 frames and using a 2×6 or a 2×8 as your board.
And now let’s do the math… I paid $6 for the frames, $2.50 per sign for the wood, and the pictures were free. That’s about $10 a sign if you count the spray paint… My kind of gift!
Thanks so much for stopping by! Let me know if you have any questions!
~Whitney


Hi I found your site via pinterest a few weeks ago. And I LOVE this idea!! My daughter’s name is Saraia same amount of letters, so I thought it would work! super bummed it didn’t look as fantastic as yours did, (but I will be trying again soon). However, I did not give up! I started playing around with the frames and the pictures and wallah I came up with a beautiful concept that I will be hanging on her wall. When I finish it (tonight) I will take a picture to show you! Thank you for your inspiration!
FYI to the comments below, you REALLY have to play with things before you just up and try to pop out a DIY craft online. When you download the picture, the best idea is to download the ORIGINAL picture file. That way the picture isn’t cropped too large etc. It took lots of trips to CVS finally a purchase of ink and printer paper for me to finally figure it out.
Thanks so much for the cute idea! I did mine today and it turned out so cool! Tomorrow I’m doing another one. 🙂
Aww I need help printing the pictues to the right size. I have downloaded th epics but when I print the pictures are cut off. I have read the comments and still cant do it. Anyhelp will be aprciated. I am making one for my baby sis bridal shower. Thanks.
When I try to print these letters to a 4×6 it crops them A LOT. How did you keep the integrity of the letters when you printed them?
My only question is how do I go about downloading, there is no option for that…
Andrea…once you find the letter you want, click on it. It takes you to a screen where the picture is blown up. Now click on the picture again. At the top right you’ll see “view all sizes”. Click on that. Choose the size you want. NOW, you can do one of two things. You can click on “Download….” OR you can right click on the image and save it to your computer that way. Once you have the picture saved, you can edit it in your favorite photo app.
The link for the letters is in the second little paragraph at the top, if you click on the word HERE it will take you to the page with the letters.
Ok, I got everything this link says to get and the wood was entirely too small for the frames. There was no room for anything on top or bottom or the sides. I could only fit 4 frames on it. What did you do that I didn’t?? The picture of the finished product shows spacing in between and extra wood on top/bottom of the frames. Can you tell me exactly what you said to lowe’s to have the wood cut? I wanted the 1×10 pine, so they can hang it on the wall. Hope I can finish this! Such a cute project!
Measure, measure, measure!! If you got 4×6 frames and the 2×8 wood, you should have been just fine. I used 5×7’s for my first project and needed 7 letters (it’s a big focal piece). So 5″ wide x 7 frames = 35″. Add a few more inches for the space between and the ends and there’s your length. Hope that helps!
in the second paragraph is the words fliker site in a different color font. it will take tyou to the site for pictures
Did you print the letters using copy paper or photo paper? Thanks
Where did you find the 2×4 hollowed out that way? Thanks
so, i tried making this as an anniversary gift for my dad and step-mom…..cut a 36” piece of wood for 6 letters……stained it and then went and bough cheap frames from walmart. (husband works 2nd shift and i have 2 little boys so had to do a little at a time) ……the board is 10 inches short…..can only fit 5 letters on the board and i used 4×6 letters. super bummed…..i live 8 hours away from them and will be seeing them this weekend and their anniversary is Monday…..i guess their gift will be late. frames aren’t even thick ones. even if they were thin all the letters wouldn’t even fit. 🙁 love this idea…….but upset now that i can’t give my parents their gift.
I’m so sorry it didn’t work out for you Amber. I always give my directions exactly how I do them myself. I bet they still love it even if it’s a little bit late though. 😉 Hope it works better next time. I did get my frames at the Dollar Tree, so maybe that’s the difference.
You’re the bestest. I always enjoy your creativity!
so i found the link for the letters but am having problems printing. I love this idea! My daughter will be born december of this year and i wanted to make one for her room
Please share how you resized the pictures. I have been trying with no such luck.Thanks
I need help with resizing. When I try to resize the photo it makes my letter mis shaped or cuts part of it off. Please help, if anyone knows how to do this. Thanks