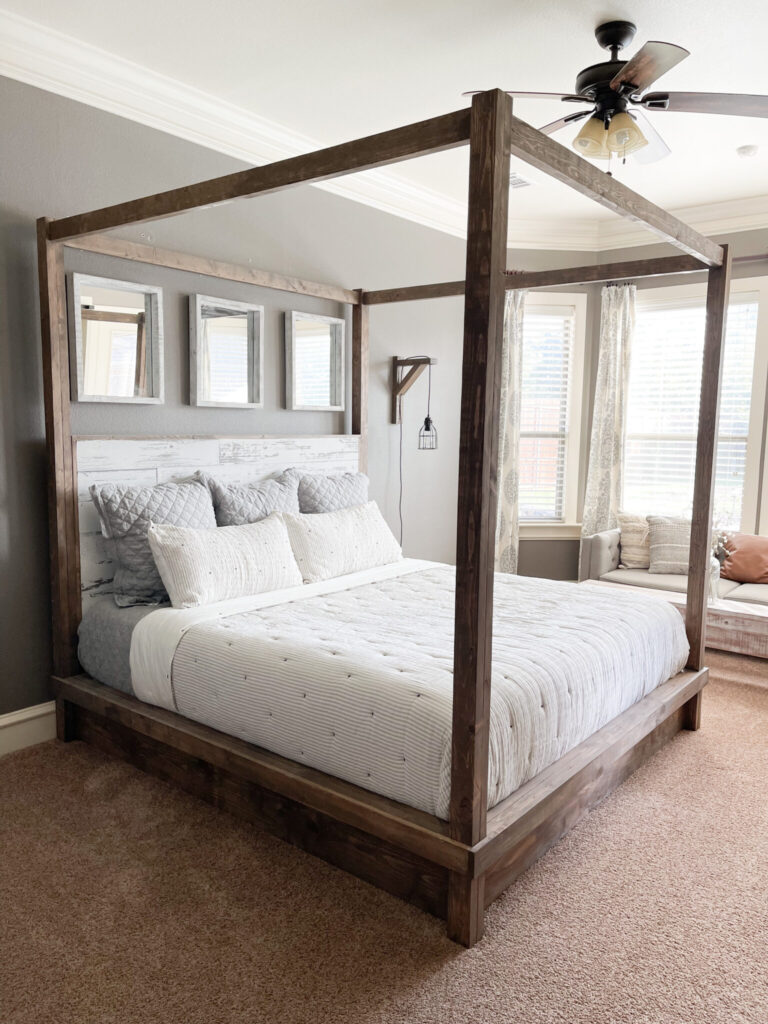
Learn how to build a simple full-size bed frame with free plans from Shanty2Chic. Add rustic charm to your room with this easy DIY project!

When my second oldest moved out, I turned the extra bedroom into a guest room—and the first step was building the bed. Since the bed sets the tone for the whole space, I wanted it to be just right. I’ve been really into turned legs and feet lately—they have that vintage charm I love, and the right stain gives them a fresh, modern feel.
This design is simple to build with just a few basic tools, and the total cost for the lumber and feet came to around $220—an amazing value for a custom headboard and frame!
You can watch the full build on our Instagram channel, and be sure to download the free printable plans with a shopping list to make your own.
Watch the build on Instagram here!
Click here to jump to the free printable plans!Now, let’s get to building!
Table of Contents
DIY Full Size Bed Frame
Materials
Tools:
Supplies:
- 8 – 2x6x8 Framing Lumber
- 1- 2x4x8 Framing Lumber
- 4 – 1x6x8 Whitewood or Common Boards
- 15 – 1x4x8 Furring Strips (or Whitewood or Common Boards)
- 2 – Turned Furniture Feet (if out of stock this set is similar)
- 2 1/2″ Pocket Hole Screws
- 1 1/4″ Pocket Hole Screws
- Wood Glue
- Paint or Stain for Finish
Building the Headboard
Step 1: Planking the Headboard

To kick things off, I cut the planks for the headboard and drilled used my Kreg Jig 720Pro to drill 1 1/2″ pocket holes along one edge and both ends. Then I joined them together using 2 1/2″ pocket hole screws. These wide planks give the bed a grounded, solid presence—and the width of the headboard adds a lot of visual impact.

We always get asked how we keep our planks smooth. We use the Kreg Face clamps at each pocket hole for a smooth finish!
Step 2: Building The Headboard Frame
Next, I cut the frame pieces and drilled 1 1/2″ pocket holes into the horizontal boards. I assembled the top and sides using 2 1/2″ pocket hole screws and wood glue. This frame added the clean lines I was after, while keeping the design sturdy and durable—key for full bed frames meant to last.
Step 3: Adding the Planks to the Headboard Frame

Once the frame was ready, I placed the planked panel inside and attached it to the posts with 2 1/2″ pocket hole screws.
I followed up with one final vertical board to complete the structure. It’s these thoughtful layers that give this full bed its polished look.
Step 4: Bottom Headboard Stretcher

For added strength (especially important for platform beds that support full size mattresses), I cut and attached a stretcher across the back of the headboard, positioned 6″ from the bottom. I used 2 1/2″ pocket holes to attach.
Step 5: Headboard Trim

I added a trim board across the top of the headboard, with 2 1/2″ pocket hole screws and wood glue, from the top of the headboard frame into the trim, and centered it to give the piece more definition. The design now had a hint of rustic charm while still feeling clean and versatile for different comforter or bedding preferences.
Building the Mattress Frame
Tip: I sanded and stained all pieces before bringing them inside. It kept the mess out of the house and made assembly much smoother. You can skip down the The Finish step to see the staining process I used.
Step 6: Side Rails
With the headboard done, I moved on to the mattress frame. I cut the side rails and footboard, drilled 1 1/2″ pocket holes at both ends of the rails, and joined them with glue and 2 1/2″ pocket hole screws. I opted for a low-profile design common in platform beds, which also allows for optional built-in storage underneath later on—think baskets or even custom drawers (and easy cleaning of course).
Step 7: Corner Blocks

To reinforce the turned feet, I added blocks inside each one, using 2 1/2″ wood screws (you can use 2 1/2″ pocket hole screws as well). These make a huge difference when you’re aiming for long-term strength and stability in any double bed or full bed frame.
Step 8: Middle Support

I cut and installed a center support, securing it to the footboard with 2 1/2″ pocket hole screws and wood glue. This ensures plenty of support across the width of the frame—especially important if you’re using full size mattresses without a box spring.
Assembling the Full-Sized Bed
Step 9: Attaching the Headboard to the Side Rails

I attached the side rails and middle support to the headboard using 2 1/2″ pocket hole screws. With everything secured, the frame started to take shape—and had plenty of room to accommodate any standard full size mattress.

Note: If you plan to move this bed, do not use wood glue to attach the rails and middle support to the headboard.
Step 10: Cleats

Next, I added cleats along the inside of the side rails to support the slats with 2 1/2″ wood screws and wood glue (or pocket hole screws).
Step 11: Attach the Feet

One of my favorite details? The turned wood feet. I attached them to the front corners of the mattress frame using 2 1/2″ wood screws that I drove from the corner blocks into the base of the feet at an angle. They add such a nice vintage touch and elevate the overall design (literally and stylistically).
Step 12: Bottom Support

Cut the bottom support piece to size and attach it to the middle support board, from the top of the middle support into the bottom support. Use a 2 1/2″ wood screw and wood glue.
Step 13: Adding the Mattress Slats

Cut the slats to size and space them out evenly along the cleats. Attach them to the cleats and middle support with 1 1/4″ wood screws and wood glue.
The Finish
Step 14: Sanding

Sand the entire piece down with an 80-grit sandpaper followed by a 180-grit then a 220 grit.
Step 15: Staining

The Kreg Project Blocks made it easy to prop the bed up off the ground, making staining a whole lot easier. They’re a game-changer for any workshop—especially with those handy retractable painting points!

I used my Kreg Project Blocks to prop the bed up off the ground, which made staining so much easier. These things are a game-changer for any workshop. I really like the retractable painting points!

I applied the mix with a staining rag, let it sit for 5–10 minutes, and wiped off the excess.

With the bed now in place, the guest room finally feels like a space with intention and warmth. The solid wood construction brings durability, the turned feet add a touch of vintage personality, and the low platform design with 6 inches of clearance, opens the door for future built-in storage—like custom drawers or hidden compartments.
This full-sized platform bed turned out to be more than just furniture—it’s the foundation for a room that balances style, function, and personality. Up next, I’ll be building a matching nightstand and dresser, and I’m planning a wall treatment that’ll pull everything together. Whether you’re furnishing a guest room, upgrading from a twin bed, or just looking for a timeless double bed design, this project is full of flexible ideas to fit your space—and your preferences.

Stay tuned… the best is yet to come!
Make sure to share your builds with us on social media and use #shanty2chic so we can share them too!
Happy Building!
Links to Decor in This Space
Check Out our Other Bed Plans!


Full Size Loft Bed with Desk and Shelves

Simple Full Size Bed Frame Plans
Tools
- Miter Saw
- Kreg Jig
- Drill
- Table Saw (optional)
Supply List
- 8 2x6x8 Framing Lumber
- 1 2x4x8 Framing Lumber
- 4 1x6x8 Common Board
- 15 1x4x8 Furring Strips (or Common Boards)
- 2 Turned Furniture Legs
- 2 1/2" Pocket Hole Screws
- 1 1/4" Pocket Hole Screws
- Wood Glue
Instructions
Cut List
- Cut List 1

- Cut List 2

- Cut List 3


Building the Headboard
- Cut the planks to size and drill 1 1/2" pocket holes on one edge and both sides of each board. Attach them together with 2 1/2" pocket hole screws.

- Cut the headboard frame pieces to size and drill 1 1/2" pocket holes on one edge and both ends of the horizontal boards. Attach the side frame pieces to the top frame piece with 2 1/2" pocket hole screws and wood glue.

- Place the planked assembly inside the headboard frame and attach it to the frame posts with 2 1/2" pocket hole screws and wood glue. Follow up by attaching the remaining vertical board.

- Cut the back stretcher to size, drill 1 1/2" pocket holes at both ends and attach it between the vertical posts, 6" from the bottom, with 2 1/2" pocket hole screws and wood glue.

- Cut the top trim piece to size. Center it over the top of the headboard frame and attach it to the headboard with 2 1/2" pocket hole screws and wood glue, through the pocket holes in the top frame board.


Building the Mattress Frame
- Cut the side rails and the footboard pieces to size and drill 1 1/2" pocket holes at both ends of the side rails. Attach the footboard to the side rails with 2 1/2" pocket hole screws and wood glue.

- Cut the corner blocks to size and attach them to the inside corners of mattress frame with 2 1/2" wood screws and wood glue.

- Cut the middle support to size and drill 1 1/2" pocket holes at both ends. Attach it to the center of the footboard with 2 1/2" pocket hole screws and wood glue.


Assembling the Full Size Bed
- Attach the headboard to the side rails and middle support with 2 1/2" pocket holds through the rails and support and into the headboard posts.

- Cut the outside cleats to size and attach them to the inside of the side rails with 2 1/2" wood screws and wood glue.

- Attach the feet to the front, bottom corners of the mattress frame. I used 2 1/2" wood screws and drove them in at an angle at the base of each foot.

- Cut the bottom support piece to size and attach it to the middle support board, from the top of the middle support into the bottom support. Use a 2 1/2" wood screw and wood glue.

- Cut the slats to size and space them out evenly along the cleats. Attach them to the cleats and middle support with 1 1/4" wood screws and wood glue.


The Finish
- Sand the entire bed down and add a finish!Make sure to share your builds with use on social medica and use #shanty2chic so we can share them too!Happy Building!


Great build! Wondering about the ratio for pickling wash and stain. Would you mind sharing? Thanks!