Hey guys! Just thought I’d show you what I’ve been working on!

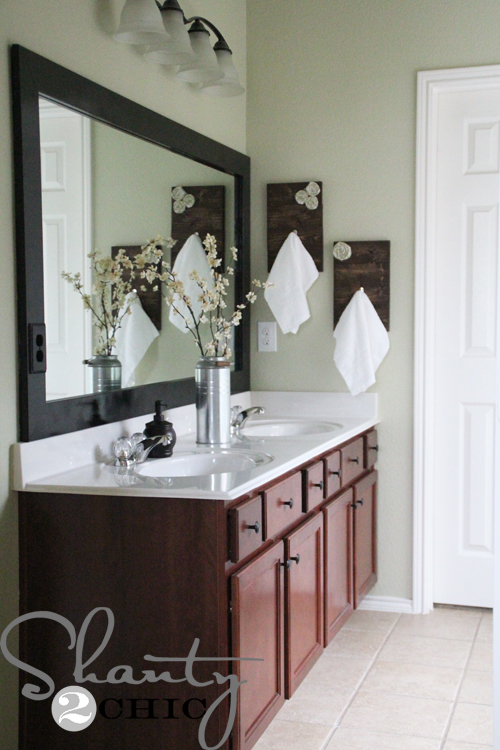
I’ve been working on my master bathroom this week. So far, I have painted the walls a pretty green color to match a waverly fabric that I picked out for my master bedroom

and framed my gigantic mirror! Here is the before….
 I originally had a thin frame around it but I wanted a new chunkier look.
 I bought three 1×4 pre-primed MDF boards at 8′ (they were about $5 each at Home Depot).

I used my compound miter to cut the 45 degree angles (you can also do this with a miter box and a hand saw)
 and spray painted them with 2 coats of black gloss.

See that lovely? Yah, the electrician apparently installed the outlet too far in and they had to cut a hole out of the mirror for it. I wish I had asked that the builder fix this before we moved in but you live and learn;)

I had to get creative because I was TIRED of looking at the mess up:) I used my router to cut two holes out for the socket

and I found this wooden face plate at Wal-Mart for $2! I just spray painted it with the same black gloss.
My final step was to get it up there so I used Liquid Nails and applied it directly to the mirror. LOVE the new look and it was only $15!


I feel like I got a lot of bang for my buck on this project and it was so easy and quick! I can’t wait to get started on the rest of the mirrors in my house but I guess I need to finish this room first! I’ll be back with updates soon!
~Ashley

Hey Ashley,
I love this! Just wondering how you would go about removing those little plastic “things” from the mirror so we can do this? Those “things” would prevent us from framing the mirror out. I would really like to not have to remove the mirror. Any suggestions? Thanks.
It looks great i love the vase and the bathroom..
Hi Ashley! This looks fantastic! I have builder mirrors in all the bathrooms in my house and would like to tackle a project like this! However – they all have a “border” of mirror around them (imagine huge mirror on the wall, edge to edge, then adding a 1″ or 2″ trim of mirror at all the edges, like layered on top. If that makes sense.) Any tips for removing that?
Hello Ashley,
Your bathroom is basically identical to mine, minus the color of the cabinets. I want to thank you for posting this how to because I’m not a visual person and now that I see how great your mirror looks I will attempt to frame mine.
Thank you.
I have an oval mirror stuck to the wall in another bathroom that is not budging. I removed the braces and tried running a thick plastic-like thread behind it but that did not work. I will break the mirror as a last resort but if anyone has a better solution I would love to know.
Just saw your posting… I have the exact same builder grade mirror throughout my home and I love this idea. Quick question, did/does your mirror have those little plastic clips that hold it to the wall? Those clips are the one thing that keep me from adding molding or trim to my mirrors because they would prevent me from gluing anything down to them.
Hi, Ashley! You re-inspire me! I have three huge bathroom mirrors that I have wanted to trim out for years… but I haven’t because of the huge plastic clips that hold the mirrors to the wall. They’ve stymied me – I cannot figure out how to make the molding flush with the mirror. I saw these same clips on the boys bathroom mirror – how did you make the frame work with them there???
Thank you Tina! I actually unscrewed the clips from the wall. My mirror is stuck to the wall with liquid nails and it won’t budge. Try taking the top clips off to start and pull the mirror a tad to see if it was secured to the wall! Hope this helps;)
I just want to echo what others have been saying about the change. Before the outlet was sticking out like a sore thumb, but now I barely notice it. Such a good change. Also, those zebra towels in the first pic are too cute! Thanks for sharing.
I love the vase and the flowers! where did you find that? and the mirror turned out really cute!
Hi Bri! Thanks so much! I found the vase at Ikea for dirt cheap and bought the flowers at Michaels for about $8:)
It looks great!! I’ve been wanting to do this forever in our master bathroom, but had the same issure with the outlet in the mirror! Thanks for sharing! 🙂
Crazy Denissa!! Loathe the outlet in the mirror;) Thank you!
Looks great! I’m so glad you posted this particular mirror. I have done this with all the other mirrors in our bathrooms except our Master because we have an outlet in the mirror, too!! I just haven’t been creative enough to think of a way to frame it. So thank you for doing the thinking for me!! Can’t wait to do it now.
Wow Kelli! So funny that I am hearing the same problem from so many others! It’s a pain! Thanks so much!
Question,
When you put on your first frame did you use the liquid nails on it ? how did you remove it from the mirror?
would love to do this but dont want it super permanent.
Hi Sue,
I used 3M double stick pads and applied it to the mirror. They came off pretty well but they wouldn’t hold the weight of the MDF. I’m sure what I did is permanent but if I ever want a different look I can add to these or just buy individual mirrors. Hope this helps!
~Ashley
I love framed bathroom mirrors. Looks even better that you made the outlet blend in.
Thank you Andrea!
I want to do this project, too! We have a GIGANTIC bathroom mirror that is practical but dull…and your sinks are so clean, I am envious…
LOL! Thank you Gina! I had time to clean them for pictures;)
The beefier molding looks great. Don’t you hate those little annoyances that builders leave behind? I have a few of those around my house. Biggest peeve, they didn’t tile all the way under the bath vanity, just half way. I mean come on, one more piece of tile!
Ugh! I hear ya! I am still finding things 2 years later!!! Thanks so much:)
I love the look of the thicker frame. Great job! Great solution to the electrical plug, what a challenge!
If you haven’t sealed your mirror yet, I would highly reccommend that you do. Take a clear caulk and run a thin line between the mirror and the frame. (I put a line of blue tape about 1/8 inch away from the trim to keep the caulk from getting onto the mirror) It will keep the water from running down behind the wood and possibly warping the wood.
Thank you Sherron! Great tip!!!!!