Learn how to build a blanket ladder with 3 basic tools, $15 in lumber, free plans and a step-by-step tutorial. Perfect project for beginners.
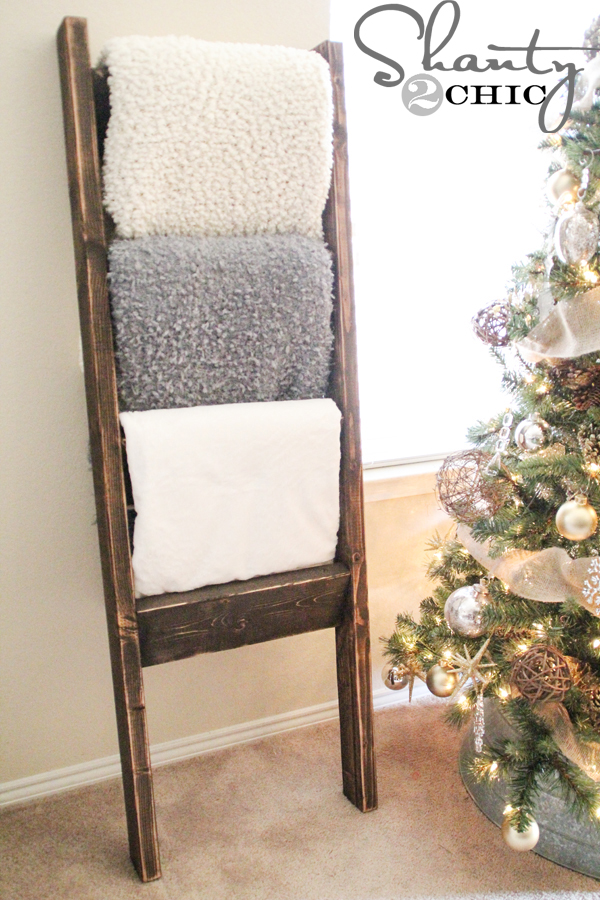
I love making my home feel comfortable but chic 😉 for the holidays, whether it be for my own family or our guests! I’ve seen a lot of ladders for blanket storage in the past but, I wanted a specific “shanty” look! My favorite part of this ladder is the 2×6’s! They give it a solid, chunky look! I’m totally in love with it 🙂 It was so easy to build and only cost me about $10!!!
CLICK HERE TO JUMP TO THE FREE PRINTABLE Easy DIY Blanket Ladder plansHere’s how I did it!
Table of Contents
How to Build a DIY Blanket Ladder
Supplies:
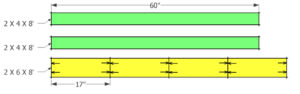
- 2 – 2x4x8 pine boards or framing lumber
- 1 2x6x8 pine boards or framing lumber
- 2 1/2″ pocket hole screws
- Wood Glue
- Finish of your choice
Tools:
- Miter Saw (or hand saw or circular saw)
- Drill
- Kreg Jig
Step 1: Make the Cuts
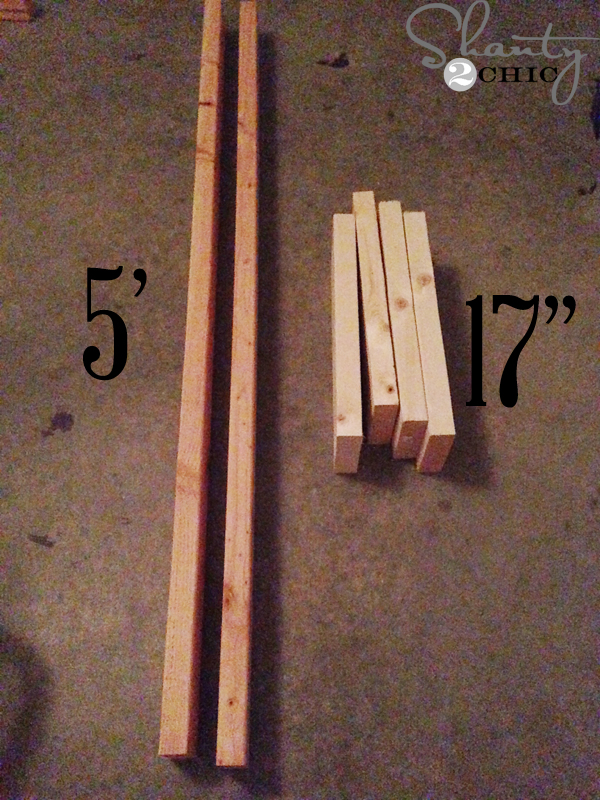
I cut two 2×4’s at 5′ long and 4 2×6 at 17″ long. I just made up my own measurements and I love how big and chunky the ladder is.
Step 2: Drill Pocket Holes in the Rungs
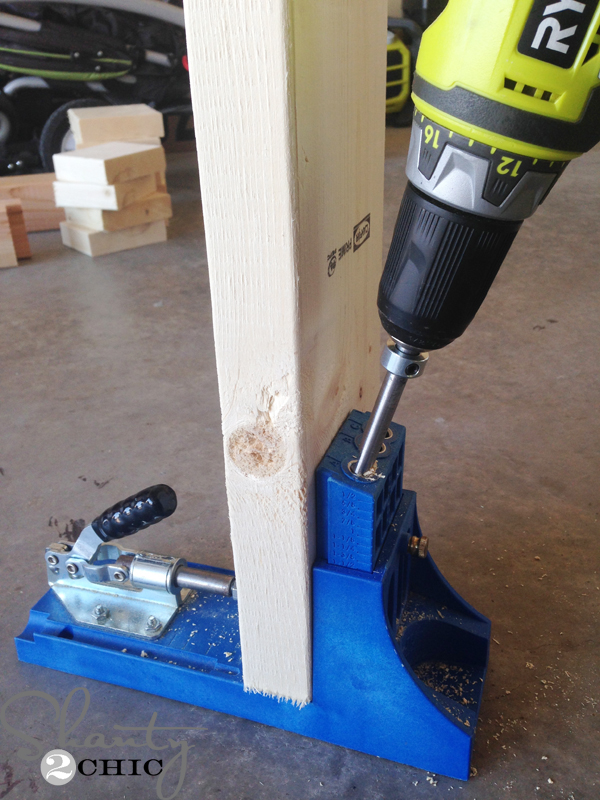
Next, I used my Kreg Jig to drill 1 1/2″ pocket holes into the ends of each 2×6. (You can find the Kreg Jig HERE on Amazon). If you do not own a Kreg Jig, you can pre drill from the sides of the 2×4’s into the 2×6’s and follow up with 2 1/2″ wood screws.
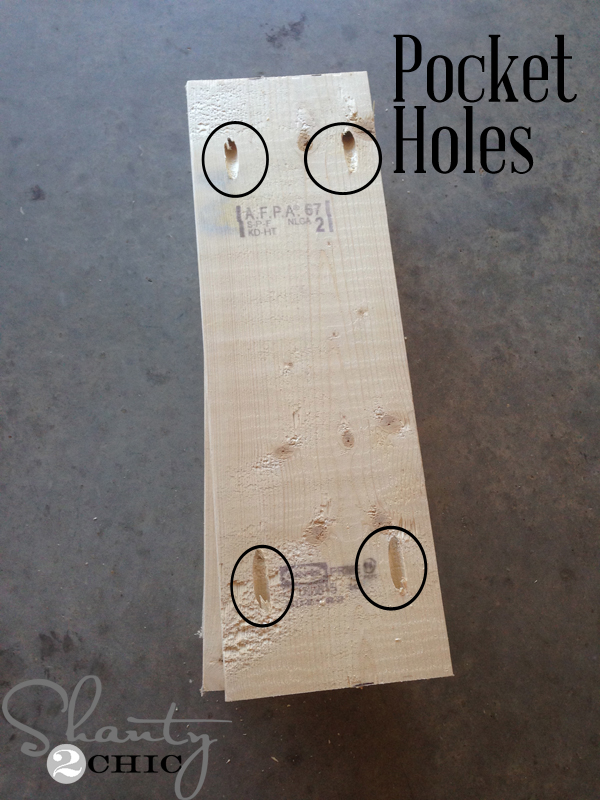
You can see that I circled where I drilled my Kreg pocket holes.
Step 3: Attach the Ladder Rungs

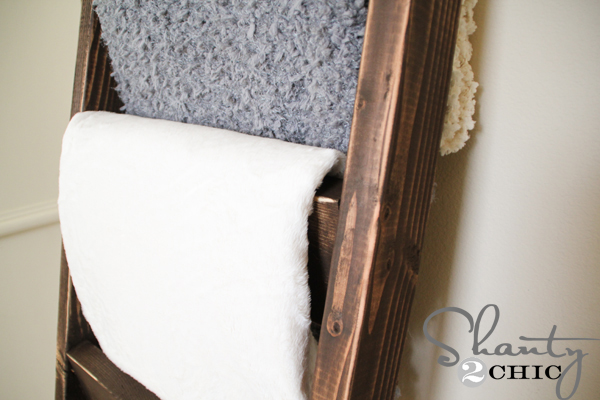
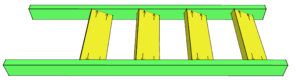
I set the 2×6 boards so that the front corner touched the front of the 2×4 and the back corner of the 2×6 touched the back of the 2×4. I placed the top rung 3″ from the top of the ladder and spaced the other rungs 12″ apart from each other. I measured from the front corner of each 2×6.
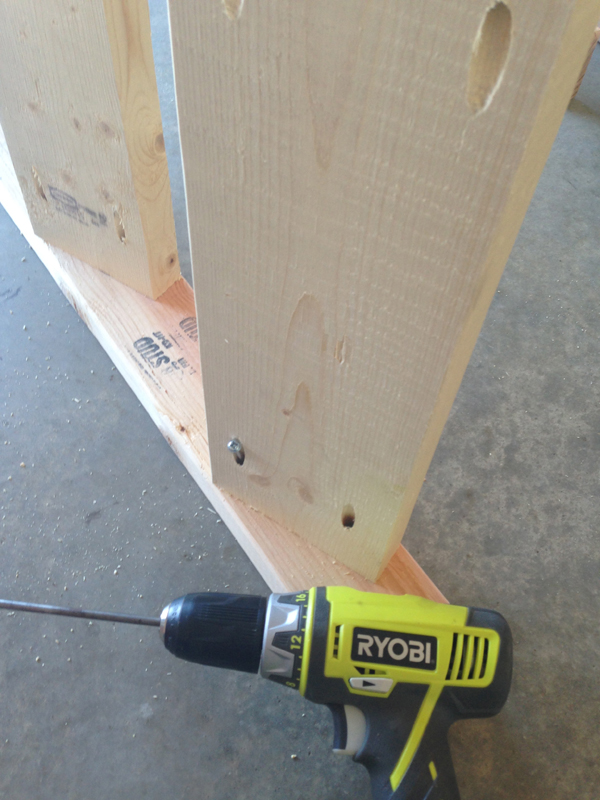
Make sure your Kreg pocket holes are facing the back. I used 2 1/2″ pocket hole screws to attach the 2×6 boards.
Next, just attach the other 2×4 to the other side of the 2×6’s the same way.
Step 4: Add a Finish
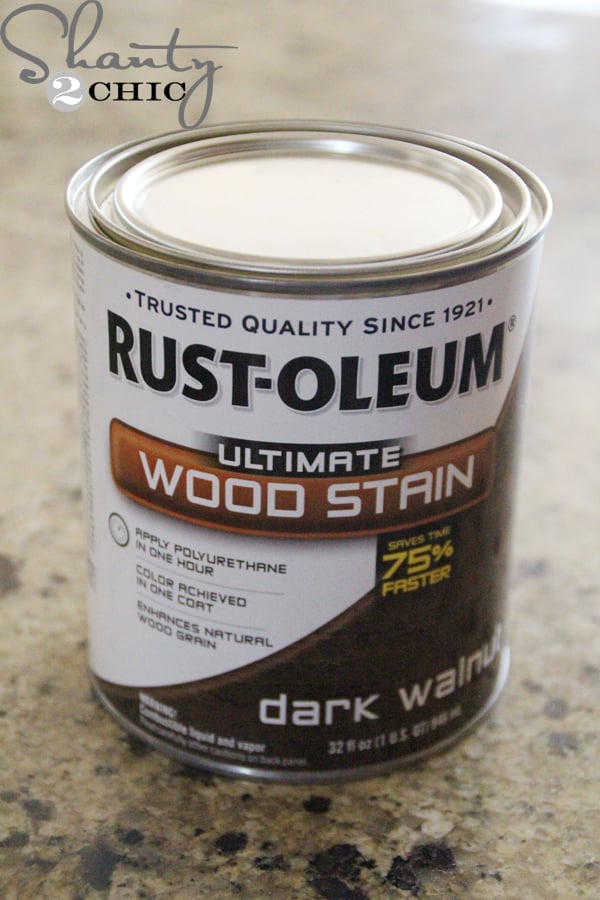
To finish this cutie off, I used applied one coat of my favorite stain, Rust-Oleum Dark Walnut, with a foam brush. Wait about 5 minutes and then blend the stain with a clean cloth.
- You can find the Dark Walnut stain HERE on Amazon
Step 5: Distressing the Finish
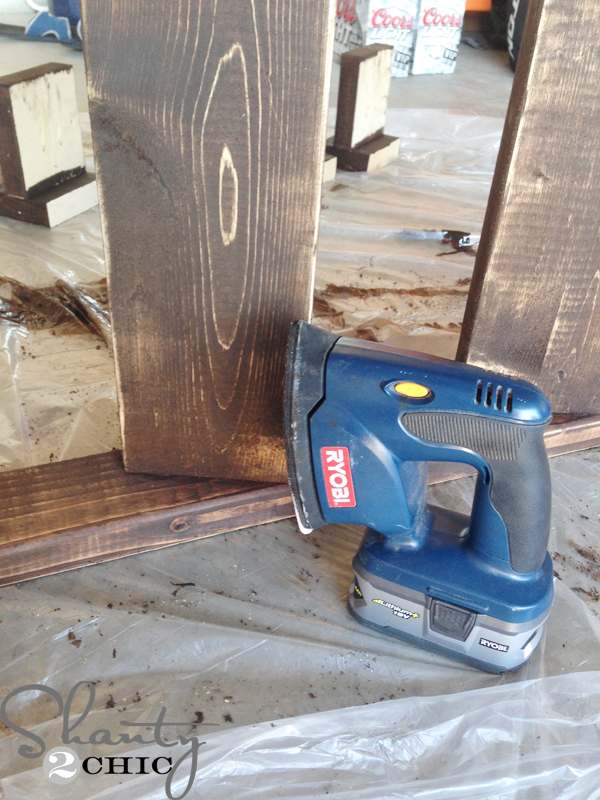
To give it the worn look that we love so much, I used my Ryobi Corner Cat Sander to distress the wood all over. This sander is perfect for sanding this piece because of all of the angles.
Once it was dry, I added a few cute and soft throw blankets!
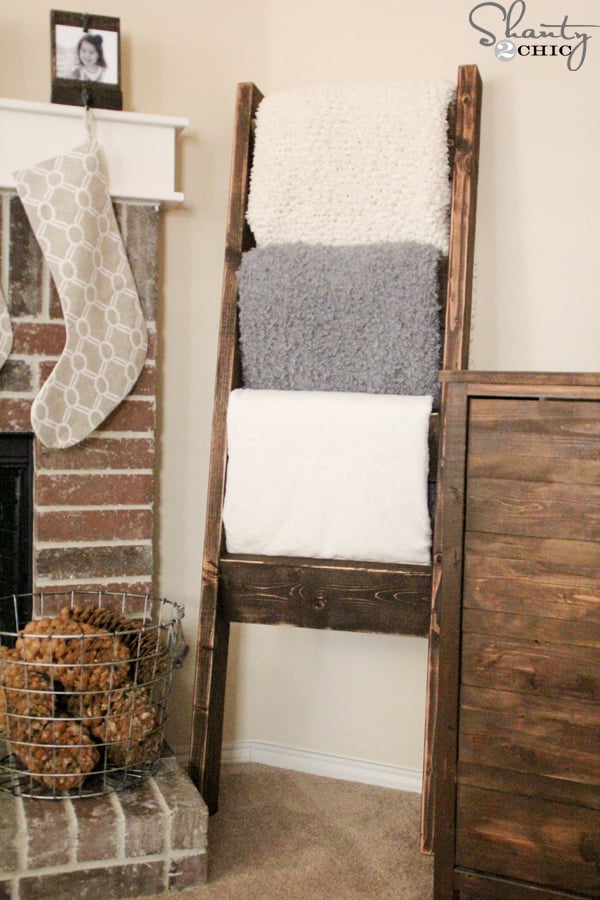
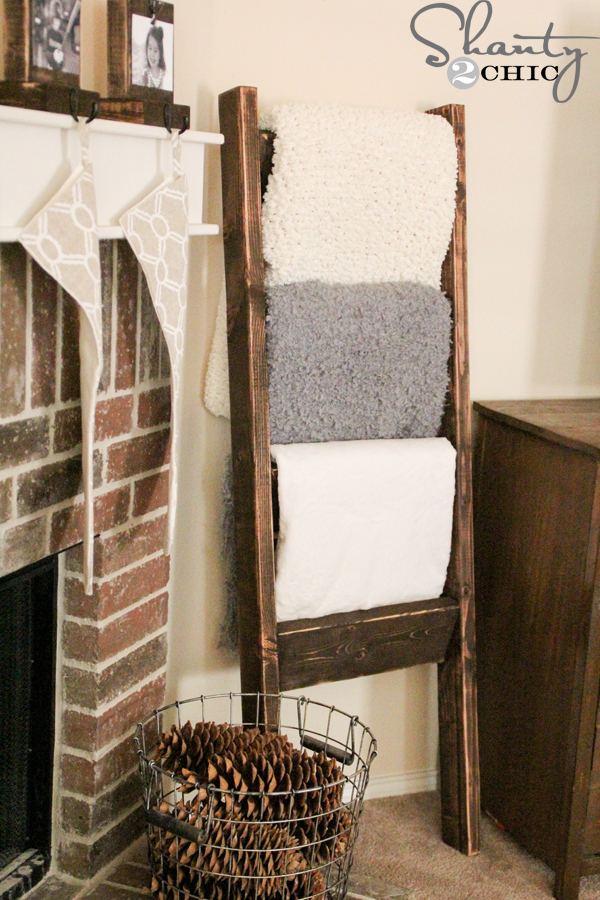
$15 Blanket Ladder
I can’t decide whereI love the form and function of this blanket ladder! It’s a beautiful way to store blankets and also serves as the perfect decor for any space! I think my next ladder might be for towel storage in the bathroom or outside by the pool.
I just love getting my home ready for Christmas! We have so much more to come over the next 11 days! This is just the beginning! We always appreciate your pins and shares 🙂
Check Out Our Other Free Blanket Ladder Plans!
- Barn Door Pull Blanket Ladder
- DIY Rustic Blanket Ladder for $7
- DIY Modern Blanket Ladder
- Blanket Ladder with Wood and Metal Pipe
Here are a few projects that we have recently done to help you get your home holiday ready!

Free Printable Merry Christmas Banner
Thanks so much for stopping by!!!
Happy Building!
DIY Blanket Ladder
Supply List
- 2 2x4x8 Pine or Whitewood Boards
- 1 2x6x8 Pine or Whitewood Boards
- 2 1/2″ Pocket Hole Screws
- Finish of Choice
Instructions
- Cut List

- Dill 1 1/2″ pocket holes into the 2×6 boards. Attach the 2×6 pieces to one of the 2×4 pieces according to the diagram. The top 2×6 piece is 3″ away from the top of the 2×4. The rest of the pieces are spaced 12″ apart measuring from the front most corner of each 2×6. They are angled so that the opposite corners are flush with the opposite sides of the 2×4 as shown.

- Attach the other 2×4 side in the same way. Sand and finish as you wish! Make sure to share your builds with us on social media and use #shanty2chic so we can share them too!


This is awesome. What sanding sheet grit do you recommend for distressing stain and/or painted wood?
I saw this ladder on Instagram and immediately fell in love
with it! I had to attempt to recreate it but add a little of my own style. I
built it with no problems. I wanted to give a fancy reveal to the sides of the
ladder. Initially, I was going to use a router but ended up getting a
decorative trim. I applied the trim with a nail gun. However, staining it
wasn’t as simple because I wanted the stain to match my hardwood floor. I must have tried about four different color stains. Than it dawned on me to mix two of the color and BAMM there it was the color I was looking for. After torching the wood to give it an antique look I began staining with the two colors stain (colonial maple and red oak). Since, it is a one shot deal with the stain I took the extra 2 by 4 I had to practice the technique I wanted to use on the ladder. Than i polyurethane and HERE IS MY FINISH PRODUCT:
(My next project will be the bathroom mirror storage case!
Whoop Whoop!)
If you don’t have a kreg jig, what size screws would you use? I would pre drill then use wood filler on the sides. Thoughts?
Yes, 2.5″ wood screws 🙂
OH But get a kreg jig its absolutley amazing
What was the total cost of your wood? Just trying to get an idea on how much this would cost to make
My guess would be around $10… hence, the “$10 Wooden Blanket Ladder.”
I was wondering where you got the top and middle blankets from?
All of he blankets are from Homegoods 🙂
I put this together for a quilt rack to show off some of my other handiwork. I completed it over one of Kentucky’s snowmegeddon days this winter.
I am in the process of making this……. My husband and I took great care to follow the plans to the T. Sadly, the 2&1/2″ pocket nails were far too long and we ended up drilling into our brand new worktop in the garage. We used 1&1/2″ nails in the end and these were perfect for the job. As the side planks of wood are only 1&1/2″ thickness, we cannot see how the 2&1/2 ” nails were on the plans. That said we are delighted with our finished product and looking forward to staining it. Shame about our ding in the worktop though – we were both gutted about that!
Sorry about that! If you are joining 2x boards the correct screw length is 2 1/2″. Maybe you didn’t have your Kreg jig set up to drill the correct depth of pocket hole?
My husband did that and he (being an engineer) is very meticulous. Maybe just bad luck and it is our first project. Not putting us off trying more and love love love your projects and plans. 🙂
I actually had this same issue on a few (I’m also an engineer), though it was my first time using the k5 kreg jig. I noticed I didn’t have that issue on all of them, so I’m chalking it up to user error. On the ones I did have this issue on, we trimmed the screw slightly and re-screwed it.
Figured it out! Excited to begin!!!
So today I set up my new Kreg Jig and decided to do some test pocket holes before I got started on the blanket ladder and I’m glad I did! I can’t seem to get my drill to drill into the wood the entire way. I double checked everything with the Kreg to make sure it was set up right and it is. I feel like my pushing hard enough with the drill…I’m kind of at a stand still. Is my drill a junker? Any suggestions?
I absolutely love this, and printed out the directions to show to my husband. One question- when you pull off a blanket, do you find that the ladder tips forward? I have 3 little girls and they would be pulling off blankets often. Thanks- such a clever and great looking idea!
I made one of these for my wife and i was wondering what is the angle that u cut the bottom of the legs to so that it has a clean look while leaned up against the wall.
Hi Tyler,
There are no angle cuts on the bottom of the ladder. You can add them if you like but if you have a smooth floor, like wood, it may slip.
Or you can add soft non slip pads on the bottom, that also works wonders
love this!!! Where did you get the blankets??? they look soo comfy!!!!!
Yay, just made my first one this weekend!
do you find that the ladder slips at all? i want to make one for my livingroom but we have hardwood floors and i worry the weight of the blankets will make it slip forward. any suggestions?
Hey Jessica!
I have had mine on wood floors and it hasn’t slipped. If you are worried you could put rubber pads under the legs:)
where did you get basket with pinecones and yes!im copying your house style:)
Lol! Go for it 🙂 basket is from Homegoods and the pine comes are from Hobby Lobby 🙂