My master bathroom remodel has been a project that has been a long time coming! I have not done anything to my master bathroom since I built my home in 2013. It was almost floor to ceiling beige travertine, oil-rubbed bronze faucets and the layout was super tight to get into the shower. To top it off, I opted to have an electric shower installed in this bathroom when I built my home but realized shortly after moving in, that this was a horrible idea.
Table of Contents
Why did I Need a Bathroom Renovation?
Within the first year, the shower was already having issues with the power cord and would just shut itself off. When this happened, I would have to climb into the attic, above the shower, and shut it down for 48 hours to do a hard reset. This happened randomly but became more frequent as the years went on. I had many professionals out to give me their opinions on a “fix” but the only options were to either run a conduit strip on the outside of my home or tear the wall out completely and replace it. I had already decided that I was never getting an electric shower again, so I put off the renovation until I felt I had the budget for a full renovation.
What Prompted the Bathroom Remodel?
In January, I decided to sell my home and downsize AND at the same time, my shower finally quit working all together. So, this sped the renovation up quite a bit because I didn’t want to put my home on the market with a non-working master bathroom shower! I reached out to a contractor that had done a great job on a renovation for a family friend and hired him to do the entire project. If you are local and want his contact information, just send us an email and I’ll send it over 🙂 I ordered the materials I wanted for the finish-out and he picked them up for me. Providing your own materials is a great way to save on your renovation budget!
I’m so happy with the way my bathroom turned out and I’ve been dying to share it with you all!
Master Bathroom Renovation
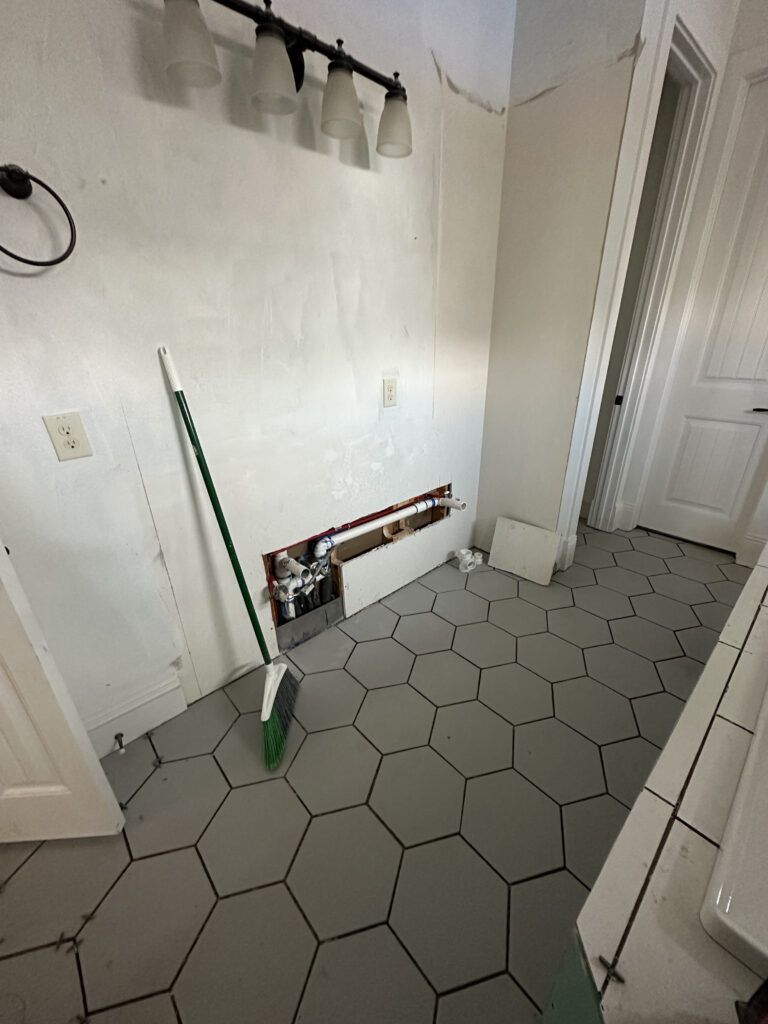
The Before

Here she is right before demo. I was so excited just to see the travertine and granite go! You can see to the right of the tub that there isn’t very much space to walk into the shower, with the vanity on that wall. I decided to fix that with the renovation by getting rid of the vanity on the right and installing a double vanity where the other one is. This wasn’t a huge added cost in the renovation because he could tap into the plumbing that was already on the wall.

Here it is from the other side of the tub. This walk way is much wider than the other. I debated a free standing tub to fix the layout issue but I would have had to pay to have the concrete chipped up to accommodate a new drain. If I weren’t selling the home, I would have splurged on a free-standing tub but it wasn’t worth the extra cost since I was moving.

I LOVE this shower! It’s so big, comfy and easy to clean, all it needed was a little makeover 🙂
Selecting the Finish Out Pieces

I found all of the tile and grout from Floor & Decor. This isn’t a sponsored post, I just like their prices and variety of styles.

For the shower walls, I decided on Iceland White 12″x24″ subway tile, run vertically. I also used this tile on the top of the tub deck.

For the bathroom floor, I chose this Opal Gray Hex. It has a matte finish so it’s a great option for floors.

This small Dove Gray hex was my favorite section by far! I put it on the shower floor.

Basic white penny tile was the winner for the tub surround.


My grout choice was Silver grout for the grout lines on all of the tile, except for the penny tile. I went with Avalanche for the penny tile.
Renovation Process
Demo

Demo was loud but super quick! I loved that the contractors cleaned the mess at the end of every work day!

The vanities didn’t come out for a while but you can see how the vanity on the right closes off the shower entry.
Rebuilding the Master Bathroom
Tile

Looking good!
Trim

I love the big subway tile running vertical on the shower walls!

I opted for the Schluter Edge Trim instead of bullnose tile. This is also available at Floor & Decor. I think it gives it a clean modern look. My first option was white trim but it was on backorder so I chose the black and have zero regrets!

The contrast of the small gray hex with the white subway tiles is perfect and let’s talk about those rain shower heads and the sprayers! I found a GREAT price on them and the quality is AMAZING!
Garden Bathtub

Here’s a picture of the tub deck with the large subway tiles and the penny tile on the backsplash. I did splurge on the roman tub faucet. It’s so pretty and it was worth the splurge.
They compliment the larger hex tiles on the floor too!

The garden tub skirt started out as my nemesis but it quickly became my favorite update! Switching it out to a free-standing tub was my first preference but it would have put me way over my budget. Since I was putting my home on the market, I decided it wasn’t worth the splurge. Tonge and groove slats with an exterior paint was a great way to get a beautiful look and stay under budget. The tub isn’t used that much and when it is, it’s not a splash zone. This helped break up the tile and I LOVE how it turned out!

I had them paint the tub skirt planks Tricorn Black by Sherwin Williams and decided to have the window trim in the shower painted to match!

The final step was to install the new double vanity! This was also a spot I chose to save on budget. The cost of countertops and custom cabinets is super pricey. I found this cute double vanity, with the countertop and sinks included, plus free shipping from Wayfair! It was under $1,700 after tax and it shipped fully assembled and the delivery guy rolled it into my garage! I was really impressed with the countertop, the color and the quality of the whole vanity. It saved me a ton of money!!
The Reveal

I could not love my new bathroom more! I think the tongue and groove planks, painted black, made the entire space!

There’s so much more walking space, along that wall now, into the shower!


- Find the Mirrors HERE
- Find the Faucets HERE
- Find the Lights HERE
- Find the Hand Towels HERE
- Find the Double Vanity HERE

I’m happy to say that my home sold in just 8 days! I’m so excited for my little family to move to our new home. We downsized a bit, moved an hour away – outside city limits, new school for my daughter (she’s so excited), and a little more land for privacy! I can’t wait to show you guys my new home and start decorating and building new furniture for it!
Happy Building!
Ashley
Check Out Some of Our Other Bathroom Remodels

Modern Farmhouse Bathroom Renovation


This master bathroom remodel looks fantastic—great balance between aesthetics and practical functionality. The cabinetry, layout, and finishes all come together really well. In spaces like this, especially with constant moisture exposure, the choice of core materials and proper sealing plays a big role in long-term durability. Using well-engineered, moisture-resistant boards can help maintain structural integrity over time. We’ve come across useful material insights on platforms like https://plywoodbazar.com/
for similar interior and cabinetry applications. Beautifully executed renovation!
The article gives a broad review without being too much for the reader
I wish I had known this sooner because it helped me a lot with my travel
Various professionals were consulted to find a solution, but the options presented were either running a conduit strip on the outside of the home or tearing the wall out completely and replacing it. The author had already made the decision to avoid electric showers in the future due to the ongoing issues. As a result, they postponed the renovation until they could afford a complete renovation.
I really like this bathroom model, thanks.