Building a DIY loft bed is the perfect way to save space, create a study nook, and give kids a fun sleeping area. In this tutorial, I’ll show you step by step how to build a loft bed with free plans and a full how-to tutorial.

I belive this DIY Loft bed is the fourth bed that I’ve built for my 9-year-old daughter! She asked to move to my oldest son’s room and she specifically asked for a Loft Bed with a desk underneath. With the new remote learning going on, I thought it was a great opportunity to get her excited for learning at home! So, I got busy designing and building! This is a massive project but it’s an easy build! I have broken it up into two parts. Today I’m sharing part one and will guide you through until the frame assembly! Watch the video below for Part 1!
Table of Contents
Why Build a DIY Loft Bed?
A loft bed is a great space-saving piece of furniture because it can combine multiple pieces into one design. It’s also customizable to fit your storage and space needs. You can combine a full-size bed with a desk and set of drawers, one full-size bed with a twin bed underneath with a desk or set of drawers or a bed over two desks or two sets of drawers. The possibilities are endless and it’s a great piece for remote learning, sharing a room, adding more space to kids/teens room and it looks great!
DIY Loft Bed Plans (Free Printable + How-to Tutorial)
This loft bed is a huge piece of furniture but the price is amazing! I spent about $300 on all of the lumber and essentially go three pieces of furniture in one! A desk, set of shelves and a bed!
Click HERE to jump to the free printable plans!You can find Part 2 of this DIY Loft Bed build HERE!
So, let’s get to building!
How to Build a DIY Loft Bed (Step-by-Step Guide)
Tools Needed for a Loft Bed Project
Materials & Lumber List
- 4 – 2x10x8 Framing Lumber
- 14 – 2x4x8 Framing Lumber
- 11 – 2x2x8 Framing Lumber (I ripped from 2×4’s)
- 12 – 1x4x8 Pine or Common Boards
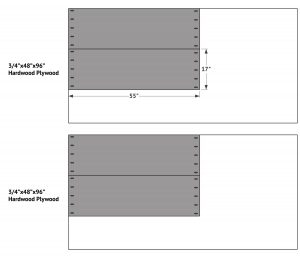
- 2 – 3/4″x48″x96″ Hardwood Plywood (I used Birch)
- 1 1/4″ Pocket Hole Screws
- 2 1/2″ Pocket Hole Screws
- 1 1/4″ Brad Nails
- 3″ Wood Screws
- 1 1/4″ Wood Screws
- Wood Glue
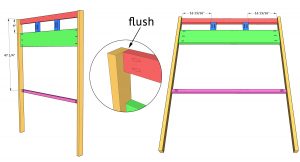
Step 1 – Build the Front and Back Loft Bed Assemblies
Cut and Prep Lumber
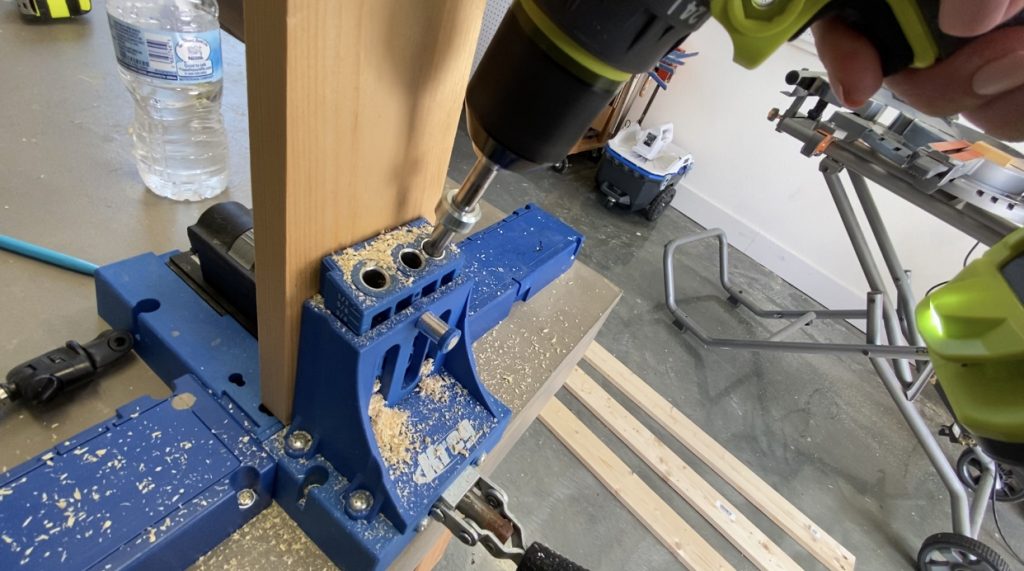
Cut the back assembly pieces to size and drill 1 1/2″ pocket holes according to the cut list.
Assemble the Side Rails

Attach the pieces together with 2 1/2″ pocket hole screws and wood glue. Note the 2×10 board should have pocket holes facing the back.
Cut the front assembly pieces to size and drill 1 1/2″ pocket holes according to the cut list. Attach the pieces together with 2 1/2″ pocket hole screws and wood glue.
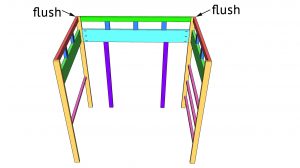
Step 2 – Build the Loft Bed Side Assemblies
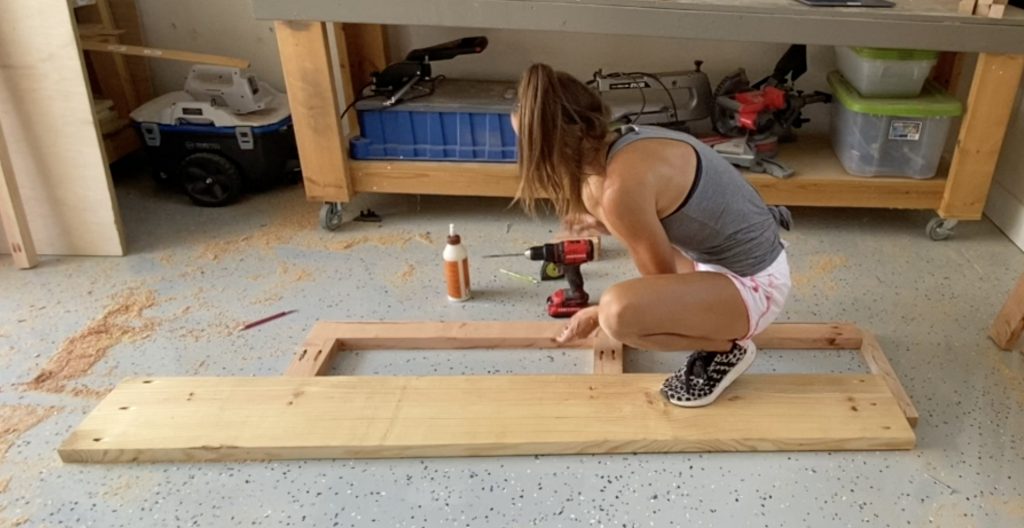
Measure and Cut Shelf Side Pieces

Cut the shelf side assembly to size and drill 1 1/2″ pocket holes according to the cut list. Attach the pieces together with 2 1/2″ pocket hole screws and wood glue. The outside of the horizontal pieces should be flush with the outside edges of the legs.
Build the Desk Side of the Loft Bed

Cut the desk side assembly pieces to size and drill 1 1/2″ pocket holes according to the cut list. Attach the pieces together with 2 1/2″ pocket hole screws and wood glue. The outside of the horizontal pieces should be flush with the outside of the legs.
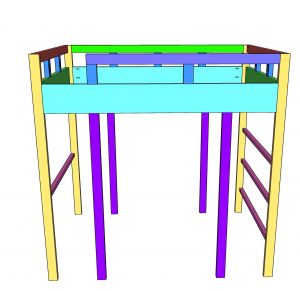
Step 3 – Assemble the Loft Bed Frame
Attaching the Back of the Bed to the Wall

I installed a scrap 2×4 board to the studs behind the wall to accommodate for the thickness of my baseboards.

Attach the back assembly to the studs behind the wall with 3″ wood screws.
Connect Front, Back, and Side Panels

Attach the side assemblies to the back assembly with 2 1/2″ pocket hole screws and wood glue.
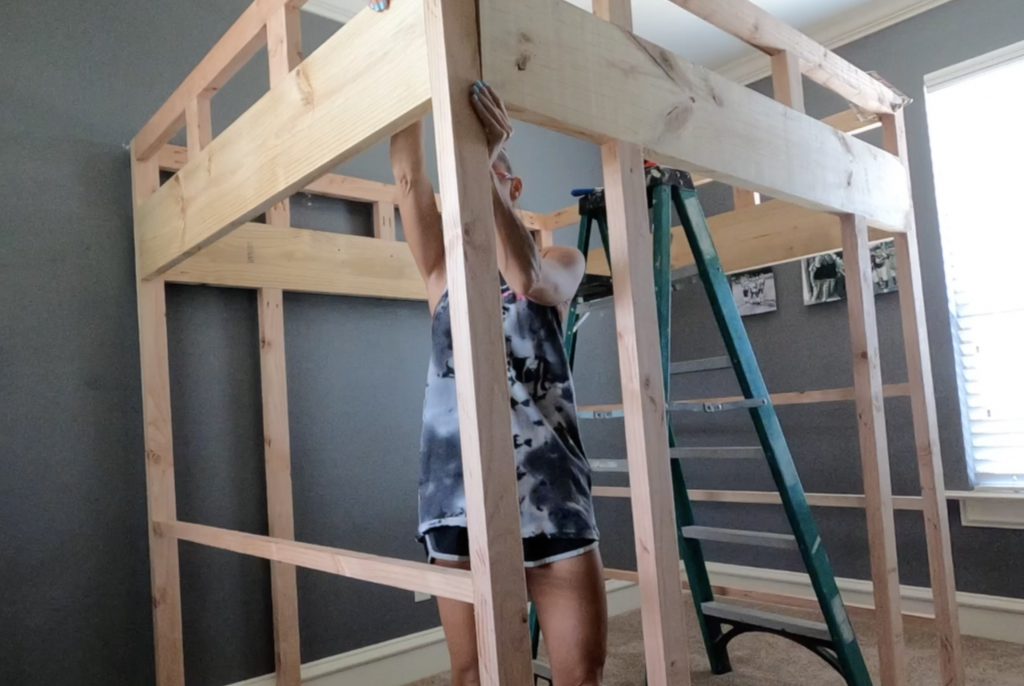
Attach the front assembly to the side assemblies with 2 1/2″ pocket hole screws and wood glue.
Your loft bed should look like this now!

I’ll be back with the second half of this Loft Bed soon! Make sure to share your builds with us on social media and use #shanty2chic so we can share them too!
DIY Loft Bed FAQs
This DIY Loft bed cost about $300 in lumber which is far less than what you would pay retail. The cost of building depends on the materials used and the prices of lumber in your area. You can use our shopping list to get an exact price that it would cost for you to build.
I designed this loft bed for a full-size mattress but you can modify the plans to fit a twin, queen or king size mattress.
Absolutely! This bed is built with framing lumber and strong pocket hole joints as well as being anchored into the studs behind the wall. It is sturdy enough for adults and kids!
You can modify this bed with any combination that fits your specific needs. Modify the plans to accommodate a twin bed underneath by removing either the desk or the shelves. You can modify to have a set of drawers, two sets of drawers or even two desks.
Download the Free DIY Loft Bed Plans

DIY Loft Bed Part 1
Tools
- Miter Saw
- Drill
- Kreg Jig
- Table Saw (optional)
- Brad Nailer
- Sander
Supply List
- 4 2x10x8
- 14 2x4x8
- 11 2x2x8
- 12 1x4x8
- 2 3/4×48"x96" Hardwood Plywood
- 1 1/4" Pocket Hole Screws
- 2 1/2" Pocket Hold Screws
- 1 1/4" Brad Nails
- 3" Wood Screws
- 1 1/4" Wood Screws
- Wood Glue
Instructions
Cut List
- Cut List 1

- Cut List 2

- Cut List 3

- Cut List 4


Front and Back Assemblies
- Step 1 – Cut the back assembly pieces to size and drill 1 1/2″ pocket holes according to the cut list.

- Step 2 – Cut the front assembly pieces to size and drill 1 1/2″ pocket holes according to the cut list. Attach the pieces together with 2 1/2″ pocket hole screws and wood glue.


Side Assemblies
- Step 1 – Cut the shelf side assembly to size and drill 1 1/2" pocket holes according to the cut list. Attach the pieces together with 2 1/2" pocket hole screws and wood glue. The outside of the horizontal pieces should be flush with the outside edges of the legs.

- Step 2 – Cut the desk side assembly pieces to size and drill 1 1/2″ pocket holes according to the cut list. Attach the pieces together with 2 1/2″ pocket hole screws and wood glue. The outside of the horizontal pieces should be flush with the outside of the legs.


Building the Loft Bed Frame
- Step 1 – Attach the back assembly to the studs behind the wall with 3″ wood screws. Attach the side assemblies to the back assembly with 2 1/2" pocket hole screws and wood glue.

- Step 2 – Attach the front assembly to the side assemblies with 2 1/2" pocket hole screws and wood glue.

- I’ll be back with the second half of this Loft Bed soon! Make sure to share your builds with us on social media and use #shanty2chic so we can share them too!Happy Building!


I can’t find the part two plans to print off. It just prints the part one plan.
Great build! I think i am going to build this for my daughter. Did you rip all the 2x4s to 3 inches to clean up the edges? You mention it in one section but it wasn’t clear if this was for all 2x4s in the project
This is the best loft DIY example. Thank you for providing the plans. Highly appreciated.
Hi! I’m in the process of building this loft for my daughter, but I am hoping to get the printed version of part 2. When I click the link, it just opens the Part 1 plans a second time. Can you help me? My kiddo is so excited.
Thanks!
Andrea
Any idea what the weight capacity of this bed is?
Is it possible to get plans for this but in twin size??
Both links are for part 1, can you please correct part 2’s plans.
Are there plans for part 1? The comments indicate that they are missing and assuming you are aware of it. How do I get them?
Nice work btw. The details and step by step are best I have found.
Is there a printable of part 1. When you click for the printable it gives the cut list but then only part two plans. We have all the lumber and our daughter is so excited for the build! Thanks so much for creating something so great for pandemic school!
Are there plans for Part 1 of the build? The plans listed above are for the desk and the shelves and the downloadable plans have the materials and cut list for Part 1 but do not include instructions for how to assemble the initial build such as how far down to place the 2×10 on the legs. I know it explains certain parts in the video but it would be great to have the written version as support. Thank you so much for providing these plans I am super excited to try this for my daughter who wanted an expensive PB loft bed as well.
Thank you for updating the plans! So excited to try this out. 🙂
This is great! What size bed is this for?
Full Size
This is the best loft DIY example. Thank you for providing the plans. Is this a full size or queen size?
Fantastic job showing all the details here. Best I’ve seen!!
I can’t download your complet free plans for the loft bed(cut list and drawerings).
This this has happened once before. I have access to only page 1 of the plan lists.
I have been signed up for your list for 5+ years.
Have you had ice cream delights from Beth Marie’s Ice Cream parlor?
This Loft bed is gorgeous. How would I scale it up to a queen? My daughter is wanting a loft bed, but we have a queen size mattress.
I’ve been searching for a loft for my daughter and this one is perfect! Is there a way to scale down for twin? Also, can the ladder be installed on the other side?
hey girl hey, this is awesome!!! do you have to have plans or know of some frat plans to have a slide? of course a lowe version of this