Table of Contents
Free DIY Platform Bed Plans (Beginner-Friendly Design)
Learn how to build a DIY Platform Bed with free woodworking plans! This is a great build for beginners, you only need 3 basic tools and about $50 in lumber.
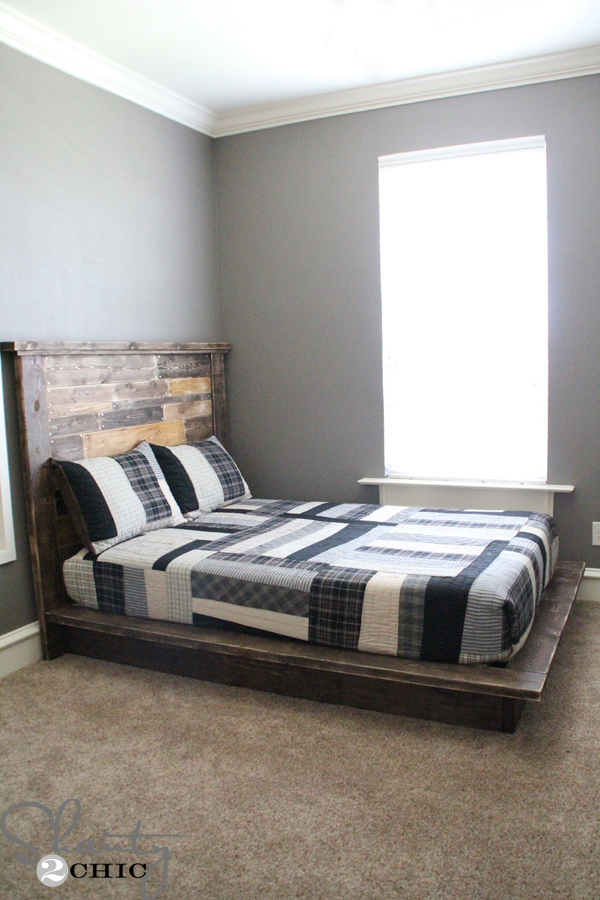
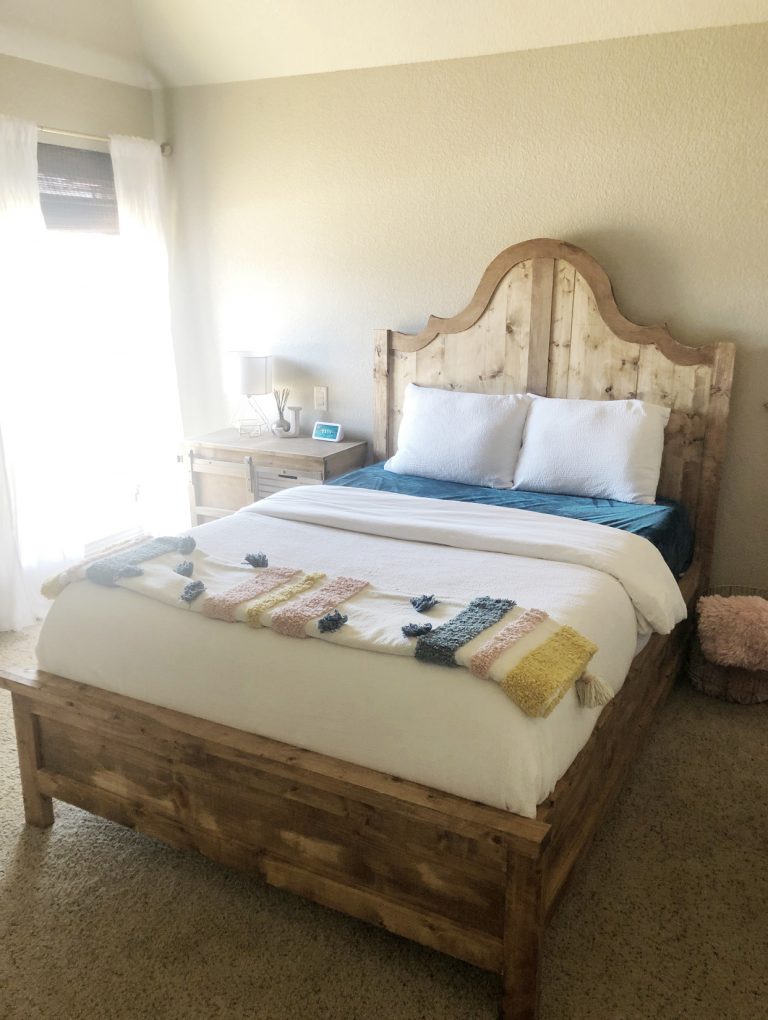
I’m back to share the Easy DIY Platform Bed that I made for my son 🙂 If you missed the Free Plans for the Planked Headboard, go check them out! I saw a platform bed in a West Elm catalog and loved how chunky the base and platform were, so that was my inspiration and I built it for about $55!!!
CLICK HERE TO JUMP TO THE FREE Platform Bed PlansThis is a very simple build so it is perfect if you are a beginner! You can follow along in the instructions below! This plan is for a full size bed but it is very easy to adjust the measurements to accommodate another size 🙂
Materials and Lumber Cut List
Supplies You’ll Need
- 8 – 1x3x10 Furring Strips for Slats
- 1 – 2x8x10 Pine Boards or Common Boards
- 2 – 2x8x8 Framing Boards
- 3 – 2x6x8 Framing Boards
- 1 – 2x4x8 Framing Boards
- 3 – 2x2x8 Pine Boards or Common Boards (I ripped from 2×4’s)
- 2 1/2″ Pocket Hole Screws
- 1 1/4″ Screws (to attach the slats if you don’t use a brad nailer)
- 2 1/2″ Wood Screws
- Wood Glue
Tools Required
- Miter Saw
- Drill
- Kreg Jig
- Sander
- Brad Nailer (optional)
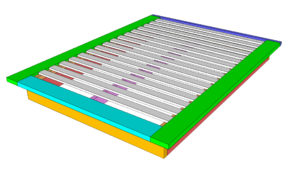
How to Build a DIY Platform Bed Frame
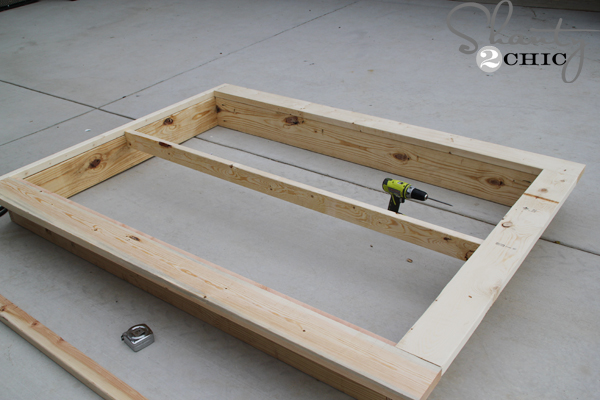
Step 1 – Assemble the Bed Frame Base
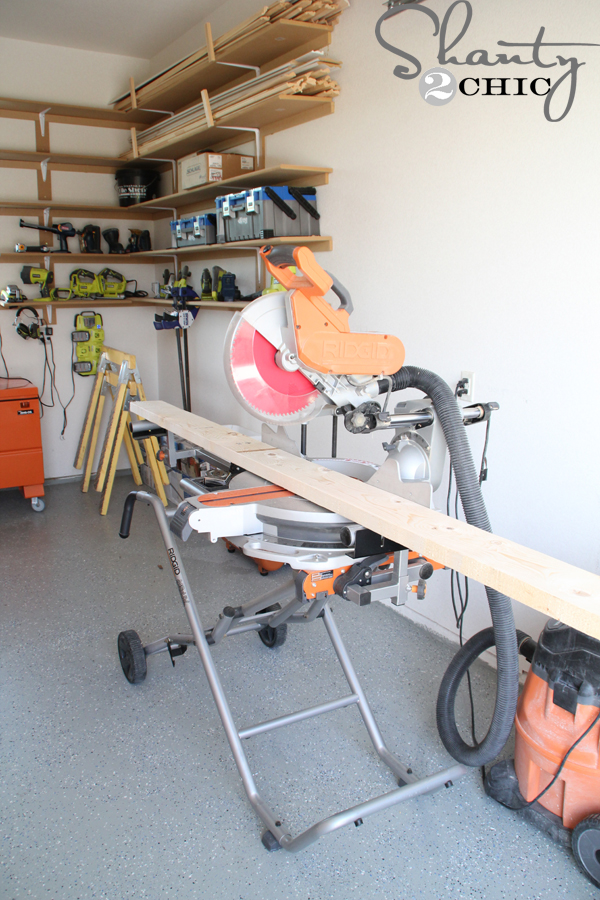
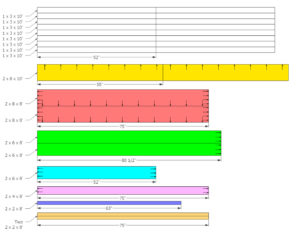
I started by making all of my cuts for my top and bottom frame. You can find the cut list diagrams in the fee plans. Watch our How to Use a Miter Saw video HERE!
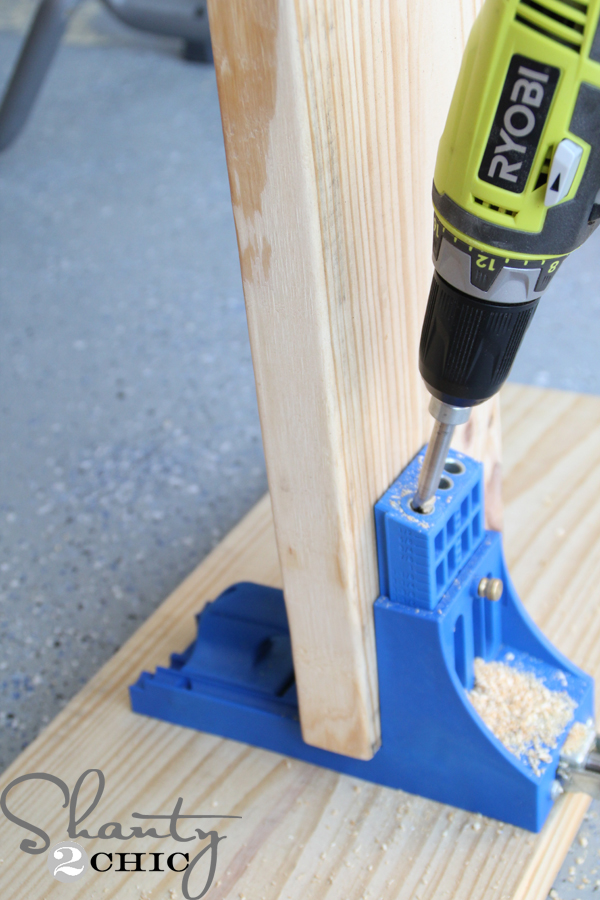
Then, I drilled all of my pocket holes with my Kreg Jig pocket hole jig set for 1 1/2″ thick boards. (You can find the Kreg Jig HERE on Amazon) and check out our How to Use a Kreg Jig Video HERE!
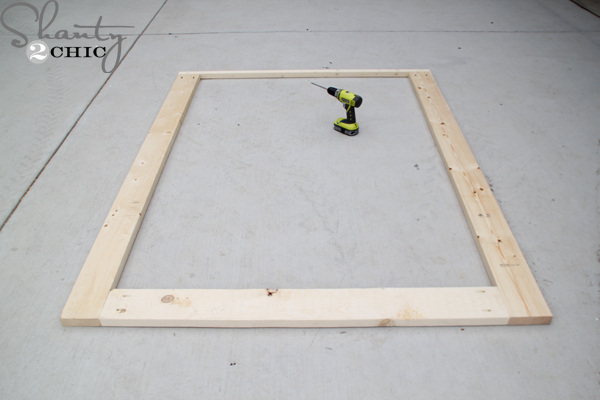
I attached the top frame with 2 1/2″ pocket hole screws and wood glue.

I followed up and did the same for the bottom frame.

Next, I flipped the top frame over and attached the bottom frame to the side rails with 2 1/2″ wood screws and wood glue.
Step 2 – Attach the Bed Frame Supports
I flipped it back over and attached the center support with 2 1/2″ pocket hole screws to the headboard and footboard. You may need help flipping the bed back over, at this point, because it is heavy.
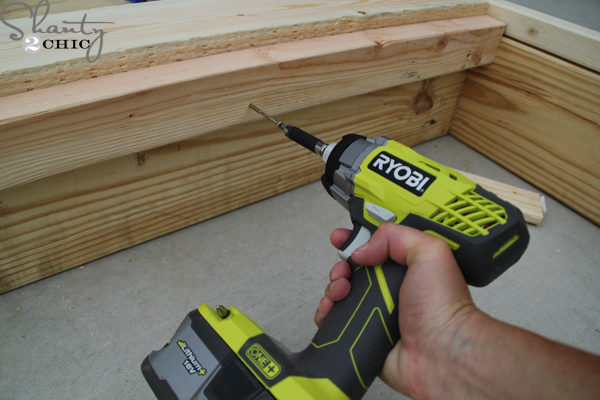
Finally, I attached the 2×3 cleats, to the sides of the bed, with 2 1/2″ wood screws (I call for 2×2 in the plans because 2×3’s are not available in every region. If you do use 2×2’s for the cleats, get furring strips to save money). I like to use the Spax self-tapping screws. I find them at Home Depot and they are pricey but you don’t need to pre-drill with them! If you use regular wood screws, make sure to pre-drill first to prevent the wood from splitting.
Step 3 – Sanding and Finishing the Wood
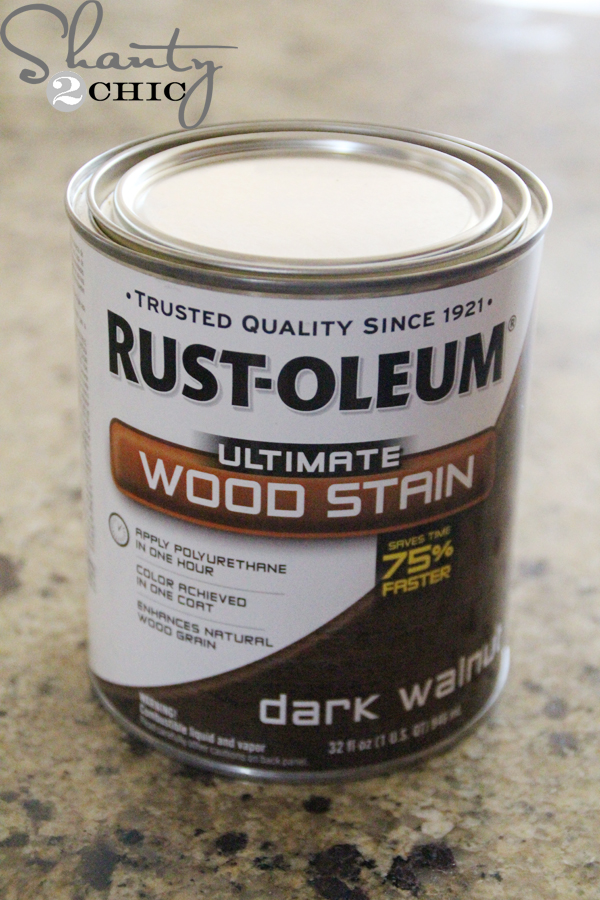
After sanding the entire Platform Bed down, I applied one-coat of Rust-Oleum Dark Walnut Stain (you can find it HERE on Amazon). If you are buying your supplies at Home Depot, get the Varathane brand in Dark Walnut (it’s the same stain).
Step 4 – Install the Mattress Slats
When the bed was dry, I took it inside and into my little man’s room! I used my brad nailer, with 1 1/4″ brad nails to attach the 1×3 slats. I just spaced them out evenly and attached them to both cleats and the center support. You can use the cheap furring strips (douglas fir) for this part, Just make sure they are smooth so they don’t tear-up your mattress. Note: you can also use 1 1/4″ wood screws to attach the bed slats.
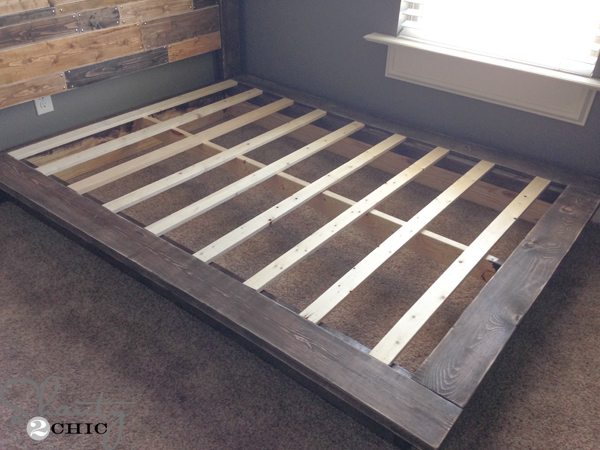
Step 5 – Attach the DIY Headboard
To attach the headboard to the bed, I drilled 2 1/2″ spax screws from the backside of the headboard legs into the bottom and top frames of the platform.
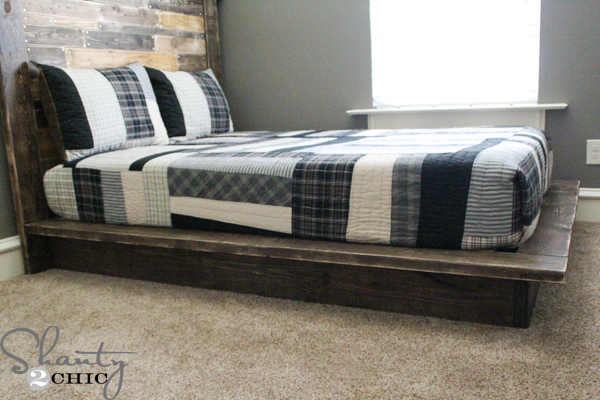
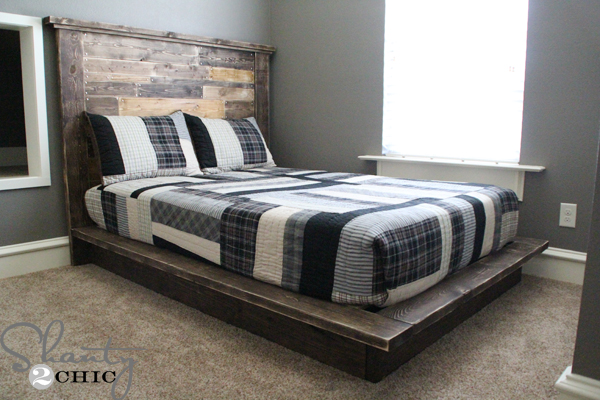
I just love this DIY Platform Bed so much! It’s the perfect combination of rustic and modern farmhouse and it’s so sturdy! I know my son loves it just as much. I’ve overheard him bragging to his friends (on a few occasions) that his mom built his bed – which is the best part for me 😉
Don’t forget to check out the headboard plans and if you like the wall color in his room (I’m obsessed!) you can read about it my wall color choices! I have received a lot of questions about the quilt on his bed, it is from Pottery Barn Teen but, I bought it a couple of years ago so I’m not sure that it is still available.
Modification Options and Measurements
We always get questions on how to modify the measurments to fit other mattress dimensions. This DIY Bed Frame is easy to modify to fit any mattress size.
- Twin Size Mattress – Subtract 15″ from the width.
- Queen Size Mattress – Add 7″ to the width and 5″ to the length
- King Size Mattress – Add 23″ to the width and 5″ to the length.
- California King Size Mattress – Add 19″ to the width and 9″ to the length.
DIY Platform Bed FAQs
How much does it cost to build a platform bed?
The cost to build a platform bed can vary by design, materials used and current lumber prices. We typically build with framing lumber, like this platform bed design. We always share our supply list which makes it very easy to research the current lumber prices in your area to get an exact price on the cost to build your bed.
What size mattress fits this DIY bed frame?
This bed frame was designed and built to fit a full-size mattress but you can always modify the dimensions to fit your mattress.
Can I build a platform bed without a headboard?
You absolutely can! We shared these platform bed plans separate from the headboard plans because it can stand alone without a headboard or, you can mix and match the platform bed plans with a different headboard design.
Is this bed sturdy enough without a box spring?
This bed is incredibly sturdy and no box spring needed! The cleats offer the support for the mattress slats. You can make the bed frame even more sturdy with short support blocks installed underneath the slats. This is highly recommended for mattresses larger than a full-size. Using the slats verse a box spring is a good option to save money and allows for a lower profile, more modern looking bed.
More DIY Bed Frame Plans You’ll Love
- DIY Modern Farmhouse Platform Bed
- Free Platform Bed Plan with Headboard
- DIY Twin Platform Bed with Chevron Headboard
- Platform Bed on Wheels
- How to Build a Platform Bed with Storage
Free Printable DIY Platform Bed Plans
Tools
- Miter Saw
- Kreg Jig
- Drill
- Sander
- Brad Nailer
Supply List
- 8 1x3x10
- 1 2x8x10
- 2 2x8x8
- 3 2x6x8
- 1 2x4x8
- 3 2x2x8
- 2 1/2″ Pocket Hole Screws
- 2 1/2″ Wood Screws
- Wood Glue
- Finish of Choice
Instructions
- Cut List

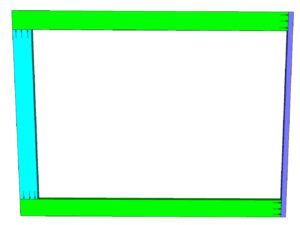
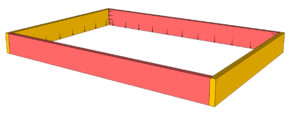
- Assemble the bed upside down. Start with the top frame. Use glue and 2 1/2″ pocket hole screws at each connection.

- Assemble the lower frame. Make sure the edge pocket holes are facing the same direction.

- Lay the top frame on the floor with the pocket holes facing up and stack the lower frame on top. Secure them together with pocket hole screws.

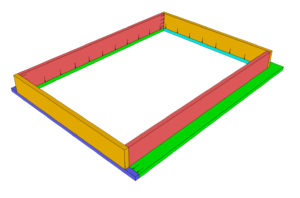
- Attach the 2×2 cleats to the sides and the center 2×4 support in the middle. The 2×2 cleats are just screwed into the bed frame with wood screws and the 2×4 support is secured with pocket hole screws on each end. All three of these pieces should be 3/4″ lower than the top of the top frame.

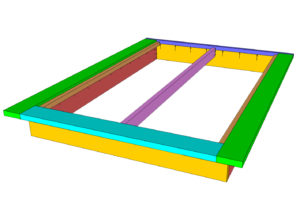
- Add your slats and the construction is done! Now, all you have to do is sand and finish as you wish and enjoy your new platform bed. This platform bed was made for a previous headboard that I also made. Search our site for “Planked Headboard” to see it. As always, if you decide to make this bed be sure share it on social media and use #shanty2chic so we can share it too!


Looks like a great idea/plan. What would everyone recommend – With or without the headboard? If I build the bed first, would it be difficult to add the headboard later? 2017 resolution, dive head first into my passion for woodworking projects. Thanks!
Would this fit a 54” W x 75” L mattress?
Thanks. I was looking for some simple platform ideas and this is exactly what I had in mind. I’d like to pass along some advice however that can save people a great deal of time and money in doing this.
First off, I’d stay away from pocket holes except the cap – and even then you don’t need to use them at all. Pocket holes have very weak shear strength. It’s fine for small cabinets, bookshelves, tables, etc. but for big heavy things like bed frames – and the mattress, and the blankets, and the people on them – not so much. And even here you used them incorrectly on the bottom part of the frame as you have them on the inside. That means the screws are heading into the end of the other boards, which is the weakest part and most likely to break under load. You should always be screwing towards the center of the board, never the outside/end. Seeing as you were staining it you wouldn’t even notice the filled and sanded holes afterward. The other major downside is Kreg jigs aren’t cheap so unless you plan on doing a lot of pocket holes in other things it’s a waste of money.
A lof ot people will tell you that just screwing the boards together – into the end grain – isn’t great either, and they’re right. However even that provides more shear strength than a pocket hole, particularly if the pre-drilled hole is counter-sunk and you use washers on your wood screws. That alone triples the shear strength right there because the surface area of the washer prevents the screw from being pulled in.
However, there’s an even better way to do this. There is hardware out there specifically designed for making bed frames. Use your fave search engine and look up “bed bolts” and “bed rail fasteners” and/or “bed rail brackets”. The brackets are the fastest, cheapest, and strongest option. Also they fit on the inside of the frame for those who don’t want bolt holes exposed like you get with bed bolts. And if you want to do it even cheaper just go get some galvanized steel deck brackets from your local big box store. They run about a buck each, so it doesn’t get any cheaper of faster than that. The upside to many of the bed hangers is it makes it easy to disassemble and move the bed too. Unscrewing things only weakens them.
I’ll be building one of these this week or next so I’ll take some shots to upload and show what I mean. I’ll also be capping out the frame with brass hex screws which looks really sexy. 😀
P.S. For all the people asking for queen sizes, the rule of thumb is you always want an inch or inch and half leeway so 62″ or 63″W and 82″ or 83″L is good. Your mattress is going to sink and stretch over time so giving it that bit of space means it doesn’t end up looking like a souffle at some point down the road.
Do you have pictures of how your project is put together? Could your share your cuts for a queen size bed. Thanks
i am too interested in how your design came out especially for a queen size bed. Thanks!
OK, I’m lost on an item. Yellow boards are 55″ and they sit on the inside edge of the other boards. That is 52″. So you can not have the yellow boards sit exactly on edge. Did you just split the difference? Is one side even with the edge?
This was so much fun to do! This is the first big project my wife and I took on since moving to Kauai. The bed turned out beautiful. We customized the measurements for a King and it worked great.
I am building this bed this weekend and went out to get everything I need tonight. I’m curious what cuts I need to make. My mattress is full size so I plan on following the directions exactly. I see the drilling instructions but no indication of where to make cuts! Please advise, I’m excited to get to work!!
I think I just figured out the answer to my question… The cuts are the corresponding lengths shown on the first page of directions.. In inches… Below the arrows for drilling?
Yes. There is a cut list on the plans 🙂 good luck!
do you need a box spring for this bed? What kind of mattress did you use?
I know this is old, but in case anyone else reads this and is wondering!
You can add additional slats if you want to avoid the use of a box spring. How far apart you want the slats would depend upon the type of mattress, with latex mattresses having the most stringent requirements – ideally around 2.75″ between slats (no more than 3″), so you can’t go wrong with that. The warranty for your specific mattress may explicitly state what kind of support is required or else that warranty may be voided.
And in case you are wondering, you don’t want to just put down sheet plywood to bridge larger gaps, as lack of air to the bottom of the mattress risks the development of mold/mildew – particularly in humid climates. In the very least, you would want to put what’s called a “bed rug” between the plywood and your mattress to allow air circulation.
Do you still need to add the slats if you are using a box spring and mattress?
Totally messed up measurements!. For example: Slats – 1 x 3 x 10′ and final length 52″. 1 and 3 can’t be foot’s because it’s impossible to have 30cm depth, 60 cm width. As far I can understand: Slats are: 1inch x 3inch x 10 foots, and final lenght after cut is 52inch right?
I’m not sure I follow?? The 1x3x10 will be cut down to 52″ long. A 1×3 is actually .75 thick and 2.5″ wide.
where did you buy the wood? I want to built this for my house in Montana! I am a broke college student with time on my hands and think it would be perfect!
Thank you for the plans, however they are useless without any measurements on them for the pocket holes. Very confusing and I am fairly experienced when woodworking. And what size bed is this for?
The plans state (at the top of the cut list) to drill pocket holes for 2 1/2″ pocket hole screw. The tutorial also mentions to set your Kreg Jig for 1 1/2″ pocket holes. The paragraph under the “Click HERE for Plans” states that this is a full size bed plan. I’m not sure how much more I could have explained it. Thanks!
I saw the heading about drilling pocket hole screws on the arrows. It’s the measurements that are missing from the plans. The arrows are just randomly in places. I can figure it out the math and choose places to put them, just wanted to clarify if there were any more technical plans you have that were more precise? I do appreciate your time and love your site.
The plans DO state the measurement depth for the pocket holes. There is only one depth for a 2 1/2″ pocket hole screw.
I think this is getting lost in translation. Not the depth..the distance. No worries.
Oh, got it. Sorry! The distance doesn’t matter 🙂 I just eye ball…
I was attempting to build off the plans instead of reading line by line of what you did and compare that to the plans. Your plans don’t have measurements on the placement. No worries. After careful reading out of the whole blog, it says “you just spaced them evenly” instead of drawing the plans accordingly. Sorry for the hassle.
you cannot be “fairly experienced” if a bed frame is to much for you
I took your platform bed and made a few design changes to make it into 12 drawer captains bed for my 8 year old. He loves it.
Love, love love! :-O Congratulations (: The colors are beautiful! Would you mind sharing how much project cost you in supplies, including or excluding the drawers? I would love to know. Thanks!
How would you convert this into a twin bed?
Thank you so much, ladies, for your great designs and sharing of your plans! Here are my results for my CaliKing!
Looks amazing! Thanks so much for sharing with us 🙂
Thanks for such awesome designs and sharing your plans! Love what you ladies are doing! Here is my final results of my California King.