Table of Contents
Free DIY Platform Bed Plans (Beginner-Friendly Design)
Learn how to build a DIY Platform Bed with free woodworking plans! This is a great build for beginners, you only need 3 basic tools and about $50 in lumber.
Before You Build This
- Skill level: Beginner
- Tools required: Kreg Jig, Drill, Miter Saw, Sander, Brad Nailer (optional)
- Approximate build time: 8 hours
- Cost at time of build: $50 for lumber
- What I’d do differently today: Change up the color scheme and rip the rounded edges off the 2x boards.
- Who this project is (and isn’t) for: This project is perfect for anyone that wants to learn how to build furniture because it’s a great first build! This project isn’t for you if you don’t like to DIY.
Would I build this the same way today?
I built this bed in 2014 and have improved my skills over the last 12 years. If I were to build this bed again, I would change the color scheme on the headboard to one solid color for a more modern aesthetic and I would definitely rip the round edges off of the 2x boards for a more modern, clean look. Other than that, this is a solid bed that I sold in great condition a few years later to replace with a new design.
Building the DIY Platform Bed
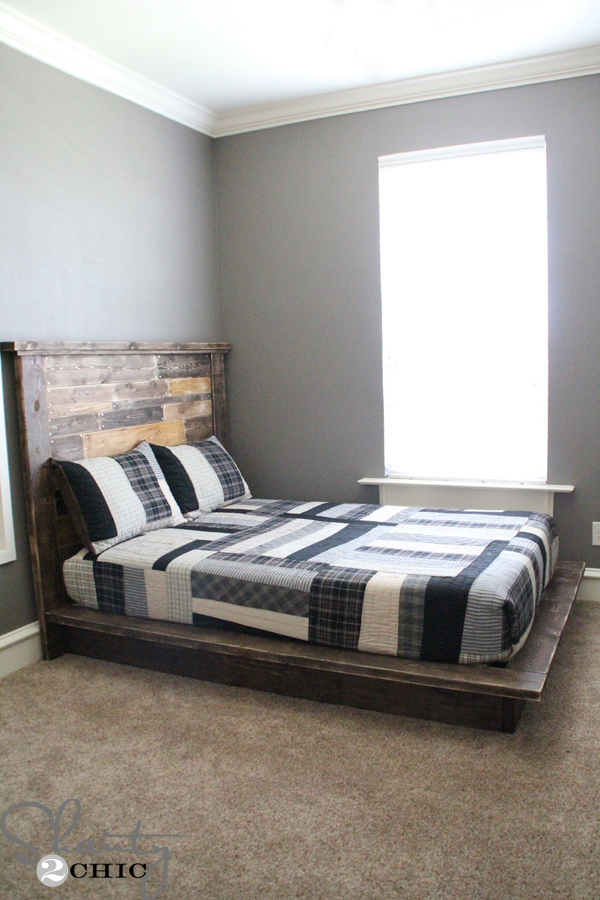
I’m back to share the Easy DIY Platform Bed that I made for my son 🙂 If you missed the Free Plans for the Planked Headboard, go check them out! I saw a platform bed in a West Elm catalog and loved how chunky the base and platform were, so that was my inspiration and I built it for about $55!!!
CLICK HERE TO JUMP TO THE FREE Platform Bed PlansThis is a very simple build so it is perfect if you are a beginner! You can follow along in the instructions below! This plan is for a full size bed but it is very easy to adjust the measurements to accommodate another size 🙂
Materials and Lumber Cut List
Supplies You’ll Need
- 8 – 1x3x10 Furring Strips for Slats
- 1 – 2x8x10 Pine Boards or Common Boards
- 2 – 2x8x8 Framing Boards
- 3 – 2x6x8 Framing Boards
- 1 – 2x4x8 Framing Boards
- 3 – 2x2x8 Pine Boards or Common Boards (I ripped from 2×4’s)
- 2 1/2″ Pocket Hole Screws
- 1 1/4″ Screws (to attach the slats if you don’t use a brad nailer)
- 2 1/2″ Wood Screws
- Wood Glue
Tools Required
- Miter Saw
- Drill
- Kreg Jig
- Sander
- Brad Nailer (optional)
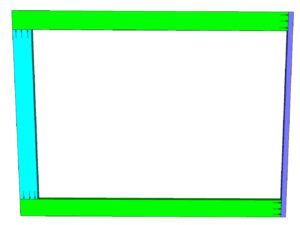
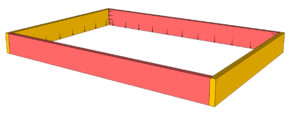
How to Build a DIY Platform Bed Frame
Step 1 – Assemble the Bed Frame Base
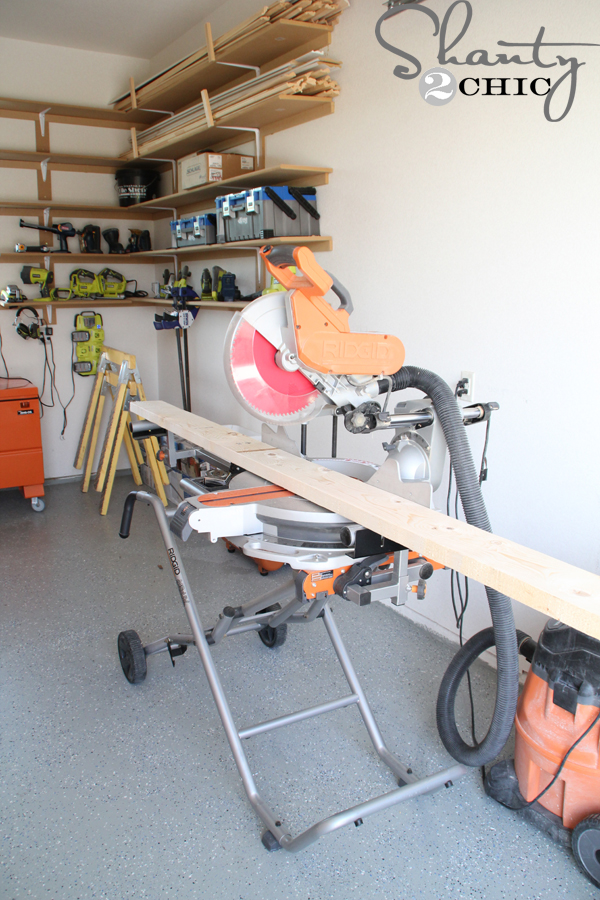
I started by making all of my cuts for my top and bottom frame. You can find the cut list diagrams in the fee plans. Watch our How to Use a Miter Saw video HERE!
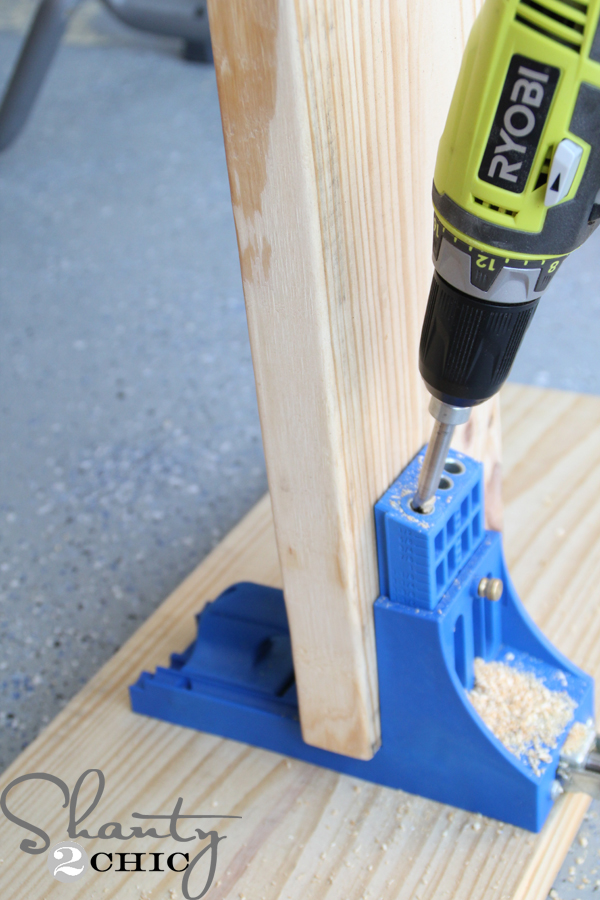
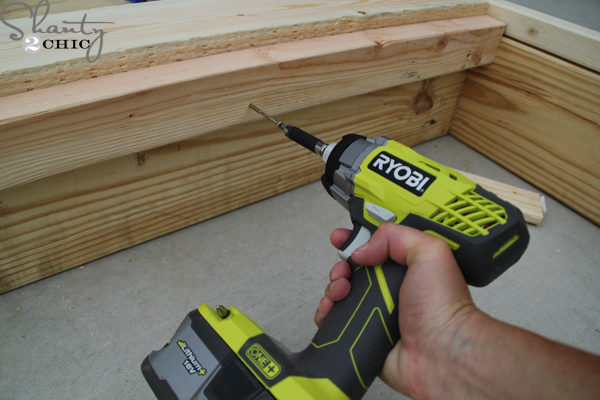
Then, I drilled all of my pocket holes with my Kreg Jig pocket hole jig set for 1 1/2″ thick boards. (You can find the Kreg Jig HERE on Amazon) and check out our How to Use a Kreg Jig Video HERE!
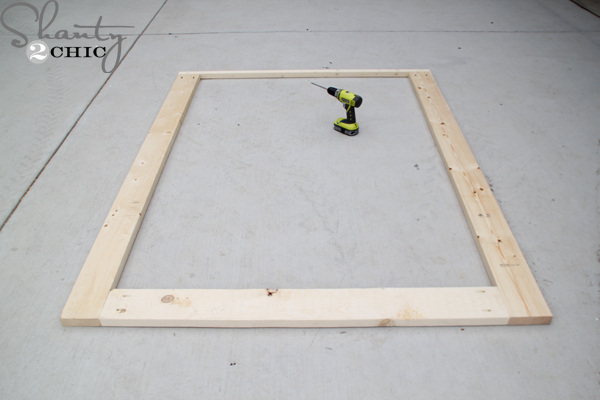
I attached the top frame with 2 1/2″ pocket hole screws and wood glue.

I followed up and did the same for the bottom frame.

Next, I flipped the top frame over and attached the bottom frame to the side rails with 2 1/2″ wood screws and wood glue.
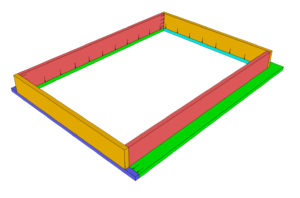
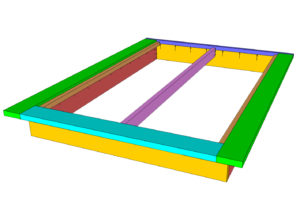
Step 2 – Attach the Bed Frame Supports
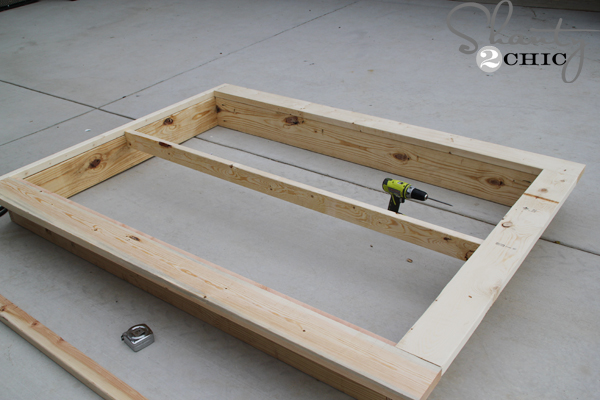
I flipped it back over and attached the center support with 2 1/2″ pocket hole screws to the headboard and footboard. You may need help flipping the bed back over, at this point, because it is heavy.
Finally, I attached the 2×3 cleats, to the sides of the bed, with 2 1/2″ wood screws (I call for 2×2 in the plans because 2×3’s are not available in every region. If you do use 2×2’s for the cleats, get furring strips to save money). I like to use the Spax self-tapping screws. I find them at Home Depot and they are pricey but you don’t need to pre-drill with them! If you use regular wood screws, make sure to pre-drill first to prevent the wood from splitting.
Step 3 – Sanding and Finishing the Wood
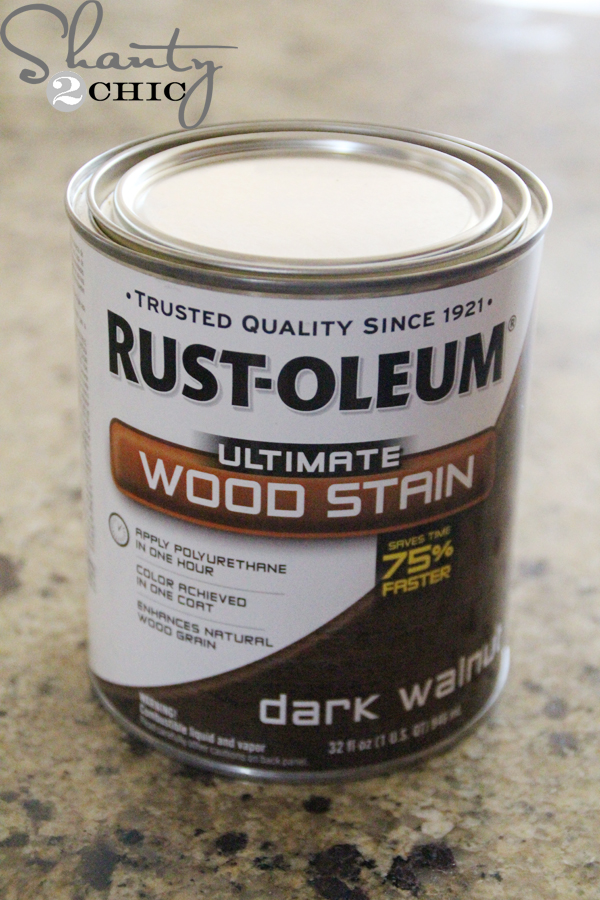
After sanding the entire Platform Bed down, I applied one-coat of Rust-Oleum Dark Walnut Stain (you can find it HERE on Amazon). If you are buying your supplies at Home Depot, get the Varathane brand in Dark Walnut (it’s the same stain).
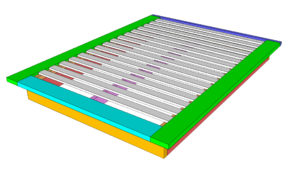
Step 4 – Install the Mattress Slats
When the bed was dry, I took it inside and into my little man’s room! I used my brad nailer, with 1 1/4″ brad nails to attach the 1×3 slats. I just spaced them out evenly and attached them to both cleats and the center support. You can use the cheap furring strips (douglas fir) for this part, Just make sure they are smooth so they don’t tear-up your mattress. Note: you can also use 1 1/4″ wood screws to attach the bed slats.
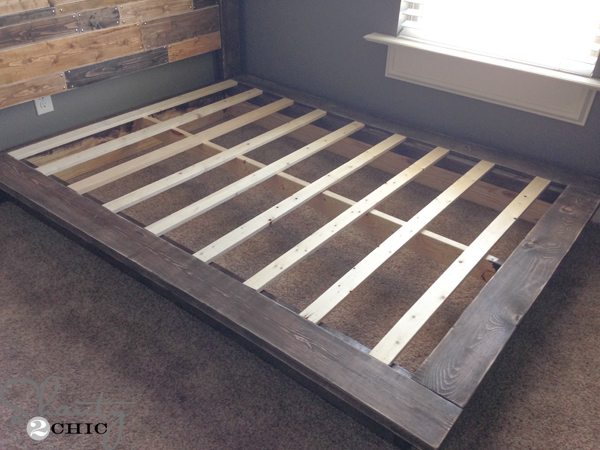
Step 5 – Attach the DIY Headboard
To attach the headboard to the bed, I drilled 2 1/2″ spax screws from the backside of the headboard legs into the bottom and top frames of the platform.
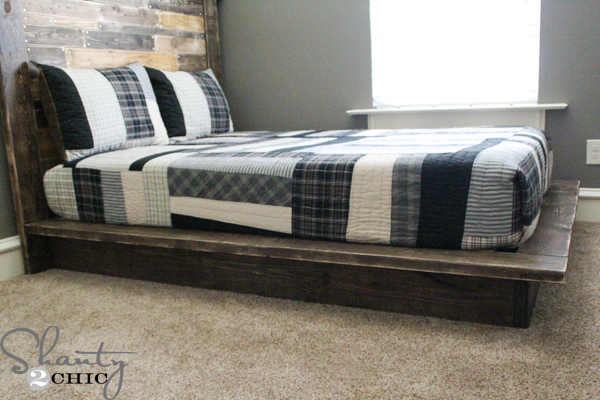
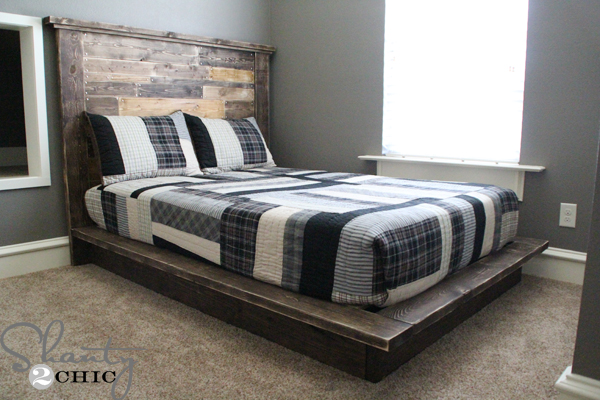
I just love this DIY Platform Bed so much! It’s the perfect combination of rustic and modern farmhouse and it’s so sturdy! I know my son loves it just as much. I’ve overheard him bragging to his friends (on a few occasions) that his mom built his bed – which is the best part for me 😉
Don’t forget to check out the headboard plans and if you like the wall color in his room (I’m obsessed!) you can read about it my wall color choices! I have received a lot of questions about the quilt on his bed, it is from Pottery Barn Teen but, I bought it a couple of years ago so I’m not sure that it is still available.
DIY Platform Bed FAQs
How much does it cost to build a platform bed?
The cost to build a platform bed can vary by design, materials used and current lumber prices. We typically build with framing lumber, like this platform bed design. We always share our supply list which makes it very easy to research the current lumber prices in your area to get an exact price on the cost to build your bed.
Is this project beginner friendly?
Yes! This is a great first build! The size might be intimidating but beds and dining tables can be the best first-time projects! They are straight forward and just a few steps and basic tools! Many of our readers have built beds from our plans as their first DIY build!
Can the dimensions be modified?
We always get questions on how to modify the measurments to fit other mattress dimensions. This DIY Bed Frame is easy to modify to fit any mattress size.
- Twin Size Mattress – Subtract 15″ from the width.
- Queen Size Mattress – Add 7″ to the width and 5″ to the length
- King Size Mattress – Add 23″ to the width and 5″ to the length.
- California King Size Mattress – Add 19″ to the width and 9″ to the length.
What tools are absolutely required?
The only tools you must have are a miter saw (a hand saw and miter box would work as well as a circular saw), a drill and a Kreg Jig!
What size mattress fits this DIY bed frame?
This bed frame was designed and built to fit a full-size mattress but you can always modify the dimensions to fit your mattress.
Can I build a platform bed without a headboard?
You absolutely can! We shared these platform bed plans separate from the headboard plans because it can stand alone without a headboard or, you can mix and match the platform bed plans with a different headboard design.
Is this bed sturdy enough without a box spring?
This bed is incredibly sturdy and no box spring needed! The cleats offer the support for the mattress slats. You can make the bed frame even more sturdy with short support blocks installed underneath the slats. This is highly recommended for mattresses larger than a full-size. Using the slats verse a box spring is a good option to save money and allows for a lower profile, more modern looking bed.
Would you still recommend this approach today?
Absolutely! We have been building furniture the same way for over 15 years. It’s sturdy and durable! The only changes I would make would be to rip the round edges with my table saw and change the stain colors!
More DIY Bed Frame Plans You’ll Love
- DIY Modern Farmhouse Platform Bed
- Free Platform Bed Plan with Headboard
- DIY Twin Platform Bed with Chevron Headboard
- Platform Bed on Wheels
- How to Build a Platform Bed with Storage
Free Printable DIY Platform Bed Plans
Tools
- Miter Saw
- Kreg Jig
- Drill
- Sander
- Brad Nailer
Supply List
- 8 1x3x10
- 1 2x8x10
- 2 2x8x8
- 3 2x6x8
- 1 2x4x8
- 3 2x2x8
- 2 1/2″ Pocket Hole Screws
- 2 1/2″ Wood Screws
- Wood Glue
- Finish of Choice
Instructions
- Cut List

- Assemble the bed upside down. Start with the top frame. Use glue and 2 1/2″ pocket hole screws at each connection.

- Assemble the lower frame. Make sure the edge pocket holes are facing the same direction.

- Lay the top frame on the floor with the pocket holes facing up and stack the lower frame on top. Secure them together with pocket hole screws.

- Attach the 2×2 cleats to the sides and the center 2×4 support in the middle. The 2×2 cleats are just screwed into the bed frame with wood screws and the 2×4 support is secured with pocket hole screws on each end. All three of these pieces should be 3/4″ lower than the top of the top frame.

- Add your slats and the construction is done! Now, all you have to do is sand and finish as you wish and enjoy your new platform bed. This platform bed was made for a previous headboard that I also made. Search our site for “Planked Headboard” to see it. As always, if you decide to make this bed be sure share it on social media and use #shanty2chic so we can share it too!


So I’m pretty good at following directions and I think I could put the bed together but not so much for figuring out the plans. My boyfriend and I absolutely LOVE this bed frame and headboard and are going to build it next week! What would be the dimensions for a king size mattress? Thank you! Love your site!!
Thanks Ashley!
Add 22″ to the width and 5 inches to the length 🙂
Thank you!!! 😀
Yes I too would love if you could post the dimensions for the King size, I know nothing about building but if I had the plans to give my husband then he could do it for us, thank you!
do you need to use slats or can you just continue across (2’x8′) with the wide boards and make it a solid piece?
If you are not using a box spring you really need slats to let your mattress breathe.
Here is my shot at the bed. The instructions were great! I have been INSPIRED!!
Here is another one I’m working on. I added the handmade woodart to jazz it up a bit. Still working of the bed now that head board is done!
HI there,
We are looking forward to building this bed as well! Any chance you could post the dimensions for a california king? 🙂
It turned out absolutely AMAZING!!!! We are soo happy with it!! Thanks again for adjusting the measurements for me! I can’t wait to make more project from your site!!! Night stands will be our next one I think 😉
What where the dimensions you used!? Please help 😀
For example the 2x8x10 is the yellow piece. And it is 52″ in is that in length or width? The directions say add 22″ to the width and 5″ to the length, how would I do that?
Is it 52+22=74 (is that the width)??
then where do i add the 5??
Sorry not good at geometry apparently!
Jeka
Yes, you are correct. So add 22″ to all of the measurements following the direction of the yellow board – that is the width. And then add 5″ to the length which would be the green board. I don’t have the paper where I did all the math to each board but just follow the colors. Green, pink and red are length. Teal, dark blue, yellow and white are the width.
did you change the height from the original plans for the headboard? what color stain did you use for the platform?
Do I add that amount to every piece? Or which ones only?
How would you adjust these plans for a twin size bed? Trying to make Christmas present for my sister!
Hi Emily,
Subtract 15″ from the width!
Hi there!
I was just wondering if you would have plans for a twin sized bed? It looks like I would have a lot of wasted material if I’m subtracting 15″. Is this true? Do you have a rough estimate as to what the total material cost was for this entire platform and headboard?
Thank you!
-Brian
Dimensions for queen size bed???
Add 6″ to the width and 5″ to the length 🙂
How would I go about changing the dimensions to fit a king size mattress?
Is this plan for a Full sized mattress?
So excited that I saw this on pinterest! I’ve been wanting a bed like this and trying to convince hubby that we can build it, so I’m so glad that you posted a plan! I’m not quite sure how to convert the measurements to queen size but I’m excited to try!!
Could you please share the dimensions to fit a twin size bed?
i see you used 52″ for the slats. Is that the width of your son’s full size bed? I’m converting the plans to fit a queen size bed and the standard full size mattress measures out to 54″x 75″ so I wanted to make sure that was what you were working with. Thanks!
How would you convert the plans to a queen sized bed?
Hey Megan. I may be a little late here, but the “standard” size for most queen size mattresses is 60″ X 80,” which is 6″ wider and 5″ longer than a standard full size. Therefore, you can adjust these plans by adding an additional 6 inches to all of the width cuts and an additional 5 inches to all of the length cuts.
For example:
The dimension cuts for the bottom support width piece (yellow in the free plans) is 55 inches. To achieve the desired queen size you are looking for, increase this cut to 61 inches. So-on and so-forth for the rest of the cuts.
Hope this helps!
Did anyone take a stab at translating all the measurements into Queen? I feel like some pieces stay the same while others change and if you don’t get them all right, you will have to buy all of them all over again.
I working on a queen right now. I’m making it 6 inches wider and 5 inches longer.
So far it is going well. The 2x8x10 will not be able to long enough to produce two pieces. I had to go back to the store. Same with the1x3x10 slats.
This is my first ever attempt at a woodwork project. Could someone please help to decipher what I’ll need as a supply list to build a queen bed? It’s currently at:
1 x 3 x 10’ 8 Furring strips for the slats
2 x 8 x 10’ 1 Pine or whitewood board
2 x 8 x 8’ 2 Pine or whitewood board
2 x 6 x 8’ 3 Pine or whitewood board
2 x 4 x 8’ 1 Pine or whitewood board
2 x 2 x 8’ 3 Pine or whitewood board
Thanks in advance! Just want to make sure that I get the right amount of wood. 🙂
lmao i was looking at this thinking “that looks just like megan’s bed… i bet she used this site”
What kind of wood did you use? Was it treated?
It calls for whitewood or pine, but I think she used pine.
Oh, I love that your son told his friends that you built the bed. My sister is a general contractor and I always get a kick of pride when I tell people. And, here comes the boast, she lives in Florida which has an extremely difficult test to pass for the license. When she took the test, she was the only woman among 700 men. You go, Girl!
My other sister was the second woman to graduate from the University of Wisconsin, Platteville, with a degree in agronomy.
I enjoy being proud of them…because….I haven’t done a damn thing.
Are you the middle child? lol! I am the middle of three girls and though I’ve had and still have a great life, I did not have the ‘recognized’ accomplishments as did my sisters. (I also live stress free!?)
Would really like to see the king plans
We simply added 16″ to the width and kept the length boards the same as the plan for our king mattress. This resulted (because I thought the plan was for a queen) in less platform protruding from the sides of the mattress. I also added another 2″x4″ down the center to compensate for the additional width (as seen in the picture) Personally, I like it better.
This plan would be great modified to have a storage space below, either with drawers or maybe even with the bed on hinges to lift it up. Hmmm…
I was wondering…….do you absolultely have to use a Kreg Jig to build this platform bed?
Nope! You sure do not. You could put this together MANY different ways, including screws, brackets, and other corner hardware. You could use corner hardware externally to give it a unique industrial look, or just hide it on the inside.
Do u have any ideas what it would be for a king size bed?? lol. I always seem to get it wrong when I get to measuring things I am not sure of. 🙂
She said to “Add 22″ to the width and 5 inches to the length :)”
Wouldn’t the length to increase by be, 18″ to the width and 9″ to the length, being a Cal King is 72×84?
Did you attach to the headboard by drilling 2.5″ pocket holes on the underside of the frame on the platform bed or where did you drill in the screws?
I’m sorry, I wasn’t very clear on that! I drilled from the backside of the headboard legs into the bottom base and top frame of the platform:)
Perfect, thanks! You girls are SO inspiring!