What’s up guys?! Happy Friday!
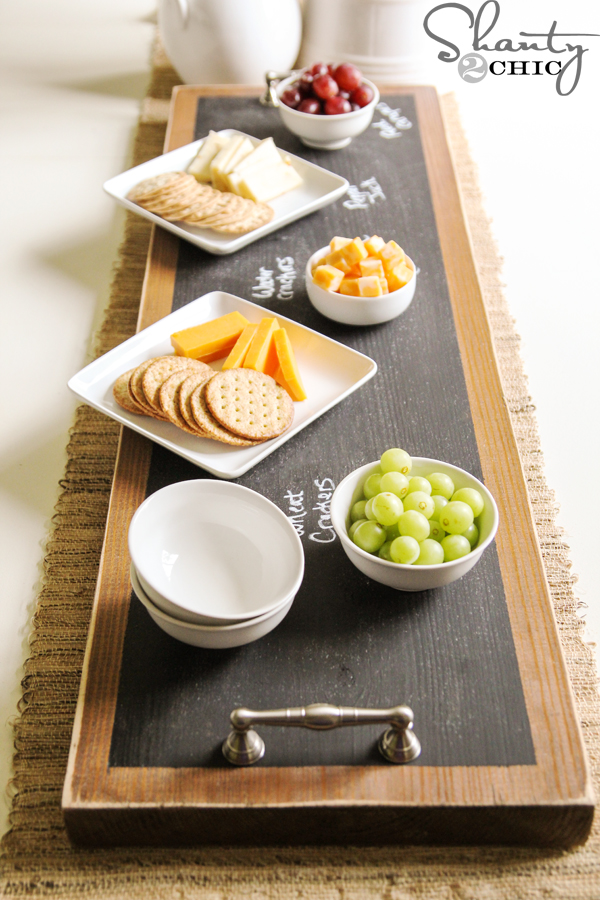
With the official first day of Fall coming, I thought it was time to break out the Fall decor! It is my very favorite season to decorate for! I made a fall centerpiece for my dining table. This took me less than 1 nap time to complete… I had the whole thing done in under an hour!
Here is how it turned out…

Many of you that frequent Shanty2Chic know how much I love a good box. I like to build them for lots of things! Here is another one to add to the list;-)…
You will need 2 boards for this project…
1 – 2x8x8
1 – 1x6x8
Total cost for wood is right around $12… If you build like me, you probably have some scraps laying around that would make this project free!
I started by making 3 cuts. I cut the 1×6 into 2- 32″ pieces for my sides, and the 2×8 into a 32″ piece as well for my base. You can use a simple $10 wood hand saw from Home Depot for this! It would only take just a minute or 2 and a little elbow grease to make the cuts.

I used Gorilla Wood glue and finish nails for the rest. Here is how I attached the sides to the base…


Now to close off your ends. I used the rest of the 1×6 to cut 2 pieces that were each 8.75″ long.

Add a little Gorilla Wood glue…


That’s it! How easy is that?? I stained the whole piece with Rust-Oleum Ultimate Wood Stain in Dark Walnut to match my new sideboard I built…

I also added a couple of cute $2 knobs I found at Hobby Lobby to the ends just because!
I put some candles into mason jars and bought some gourds to fill mine up!
I love the result…


Hope you like it!
If you do, I would love some pins and shares below! Have an awesome weekend!!!
~Whitney

I just made one today!! I love it!! Thanks for the idea!!
That’s awesome Gretchen!! I would love to see a pic if you want to add one to our FB!
Pinned and shared on facebook. Love it and hope to make one as soon as I learn how to use a saw… 🙂
Good luck!! Thanks so much!! 😉
I love this and I’m going to make one for myself but I’m going to use some pallets!
Good thinking! I would love to see pics when you get it all finished! 😉
I really am hoping to make this sometime this weekend, but my dinig room table is already very dark. Do you have a suggestion for creating one with more contrast to my dark table?
Hey Mac!
What about trying this paint method we shared…
https://www.shanty-2-chic.com/2012/03/distress-paint-with-vaseline.html
I think it would be an awesome contrast on that dark table!
Hope this helps!
I always love a goo Shanty2Chic box! Cute fall decor!
Haha thanks Mindi! I do love my boxes 😉
Super cute!
Thank you Dawn!!
CUTE!!!! Love it!
Thanks so much!! I appreciate it!
I live boxes too. You explain and show each step so clearly it is easy to follow. I know what my next project is…thank you
Awesome Sue!! Good luck! I would love to see pics when you get it all finished! 😉
I must tell you I love all your projects! ! I have tons of things I want to make for our new home! Everything is beautiful and well explained and seems pretty simple to follow. Thank you! Btw.. found you on pinterest and now follow both your site and pins 🙂
You are sweet! So glad to have you here! Thanks so much for your message and good luck with all your projects ;-))
LOVE it! Do you have a tutorial on the runner under the box? or can you say where you found it?
Thanks! Target carries a new line called ‘Threshold’… I LOVE all of it. I got it at Target last week for $14.99! Too cheap to DIY 😉 Hope this helps!
I love it! Such a great job. And it seems pretty simple to build – but looks awesome!
Thank you! It really is!! 😉
Simply gourdgeous!!!
Hahahaha yes!!!!
Love the mat underneath the box. Where can I find something like that?
Thanks! Target carries a new line called ‘Threshold’… I LOVE all of it. I got it at Target last week for $14.99! Too cheap to DIY 😉 Hope this helps!!!
Man I love all of your stuff! I have a laundry list of stuff to make from y’all. I can’t wait to get started. This is probably one of my favorites. Thank you for sharing!
Thank you Ginger!! I appreciate it! 😉
how did you sand/finish the wood before staining. I noticed in the finished pics that the corners were rounded off. in ur construction pics the corners were not rounded. did u just sand it until u were satisfied? or did you use some other tool?
Good question! I use whatever I have handy… For this one I used my orbital sander with 120 paper, but I usually use a sanding block with 80 grit paper. Cheap… You can get those for under $10! Hope this helps!