Check out my Ikea Malm Dresser Hack! I turned two boring dressers into one large custom dresser with just a few basic tools. Free plans by Shanty2Chic!

I moved into my new home last summer and I am working so hard to get every room complete with custom-built furniture. My daughter’s room was at the top of my list. She is a new teenager and I wanted her to have her own space that she was comfortable in and loved because she has had a lot of change with a new school and town, I thought having her bedroom ready would be a good retreat for her, as she adjusts.
She was in need of serious clothes storage so a dresser was the first piece of furniture I built her! With the Texas summer heat and a huge list of to-do’s, I decided to hack a set of Ikea Malm Dressers. Dressers can be pricey right now and they take a lot of time to build. So, I got busy designing a custom dresser that I would create from two 4-drawer dressers.
So, let’s get started!
You can check out the how-to video I shared on our IG page here.
Make sure to grab the free plans and follow along with the how-to instructions below.
Click here to jump to the free printable plans!Table of Contents
IKEA Malm Hacks
Materials List:
Supplies:
- 2 – 1x6x8 Primed Pine Boards
- 1 – 3/4″x20″x6′ Unfinished Pine Board
- 1 1/2″ Wood Screws
- 1 1/4″ Brad Nails
- 8 – Cabinet Pulls
- 2 – Ikea Malm Dressers
- Wood Glue
- Wood Filler
Tool:
- Miter Saw
- Drill
- Brad Nailer
- Table Saw (optional)
Assembling the Malm Dressers
Step 1: Building the Dressers

Follow the instructions to build the majority of the dressers. I did not attach the tops, backs or the front bottom trim. These pieces are not necessary for the final product.

Adding Trim to the Frames
Step 2: Middle Trim

After assembling both dressers, cut the middle trim pieces to size and attach them to the inside of dresser one, with my nail gun, 1 1/4″ brad nails and wood glue.

Step 3: Side Trim

Cut the side trim pieces to size and attach them to the outside, sides of both dressers with 1 1/4″ brad nails and wood glue. All trim pieces should be flush with the outside of the cabinet frame.

Joining the Dressers
Step 4: Bring the Dressers Together

Once the trim is all attached, bring the two dressers together, making sure they are flush with each other.

Use wood glue and 1 1/2″ wood screws to attach on the front and back side, through the inside of the dresser frame, into the middle trim. Do this on both sides of the dresser.
Base Trim
Step 5: Attaching the Base Trim

Cut the front, bottom base trim to size. Attach it to the front of the dressers with 1 1/4″ brad nails and wood glue.

Giving the Dresser a Top
Step 6: Adding the Top
Cut the project panel to size and attach it to the top of the dressers with 1 1/4″ brad nails and wood glue. There should be a 3/4″ overhang on both sides and the front. The back should be flush with the back of the dressers. You can also use wood slats for the top of the dresser.
Note: I stained the top and painted the dresser before attaching.
The Finish for my IKEA Hack
Step 7: Wood filler

Make sure to fill any of your exposed nail holes with wood filler and give it alight sanding (you can use a sander or sandpaper for this).

Step 8: Paint

I opted to stain the project panel and paint the base. To make the finish process easier, I painted the cabinet base before attaching the top.
I used two coats of our FAVORITE paint by Valspar. It works so well for furniture, doors, trim and cabinets. We have used it for years, it requires zero sanding or priming and can paint directly over any paint (including oil-based). I had it tinted to Sherwin Williams Extra White.
Step 9: Stain

While the paint was drying, I applied one coat of Golden Oak stain by Varathane over the entire project panel.

I stained the top before attaching it to the dresser.
Step 10: Hardware

Once the stain and paint had dried, I got busy attaching a cabinet pull to each dresser drawer. You can get really creative with the hardware, from knobs, to pulls, there are so many different ways to style this piece and make it your own!
That was it!


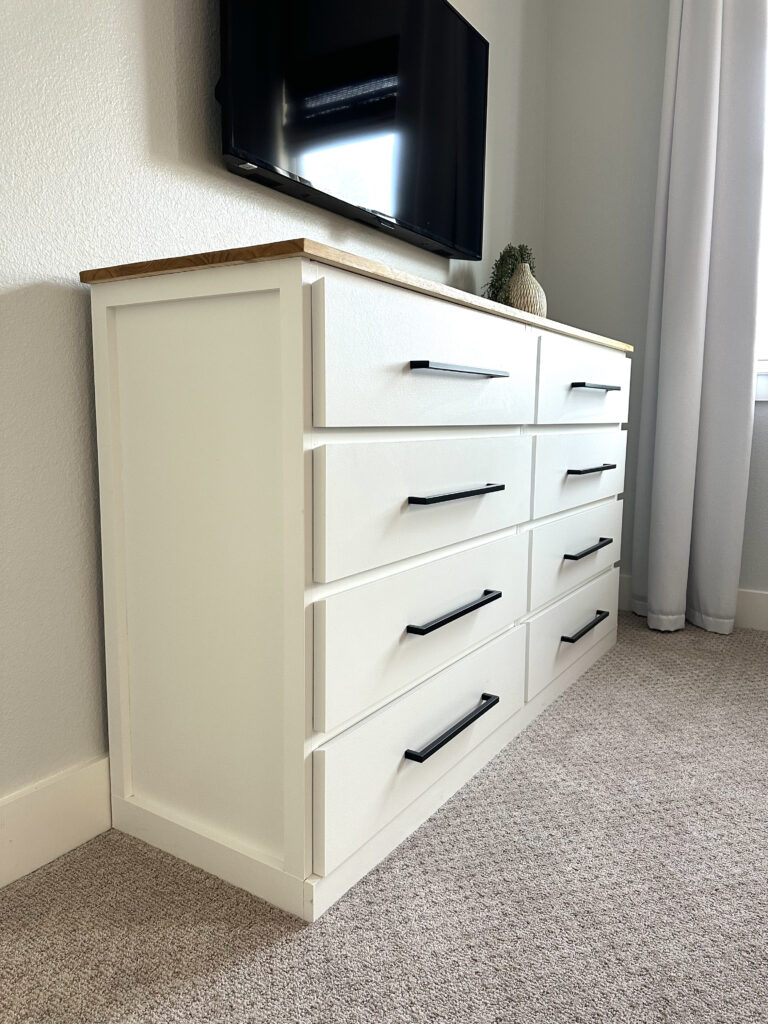
This Malm Hack was such a fun, easy and needed project! I love that I was able to create a large custom-looking dresser out of two basic dressers. It’s so versatile, too. It would look great in an entryway, master bedroom, a family / living room or any spot you need a lot of storage space.


The possibilities to make this piece unique are unlimited. You could change up the drawer fronts with some cane webbing, splurge on some unique leather pulls or even add some texture with a paint technique, wallpaper or fabric.

I love how her room is coming along and I can’t wait to see it all finished. Next up, a nightstand!
Check Out Some of Our Other DIY Dresser Projects


IKEA Malm Dresser Hack
Tools
- Miter Saw
- Drill
- Nailer
- Table Saw (optional)
Supply List
- 2 1x6x8 Primed Pine Boards
- 1 3/4"x20"x6' Unfinished Pine Board
- 1 1/2" Wood Screws
- 1 1/4" Brad Nails
- 8 Drawer Pulls
- 2 IKEA Malm Dressers
- Wood Glue
- Wood Filler
- Finish
Instructions
Cut List
- Cut List


Adding Trim
- After assembling both dressers (without backs, tops or bottom supports), cut the middle trim pieces to size and attach to the inside of dresser one with 1/4" brad nails and wood glue.

- Cut the side trim pieces to size and attach them to the outside, sides of both dressers with 1 1/4" brad nails and wood glue. Al trim should be flush with the outside of the cabinet frame


Joining the Dressers
- Once the trim is all attached, bring the two dressers together, making sure they are flush with each other. Use wood glue and 1 1/2" wood screws to attach on the front and back side, through the inside of the dresser frame, into the middle trim. Do this on both sides of the dresser.


Base Trim
- Cut the front, bottom base trim to fit. Attach it to the front of the dressers with 1 1/4" brad nails and wood glue.


Attaching the Top
- Cut the project panel to size and attach it to the top of the dressers with 1 1/4" brad nails and wood glue. There should be a 3/4" overhang on both sides and the front. The back should be flush with the back of the dressers.


The Finish
- Now, you can fill your nail holes, paint and add some hardware!Make sure to share your builds with us on social media and use #shanty2chic so we can share them too!Happy Builiding!


This MALM dresser hack turned out really well—great way to upgrade a basic piece into something more custom and refined. Projects like this really show how surface finishing and the quality of added materials can transform the overall look and durability. Using well-engineered boards like quality plywood can help improve structural strength while maintaining a clean finish. We’ve come across useful material insights on platforms like https://plywoodbazar.com/
for similar furniture and interior applications. Very creative and practical makeover!
This is a great example of how a simple furniture piece can be transformed with thoughtful design updates. The IKEA Malm dresser already has a clean base structure, and the added detailing really elevates it into something that feels much more custom and high-end. The step-by-step breakdown makes the process very approachable.
From an interior industry perspective, projects like this reflect the growing demand for customizable furniture solutions where standard pieces are adapted with new finishes, textures, or panel details. It’s interesting to see how small design interventions can completely change the character of a piece. We’ve been following similar trends in furniture materials and interior surfaces as well: https://plywoodbazar.com/
These cabinets are very suitable for storing items in the house. It will help your house become tidier