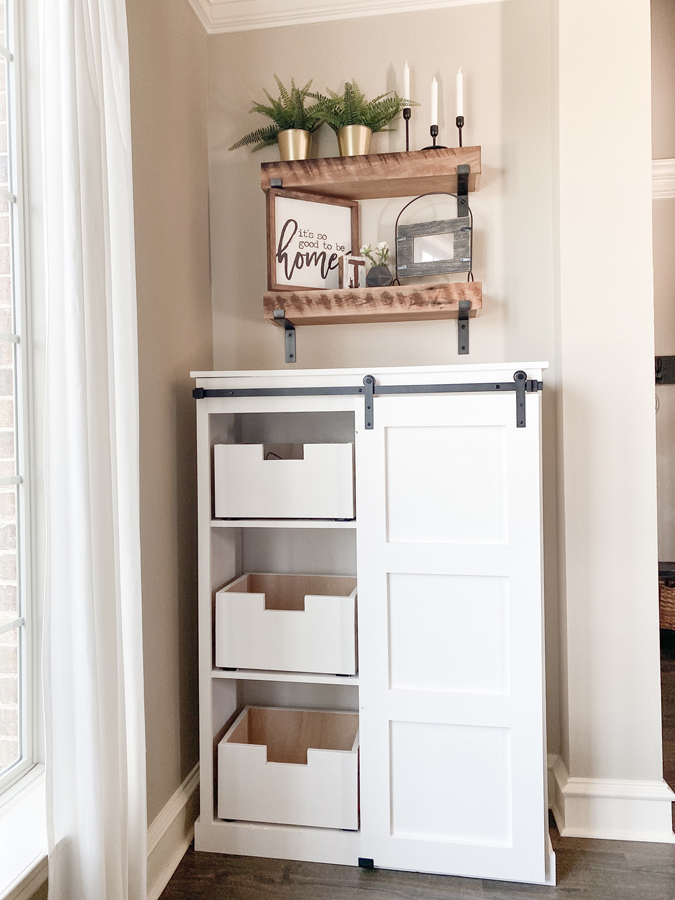
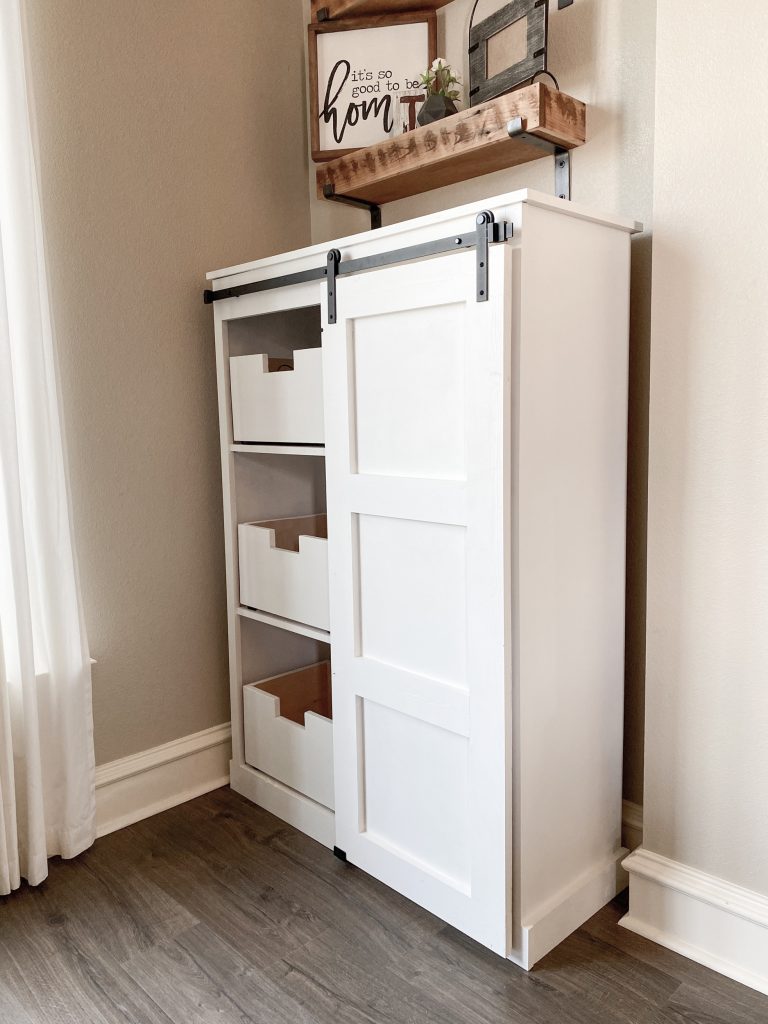
Learn how to build this DIY Sliding Barn Door Utility Cabinet with free plans and a how-to video by Shanty2Chic.
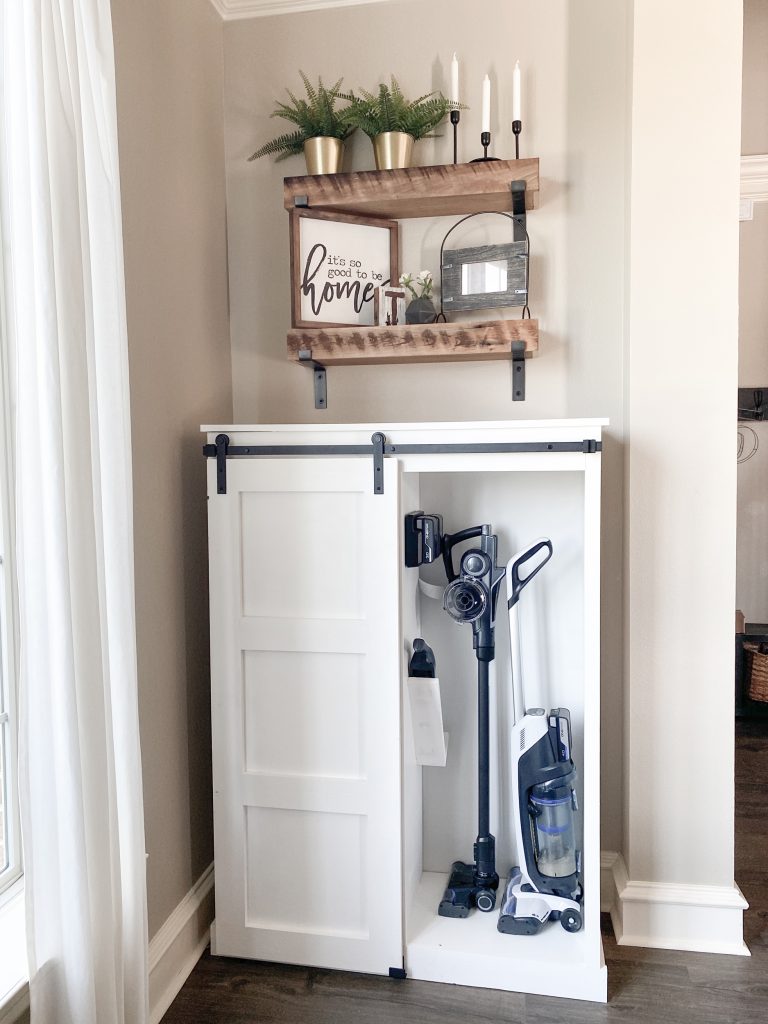
I am so excited about this project! Being 6 months into this new staying at home/remote learning experience, we are cleaning our homes constantly. Our most used tools right now are probably our cleaning tools! My pantry was so cluttered with them so I decided to build something beautiful and functional to store them with easy access! We teamed up with our friends at Hoover to build this beautiful DIY Sliding Barn Door Utility Cabinet to store all of our HOOVER® ONEPWR™ cleaning tools! We love our Hoover battery powered cleaning tools so we were ecstatic to learn that Hoover added a few new guys to the mix! Meet the new Dust Chaser Handheld Vacuum, Dual Bay Charger and the ONEPWR™ Evolve Vacuum! This entire line of Hoover ONEPWR Tools makes cleaning so convenient and purchasing them is just as simple! You can order the entire line on Hoover.com or Amazon.com!

- Purchase on Amazon
- Purchase on Hoover
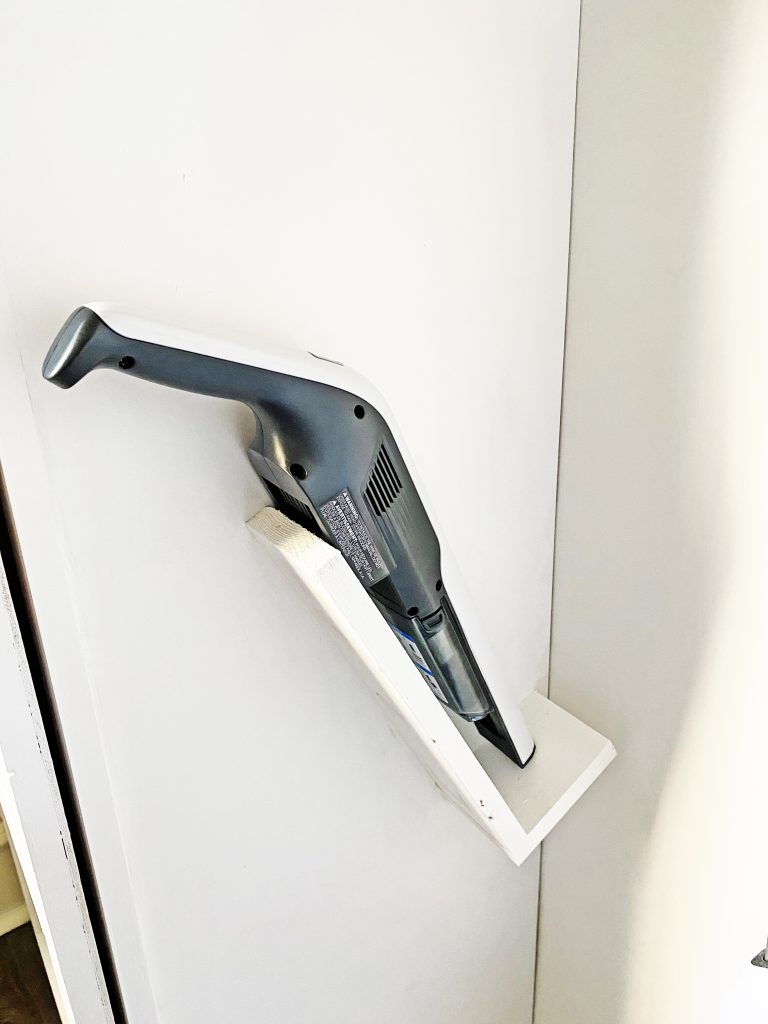
- The Dust Chaser Cordless Handheld Vacuum makes cleaning tight spaces easy and convenient around your house or in your car, with the built-in extend nozzle, the 2-in-1 crevice tool and the upholstery tool!
- It has a dual filtration with HEPA which captures 99.97% of dust, pet dander and allergens!
- It’s CORDLESS!
- Purchase on Amazon
- Purchase on Hoover
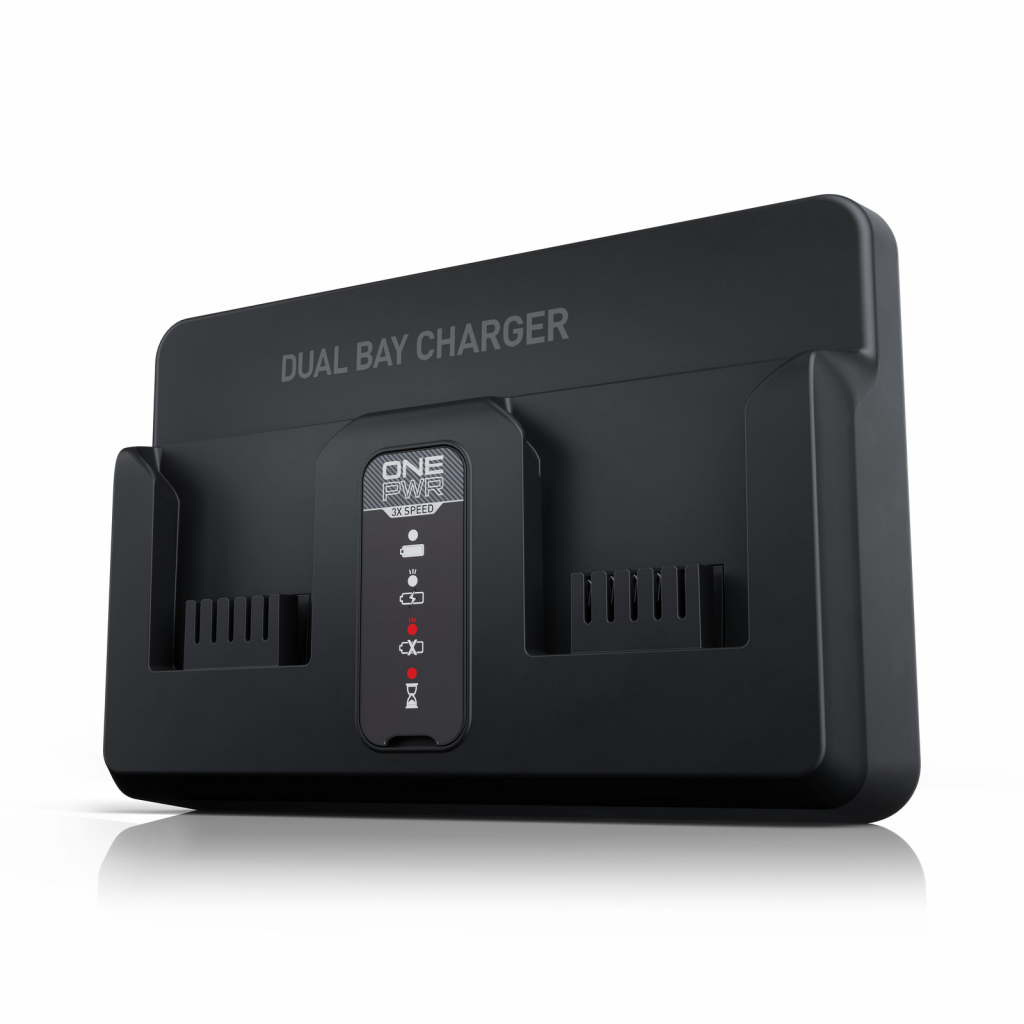
- The Dual Bay Charger charges and stores two ONEPWR batteries so you don’t have to worry about your batteries dying mid-clean!
- Purchase on Amazon
- Purchase on Hoover
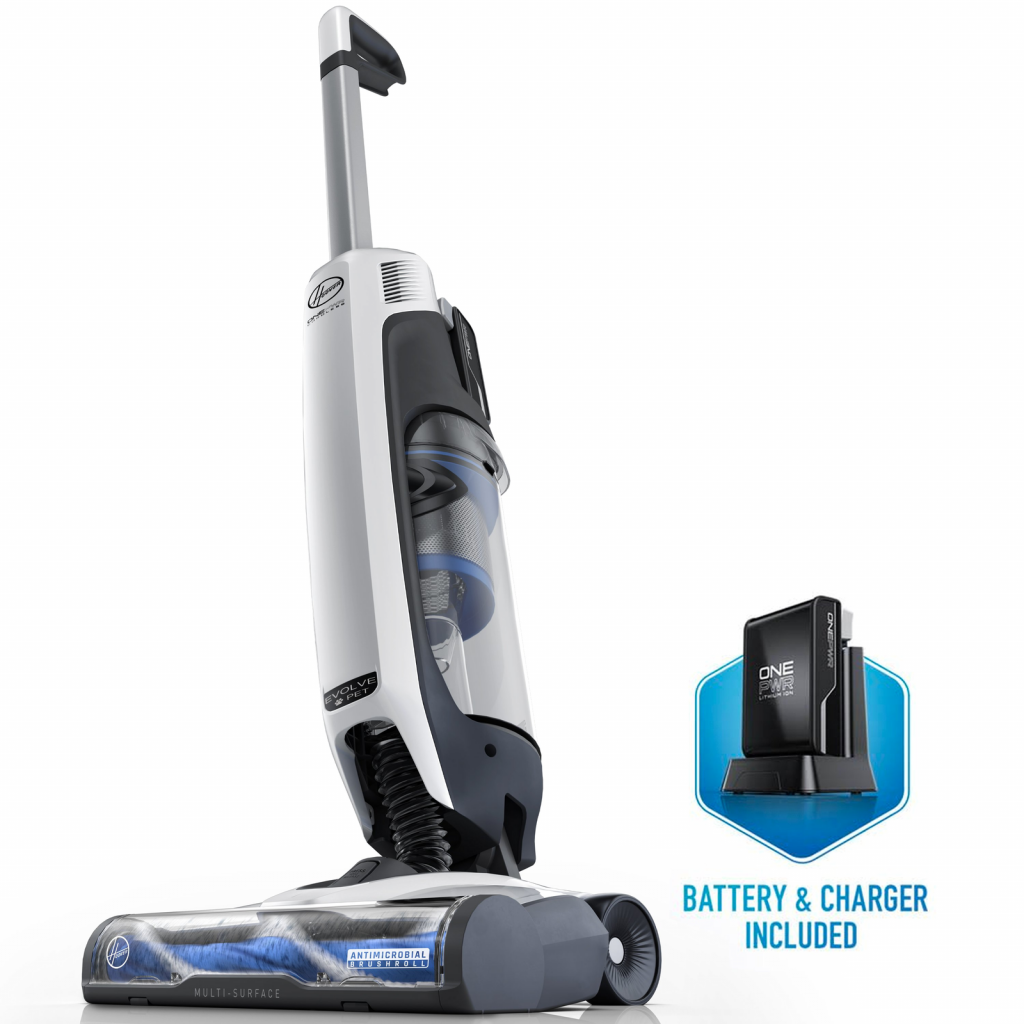
- The Evolve Pet Cordless Upright Vacuum offers the power capacity of a corded upright but it weights 50% less!
- It lifts embedded pet hair and dirt from carpets and hard floors!
- It holds 3x more dirt and pet hair than a stick vacuum with it’s larger dirt cup – meaning less trips to the trash can!
- The antimicrobial brush roll and pet filter help prevent the growth of odor-causing bacteria.
- It’s CORDLESS!
That’s enough about our favorite cordless cleaning tools. Let’s get to building! You can click the box below to watch us build this Sliding Barn Door Utility Cabinet!
How fun was that?! The perfect mix of form and function!
Click HERE to download the Free Printable PlansYou can follow along the how-to build below!
Table of Contents
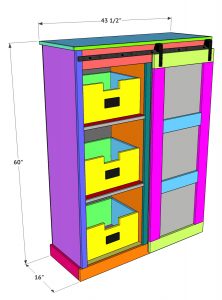
How to Build a DIY Sliding Barn Door Utility Cabinet
Supply List
- Miter Saw
- Drill
- Kreg Jig
- Brad Nailer
- Sander
- Stapler – optional
Supplies
- 1 1x10x6 Pine or Common Board
- 1 1x5x8 Pine or Common Board
- 3 1x4x8 Pine or Common Board
- 3 1x2x8 Pine or Common Board
- 1 1/2″x3/4″x80″ Trim
- 1 1/2″x3/4″x40″ Trim
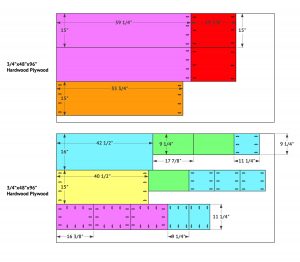
- 2 3/4″x48″x96″ Hardwood Plywood
- 2 1/4″x48″x96″ Hardwood Plywood
- 1 1/4″ Pocket Hole Screws
- 5/8″ Brad Nails or 3/4″ staples
- 1 1/4″ Brad Nails
- Wood Glue
- Drawer Slides
- Barn Door Hardware
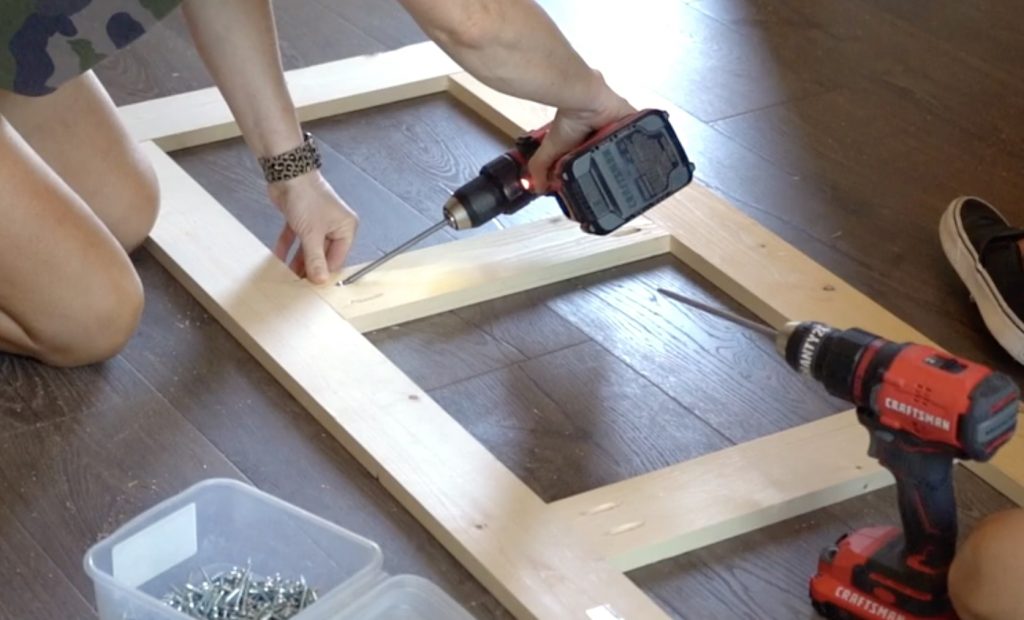
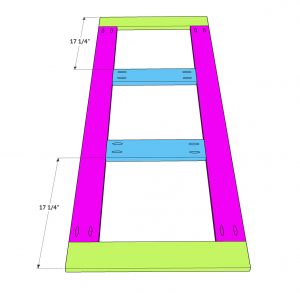
Building the Cabinet Frame
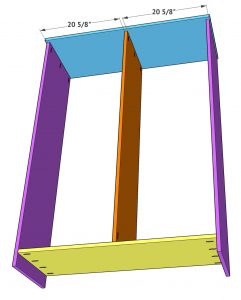
Step 1
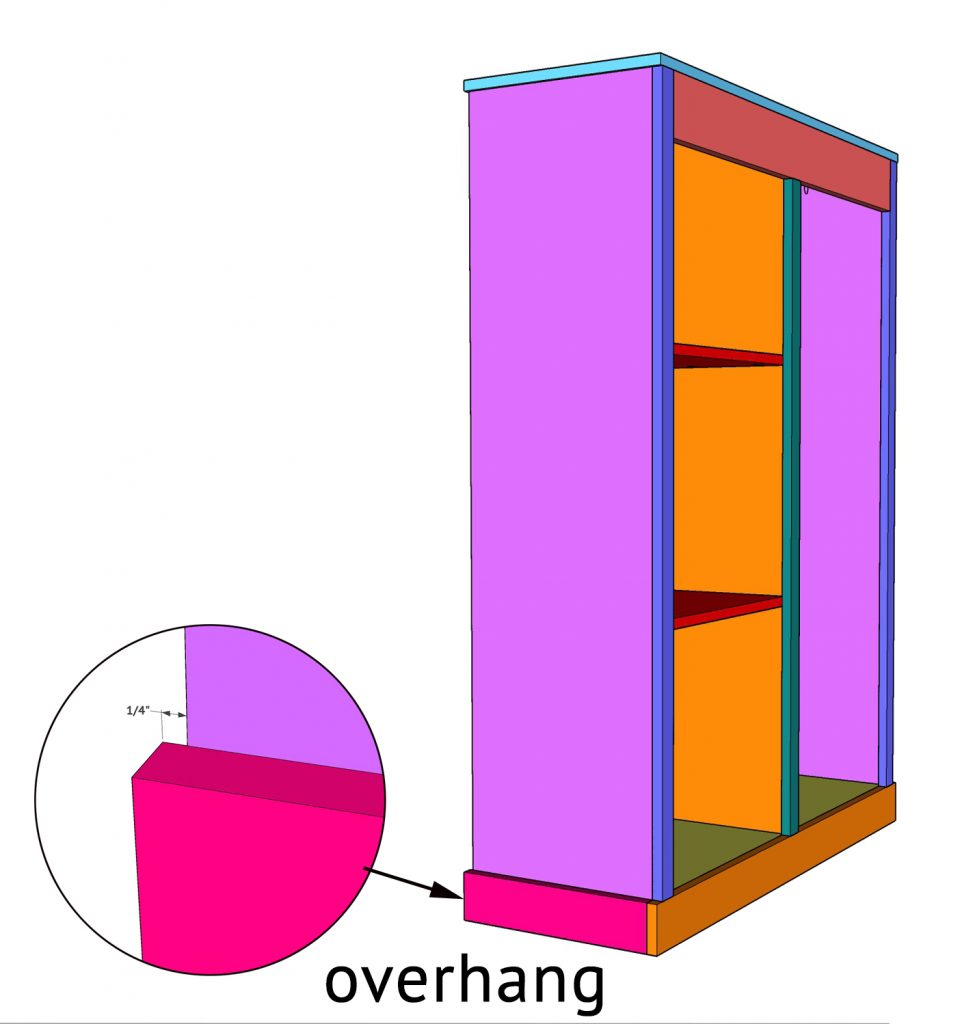
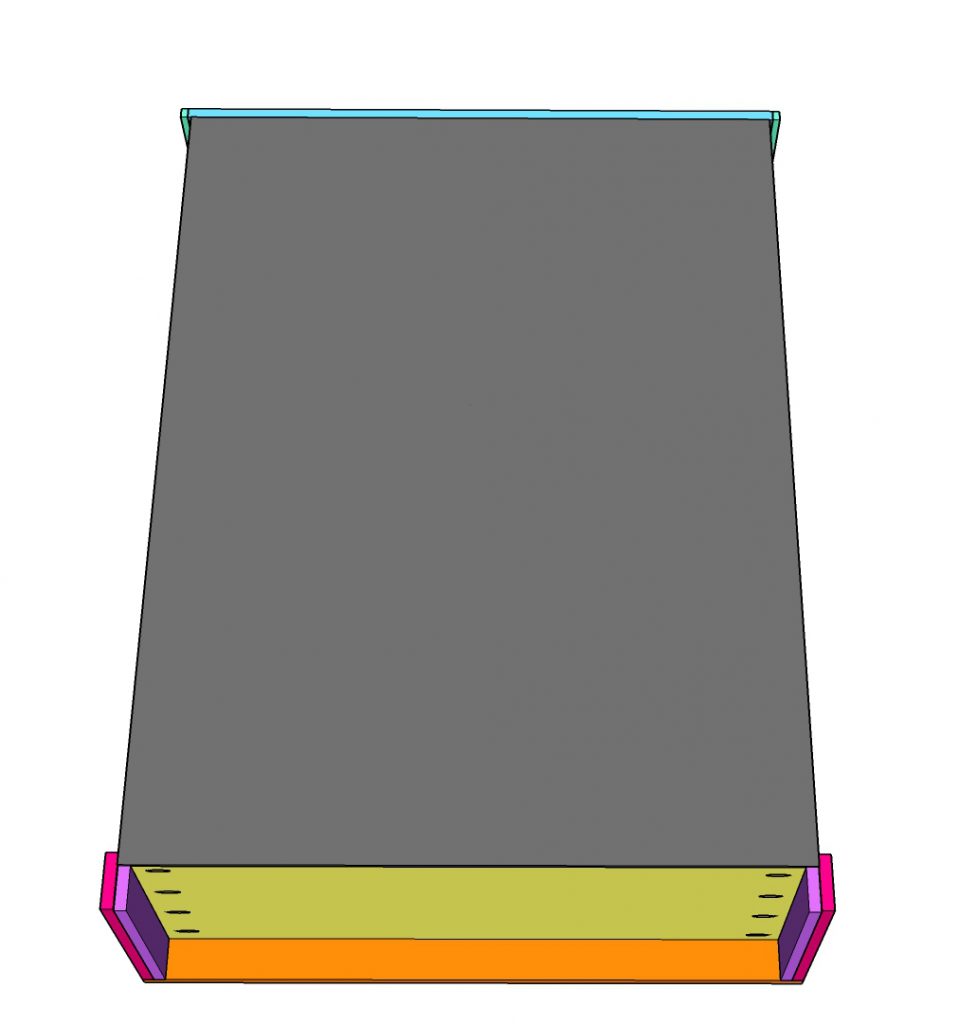
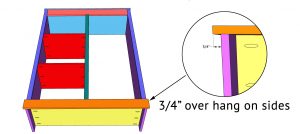
Cut the frame pieces to size and drill 3/4″ pocket holes at the top end of both side pieces and both ends of the bottom piece. Attach the boards together with 1 1/4″ pocket hole screws and wood glue. The top should over hang the cabinet 2/4″ on the front and 1/4″ on the sides and back.
Step 2
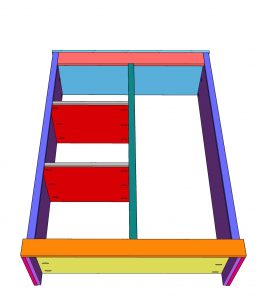
Cut the middle divider to size and drill 3/4″ pocket holes at both ends. Center it inside the cabinet and attach it with 1 1/4″ pocket hole screws and wood glue.
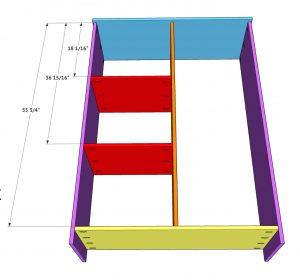
Step 3
Cut the shelf pieces to size and drill 3/4″ pocket holes on both ends of the boards. Attach them to the inside of the cabinet with 1 1/4″ pocket hole screws and wood glue.
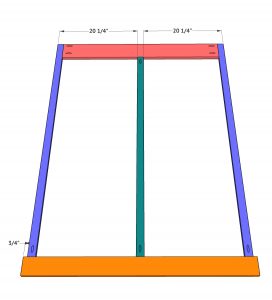
Step 4

Cut the face frame pieces to size and drill 3/4″ pocket holes in the top, sides and middle boards. Attach them together with 1 1/4″ pocket hole screws and wood glue.
Step 5
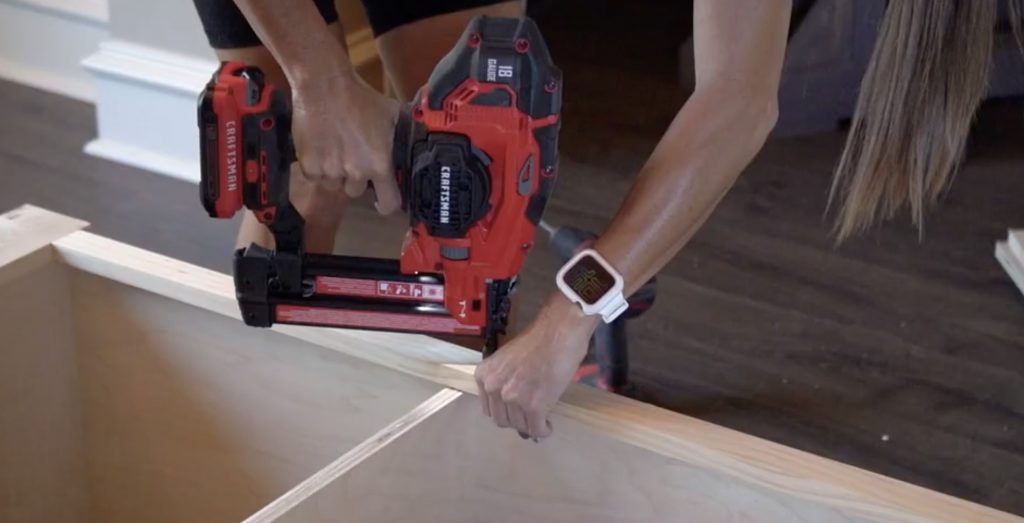
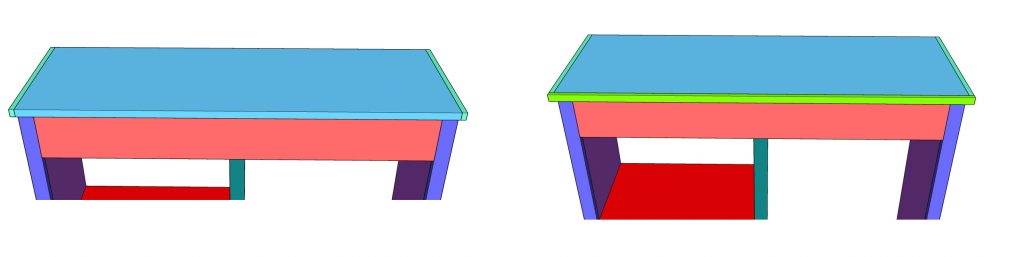
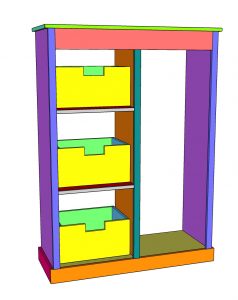
Attach the face frame to the front of the cabinet with 1 1/4″ brad nails and wood glue. The face frame should sit just under the top of the cabinet, the sides should be flushand the bottom should over hang on the sides 3/4″.
Step 6
Cut the side trim pieces to size and attach them to the bottom of the cabinet with 1 1/4″ brad nails and wood glue. There should be a 1/4″ over hang off the back of the cabinet.
Step 7
Cut the top, side trim pieces to size and attach them to the sides of the top with wood glue and 5/8″ brad nails. Cut the front trim piece to size and attach it the same way.
Step 8
Cut the shelf trim pieces to size and attach them to the front of the shelves with 1 1/4″ brad nails and wood glue. The shelf trim will sit back from the face frame 1 1/4″.
Building the Drawers
Step 1
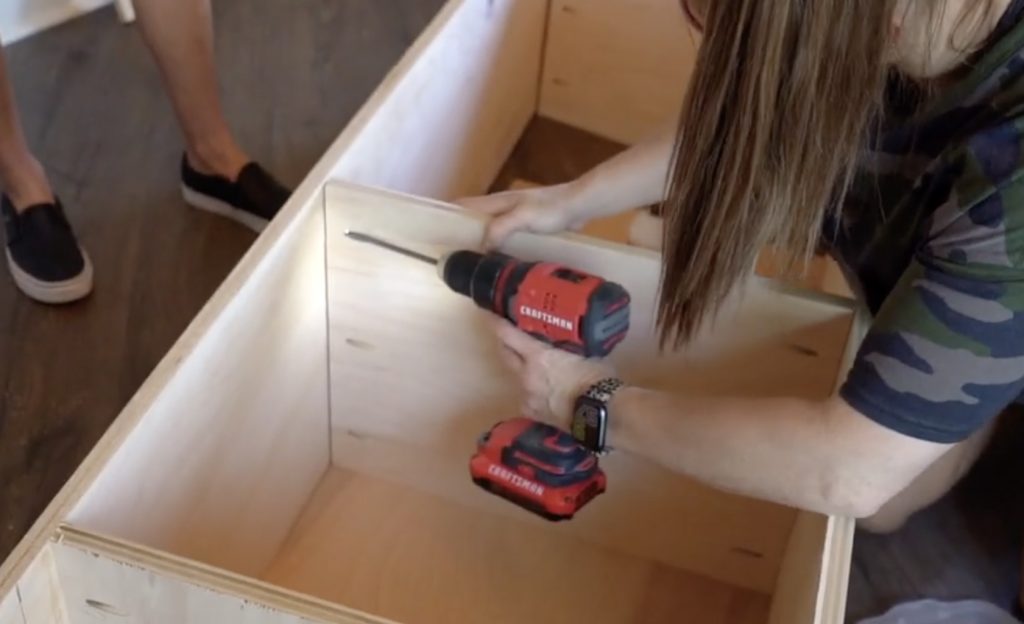
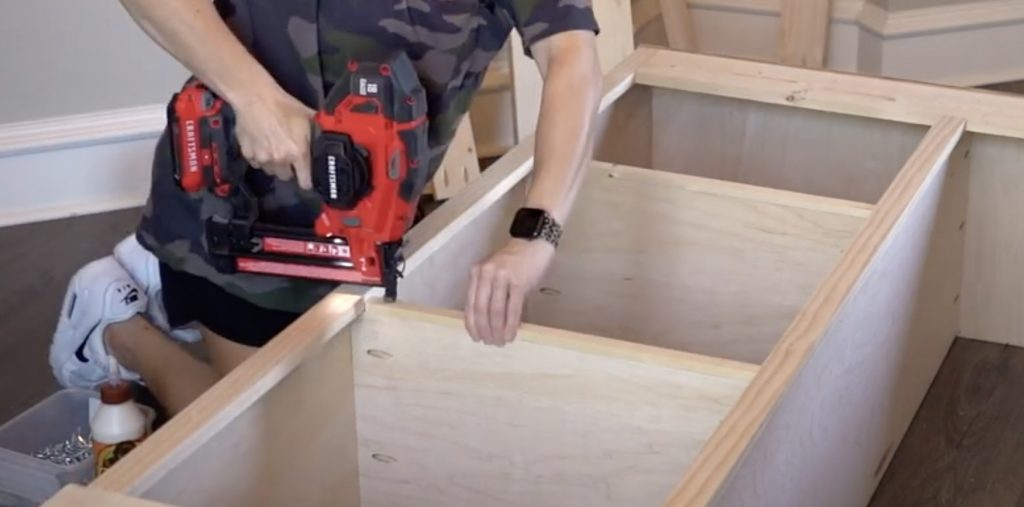
Cut the drawer pieces to size. Drill 3/4″ pocket holes at both ends of the side pieces and all around the bottom piece.

Attach everything with 1 1/4″ pocket hole screws and wood glue.
Step 2
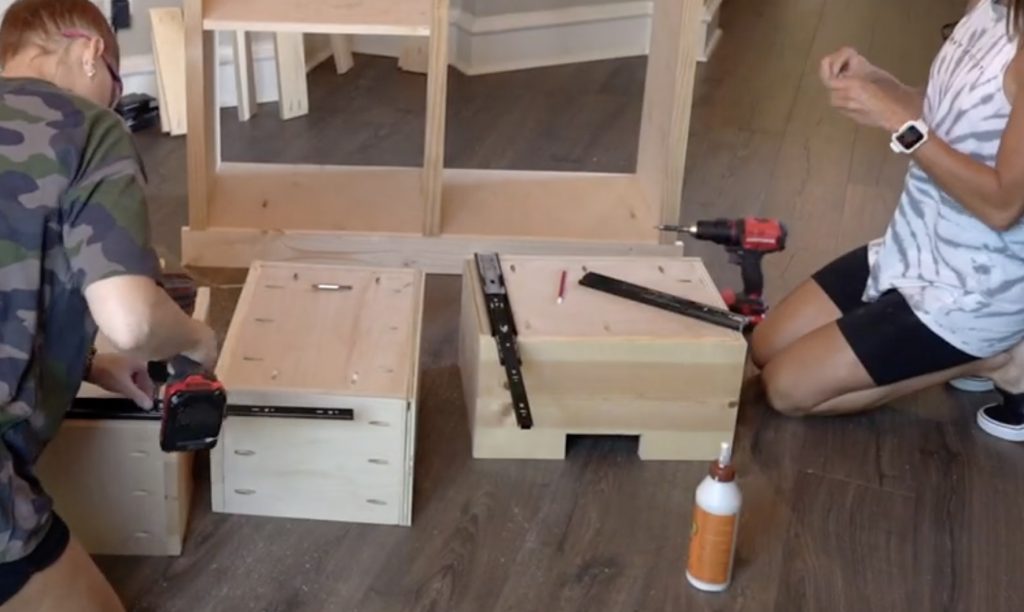
Install the drawers with drawer slides.
Building the Hand Vac Holder
Step 1

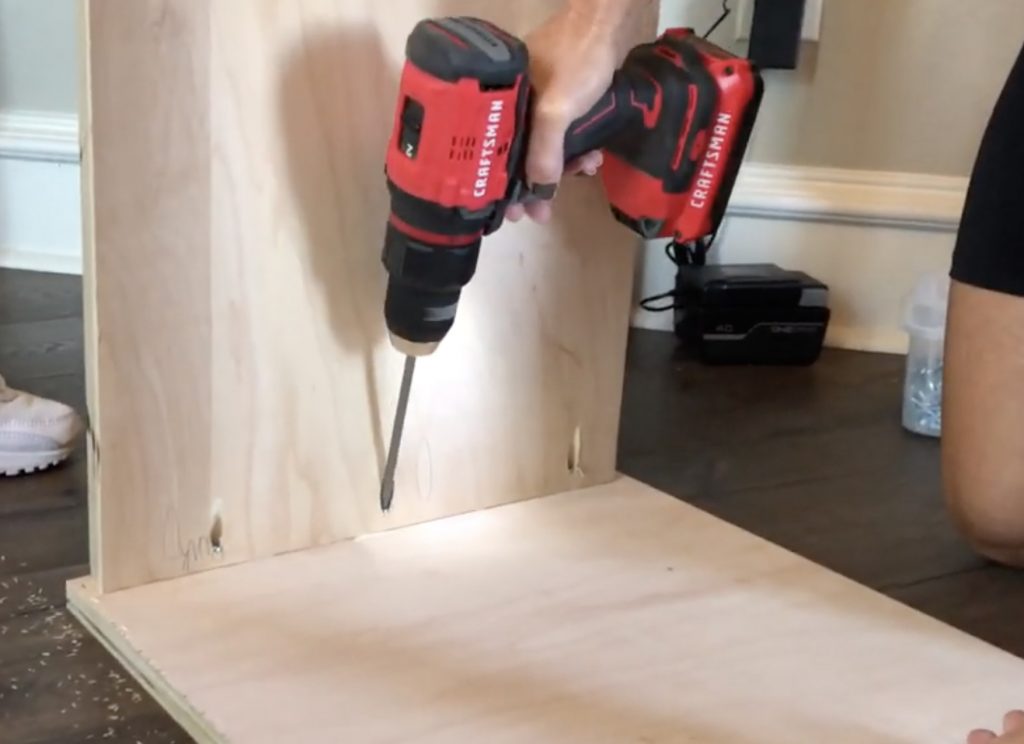
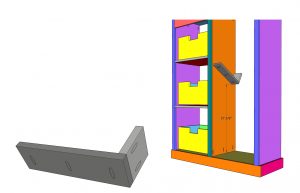
Cut the hand vac holder pieces to size and drill 3/4″ pocket holes along one edge of the long piece and one end of the short piece. Attach them together with 1 1/4″ pocket hole screws and wood glue. Attach it to the inside of the cabinet the same way.
Building the Barn Door
Step 1
Cut the barn door pieces to size. Drill 3/4″ pocket holes in the vertical and middle boards. Attach the pieces together with 1 1/4″ pocket hole screws and wood glue.
Step 2
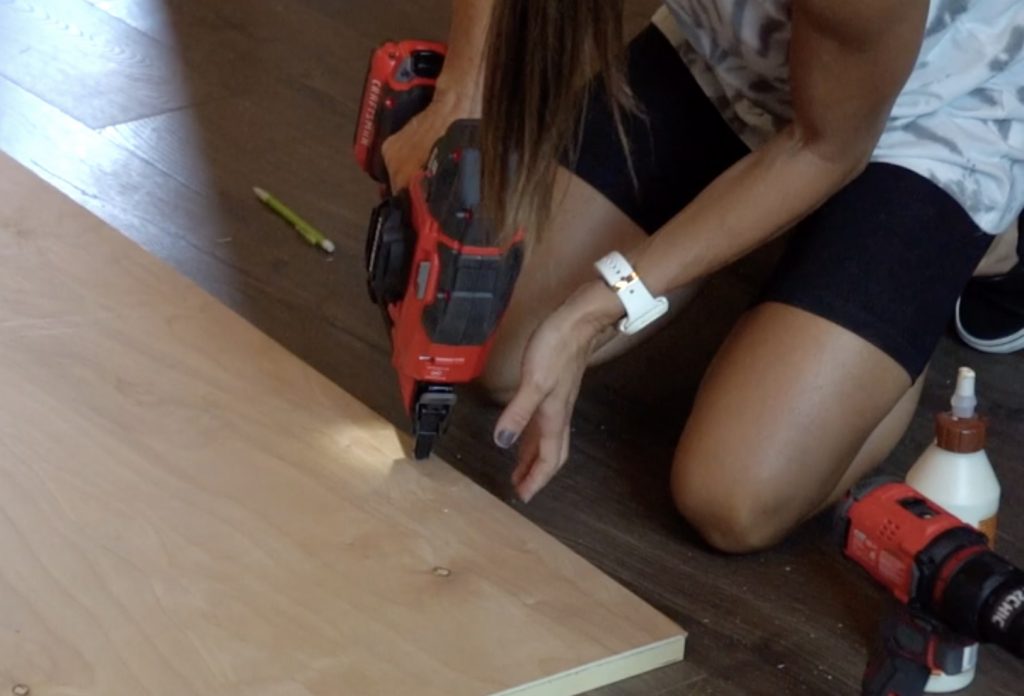
Cut the barn door panel to size and lay it on the back of the barn door frame. Attach it with 5/8″ brad nails or 3/4″ staples and wood glue from the back of the panel and into the frame.
Attaching the Back
Step 1
Cut the back panel board to size and attach it to the back of the cabinet with 5/8″ brad nails or 3/4″ staples from the back panel into the cabinet.
Note: If you want to have the Dual Bay Charger mounted inside, cut a small hole for the cord to run out the back of the cabinet.
We built the cabinet inside to beat the ridiculous Texas heat. We made a mess building but it was no match for our Hoover ONEPWR tools!


Clean and ready for the finish!
The Finish
Step 1
Give it a finish and attach the barn door hardware!
It’s so perfect to store all of my Hoover ONPWR tools and its super cute in my dining room!
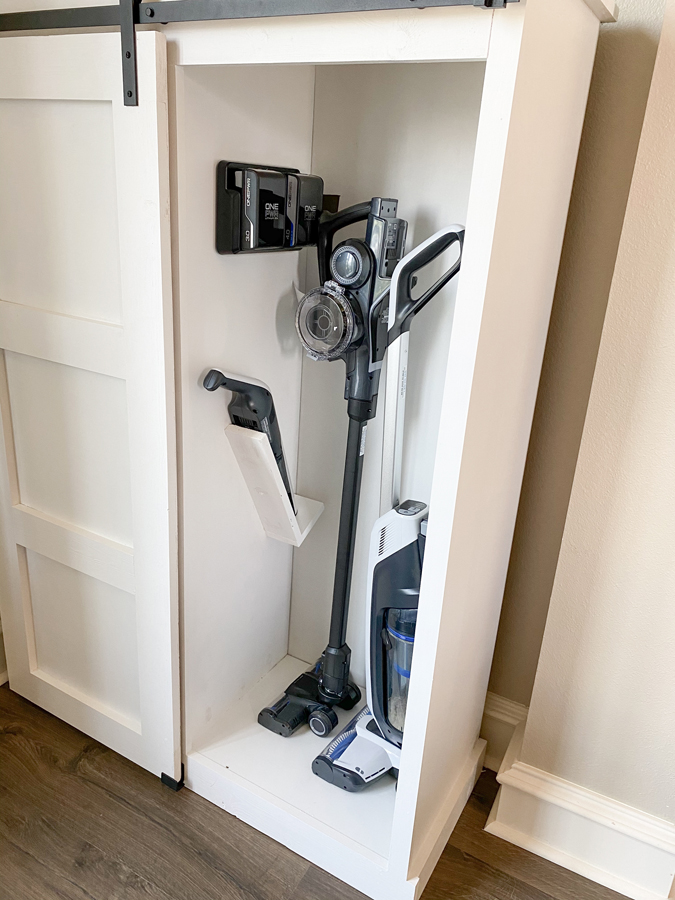
I love that I have a spot for my Dust Chaser! It’s super handy and my kids love that it’s easy to grab for cleaning!
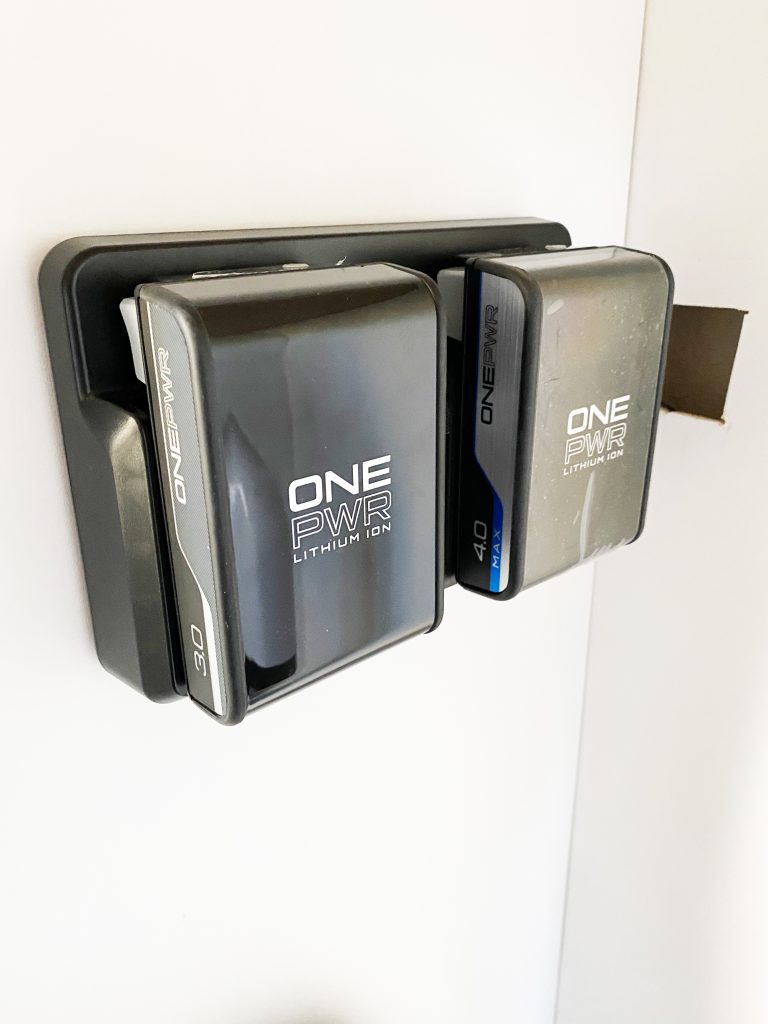
Having the Dual Bay Charger mounted inside the cabinet is amazing! I always have batteries charging so they never fail me!
Make sure to share your builds with us on social media and use #shanty2chic so we can share them too!
Happy Building….and cleaning!

Sliding Barn Door Utility Cabinet
Tools
- Miter Saw
- Drill
- Kreg Jig
- Brad Nailer
- Sander
- Stapler (optional)
Supply List
- 1 1x10x6 Pine or Common Board
- 1 1x5x8 Pine or Common Board
- 3 1x4x8 Pine or Common Board
- 3 1x2x8 Pine or Common Board
- 1 1/2"x3/4"x80" Trim
- 1 1/2"x3/4"x40" Trim
- 2 3/4"x48"x96" Hardwood Plywood
- 2 1/4"x48"x96" Hardwood Plywood
- 1 1/4" Pocket Hole Screws
- 5/8" Brad Nails or 3/4" Staples
- 1 1/4" Brad Nails
- Wood Glue
- Drawer Slides
- Barn Door Hardware
Instructions
Cut List
- Cut List 1

- Cut List 2

- Cut List 3


Cabinet Frame
- Cut the frame pieces to size and drill 3/4" pocket holes at the top end of both side pieces and both ends of the bottom piece. Attach the boards together with 1 1/4" pocket hole screws and wood glue. The top should over hang the cabinet 3/4" on the front and 1/4" on the sides and back.

- Cut the middle divider to size and drill 3/4" pocket holes at both ends. Center it inside the cabinet and attach it with 1 1/4" pocket hole screws and wood glue.

- Cut the shelf pieces to size and drill 3/4" pocket holes on both ends of the boards. Attach them to the inside of the cabinet with 1 1/4" pocket hole screws and wood glue.

- Cut the face frame pieces to size and drill 3/4" pocket holes in the top, sides and middle boards. Attach them together with 1 1/4" pocket hole screws and wood glue.

- Attach the face frame to the front of the cabinet with 1 1/4" brad nails and wood glue. The face frame should sit just under the top of the cabinet, the sides should be flushand the bottom should over hang on the sides 3/4".

- Cut the side trim pieces to size and attach them to the bottom of the cabinet with 1 1/4" brad nails and wood glue. There should be a 1/4" over hang off the back of the cabinet.

- Cut the top, side trim pieces to size and attach them to the sides of the top with wood glue and 5/8" brad nails. Cut the front trim piece to size and attach it the same way.

- Cut the shelf trim pieces to size and attach them to the front of the shelves with 1 1/4" brad nails and wood glue. The shelf trim will sit back from the face frame 1 1/4".


Drawers
- Cut the drawer pieces to size. Drill 3/4" pocket holes at both ends of the side pieces and all around the bottom piece. Attach everything with 1 1/4" pocket hole screws and wood glue.

- Install the drawers with drawer slides.


Hand Vac Holder
- Cut the hand vac holder pieces to size and drill 3/4" pocket holes along one edge of the long piece and one end of the short piece. Attach them together with 1 1/4" pocket hole screws and wood glue. Attach it to the inside of the cabinet the same way.
BarnDoor
- Cut the barn door pieces to size. Drill 3/4" pocket holes in the vertical and middle boards. Attach the pieces together with 1 1/4" pocket hole screws and wood glue.

- Cut the barn door panel to size and lay it on the back of the barn door frame. Attach it with 5/8" brad nails or 3/4" staples and wood glue from the back of the panel and into the frame.

Back
- Cut the back panel board to size and attach it to the back of the cabinet with 5/8" brad nails or 3/4" staples from the back panel into the cabinet.

The Finish
- Give it a finish and attach the barn door hardware!Have fun with it and make it your own!Make sure to share your builds with us on social media and use #shanty2chic so we can share them too!Happy Building!


I absolutely love the design of this sliding barn door utility cabinet! It perfectly combines rustic charm with functionality. The step-by-step instructions look easy to follow, and I can’t wait to try this project out in my own home. Thanks for the inspiration, Shanty 2 Chic!
I absolutely love this sliding barn door utility cabinet! The design is not only stylish but also incredibly functional for maximizing space. I can’t wait to try building one for my home. Thank you for the detailed instructions and inspiration!
I absolutely love the design of this sliding barn door utility cabinet! It adds such a charming farmhouse vibe to the space. The tutorial seems easy to follow, and I can’t wait to try making one for my own home. Thanks for sharing this project!
I absolutely love this sliding barn door utility cabinet! The design is both practical and stylish, perfect for maximizing space while adding a rustic touch to my home. The instructions look easy to follow, and I can’t wait to try it out for myself. Thanks for sharing such a great project!
I absolutely love this sliding barn door utility cabinet! The design is not only stylish but also incredibly functional for maximizing small spaces. I can’t wait to try this DIY project in my own home. Thanks for sharing such detailed instructions!
I absolutely love the design of this sliding barn door utility cabinet! It combines functionality with a rustic charm that would fit perfectly in my home. The step-by-step guide you provided makes it seem achievable, and I can’t wait to try building one myself. Thanks for the inspiration!
I love this sliding barn door utility cabinet! The design is both stylish and functional, and it would fit perfectly in my space. Thanks for sharing the step-by-step process; I can’t wait to try it myself!
Absolutely love this sliding barn door utility cabinet! The design is not only stylish but also super functional. I can’t wait to try this project at home. Thank you for the detailed instructions!
I absolutely love the design of the Sliding Barn Door Utility Cabinet! It’s such a creative way to add both style and functionality to any space. The step-by-step instructions are really helpful, and I can’t wait to try this project out in my own home. Thanks, Shanty 2 Chic, for the inspiration!
I absolutely love the design of the Sliding Barn Door Utility Cabinet! The rustic charm combined with practicality is just what I need for my laundry room. The step-by-step instructions look easy to follow, and I can’t wait to try building one myself. Thanks for the inspiration!
You could use a 2 inch holes saw bit and put in a power grommet for the plug if you don’t want to just have a hole in the back. Or use a regular desk grommet to run the wires through. Love you guys!
I love this I live in a small house without any closets so my cleaning stuff is in the basement this is going to be a great and stylish piece of furniture for storage! I love EVERYTHING the sisters make
I love this! I know I could follow your plans no problem, but for the life of me CAN NOT do drawer slides!! I’ve wrecked so many projects just because of those!!
Kreg has a drawer slides jig that I just saw!
Lovely and so very functional. I am curious though as I’ve noticed on the last 2 postings that you are no longer using Ryobi. May I ask why the switch? Thank you.
Love this…well, anything with a sliding barn door. 🙂
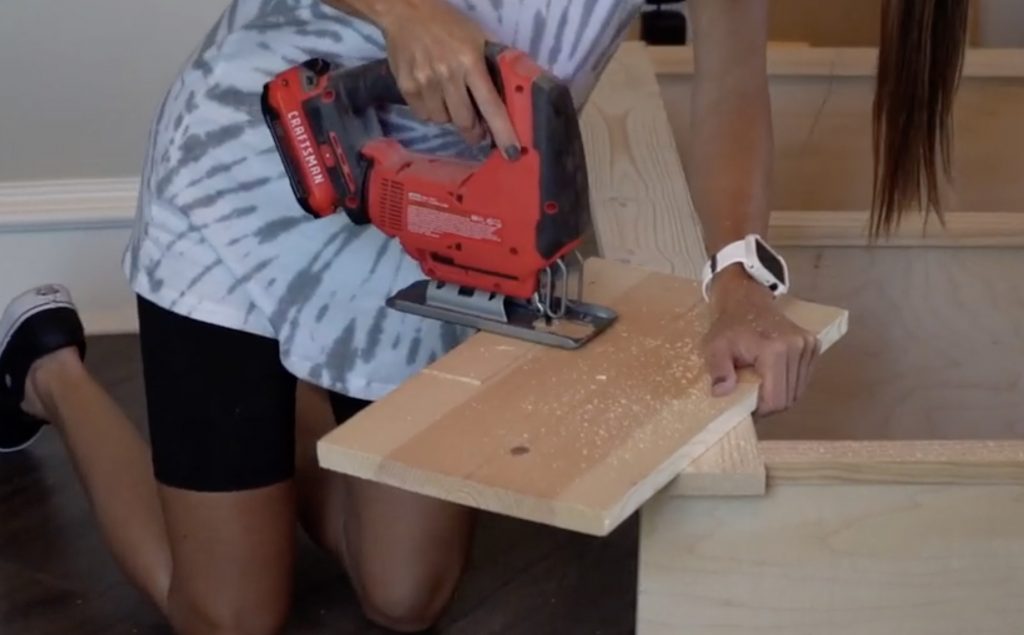
It looks like you used a jigsaw to cut the notches in the pull-out drawers?