
Hey girls! So I have been “gettin’ her done” today! I spent most of yesterday playing musical chairs with my kids beds. The result… I was finally ready to tackle this project today. My kids rooms have been at the very, very back of my mind since we moved in a few months ago. I have learned that if I don’t wait until I WANT to do something that it usually ends up looking half done so I have been patiently waiting to get the itch to start theirs. I’m sure it was the blog and the endless amount of projects I could post that finally did it:)
I love these shanty shutters that Ashley found up for me about a month ago. I had 2 sets in the corner of my dining room on the floor and two sets that belonged to my mom out in the garage. I just left them laying around until I WANTED to do something with them… See how that works? When I moved the queen bed from my son’s room to my daughter’s room I was in need of a new headboard. As I was walking through the garage one day and staring at them I finally found their purpose… Here’s how I did it…
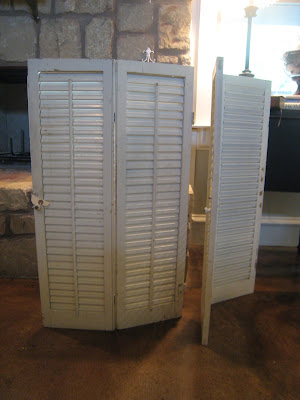 ~I removed all of the old hardware from the shutters and laid them face down on the ground, side-by-side
~I used a couple of 1×2’s and a 1×4 to brace all of the shutters together. I put a small line of gorilla glue under each piece and then used wood screws and my drill to secure them.

~I flipped the whole piece over and laid it face up. We had some spare crown in our garage so I cut a piece of that, angled at each end and attached it to the top of the shutters using gorilla glue, 2 wood screws and some finishing nails.
~I spray painted the cute scroll pink and let it dry while painting the headboard. I used Olympic Satin in Aloe Vera… love this color!
~After letting it dry I attached the scroll with gorilla glue and a few finishing nails. I then used my block sander on the entire thing. I scraped just about every edge.
~You can guess my next step… Ralph Lauren Smoke Glaze… Painted it on and wiped most of it off to give it a perfect aged look
~Final step… I used D-ring hangers on the back of the headboard and anchors and screws on the wall. I want to give props to Cobra Triple Grip anchors… I can’t tell you how many anchors I have used in the past that were cheap and flimsy and left a big mess on my wall… Not these! They are superb!
 So… You want to see it in her room??? Me too!! Here it is!! I will be posting this at Between Naps on the Porch for Metamorphosis Monday! Go check it out…great stuff there! http://betweennapsontheporch.blogspot.com/2009/09/welcome-to-34th-metamorphosis-monday.html I will also be posting this at Sanctuary Arts at Home “You Should Have Seen it Before” Party at http://sanctuaryart.blogspot.com/2009/09/you-should-have-seen-it-before.html Lot’s of great stuff…go check it out.



Wow, that headboard is simply gorgeous! Great job!
Jane
WOW it is beautiful…
xoxo
Julie
Absolutely adorable! I happen to need a headboard for the guest room. Now you've got me to thinking!
so awesome! and we have the same quilt! I love that…
kether
Love it.Looks great. I just found an old door, I plan on turning into a headboard for my daughters room. My husband thinks I have lost it.
I can see by the long list of comments, that I'm not alone, this is darling. I also love the green and pink combo, clever girls!
Absolutely fantastic – so inpirational 🙂 x
WOW! This is really fantastic!
Beautiful and very creative! That is a gorgeous color too. Thanks for sharing.
WOW! I love it! It looks great with the linens too! The color is beautiful!
Adorable — really clever. Love the color and the finish. xo
Looks great! I especially love the addition of the molding on the top! This is my first time here…your blog is great. Thanks for sharing 🙂
Chelsea
Yep, it's a winner!
That is probably my favorite project out of all that you have done! FANTASTIC!!! I need to come over and see it.
super job! love the colors!
gail