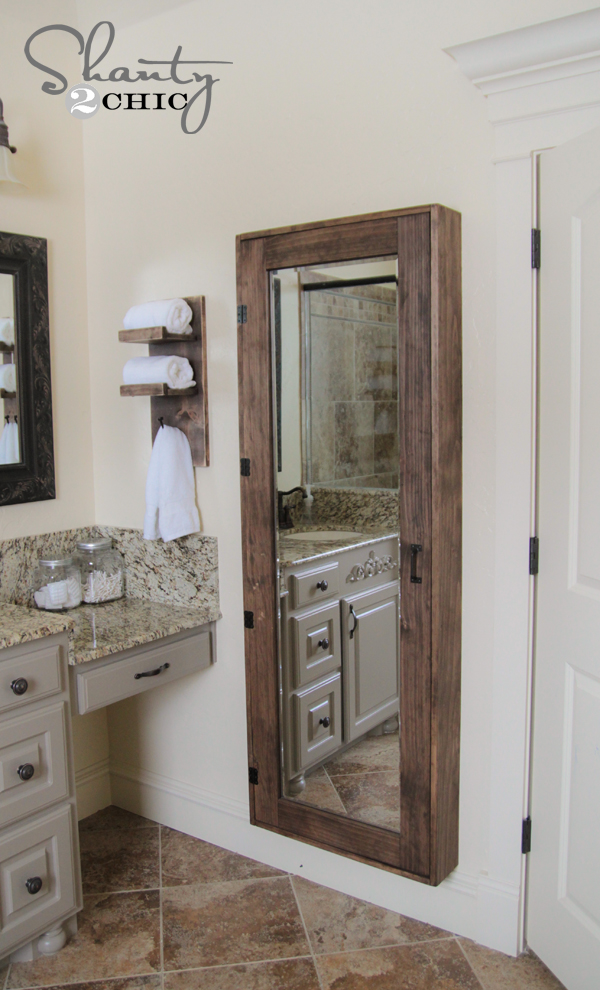
I am just slightly excited about this DIY Bathroom Mirror Storage Case I am sharing today. Ok, just kidding. I’m giddy! I shared a little sneak peek on INSTAGRAM last week, and I am so happy to finally reveal the whole thing! I have imagined it in my head, and the results are even better than I was hoping. I have always wanted a full length mirror. It makes checking out the final outfit before heading out the door so much easier than using the reflection of my glass shower door or my blank computer screen 😉 I thought it would be so great to add some function to this new mirror. May as well kill two birds with one stone! I decided to build a big storage case behind the mirror to hold all my goodies and I am LOVING the results! Here is how it turned out!
How fun is that guys? Who doesn’t love a some beautiful function in their bathroom?? I DO! I will walk you through the entire build below, and you can also download the FREE printable plans HERE or by clicking the button below!

Let’s get started!
DIY Bathroom Mirror Storage Case – Supply List
2 – 1 x 6 x 8 pine or whitewood boards
4 – 1 x 4 x 8 pine or whitewood boards
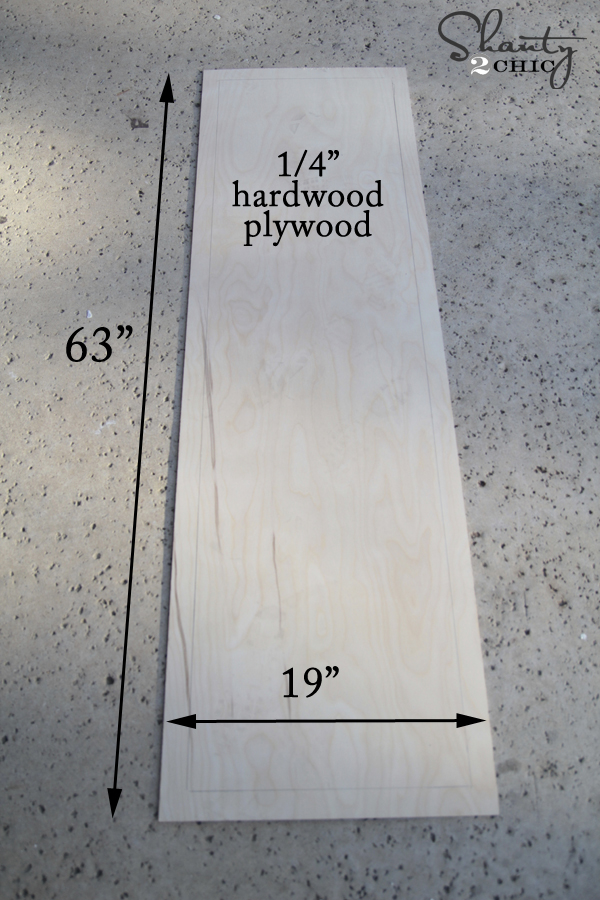
1/4″ hardwood plywood cut to 19″ x 63″
Full Length beveled mirror (found at Home Depot)
3M Stainable Wood Filler
ScotchBlue Painter’s Tape
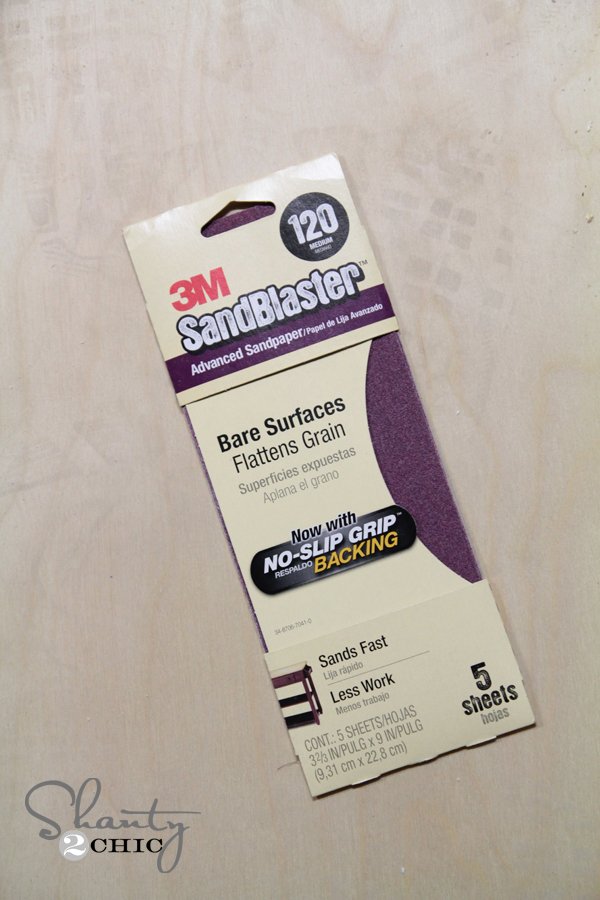
3M Advanced Abrasives 120 grit sanding paper
3m safety glasses
4 decorative hinges
1 pull or knob
magnet closures
wood stain of your color choice
I bought all the supplies and wood for this project for under $100.
DIY Bathroom Mirror Storage Case – mirror door
I started by building out the mirrored door. I used this great mirror I found at Home Depot for $25. I love it because it is beveled and it’s also a great quality mirror. It won’t give you the whole clown house distorted view when you look into it as some of the cheaper full length mirrors will. This project is done off the specs of this mirror. If you choose to use a different one, you will need to fix your measurements to fit it.

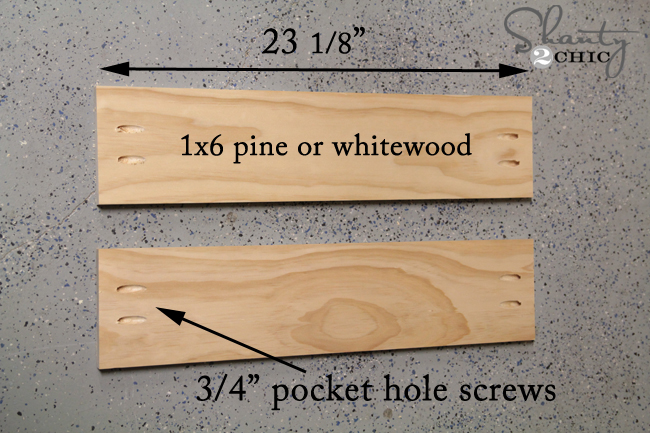
I started with my 1×4 hardwood plywood back. I had the nice guys at Home Depot cut mine down for me.
Next, I cut my wood for the frame. I used 1×4 pine boards for this part. You can also use whitewood to save money, but make sure it is straight! Watch our How to Use a Miter Saw video HERE!
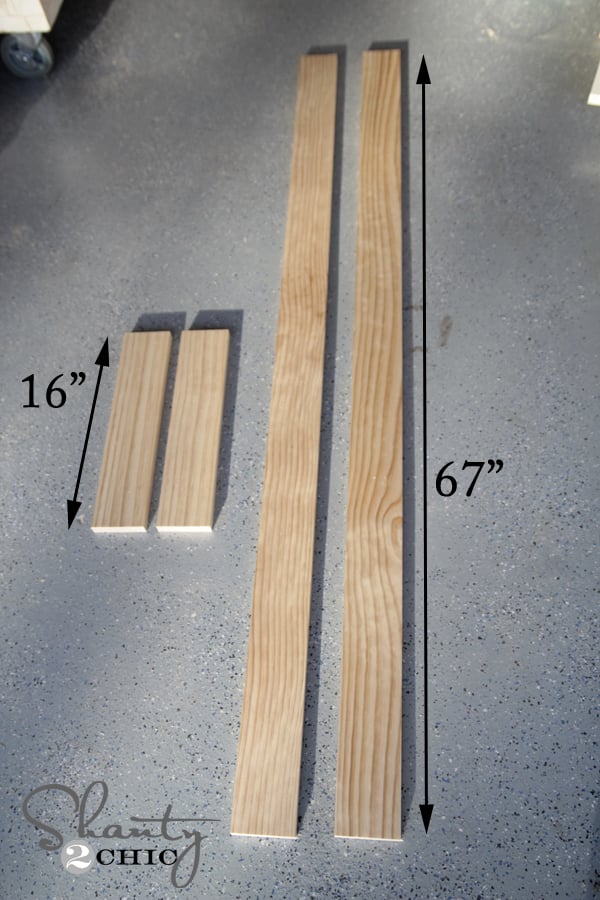
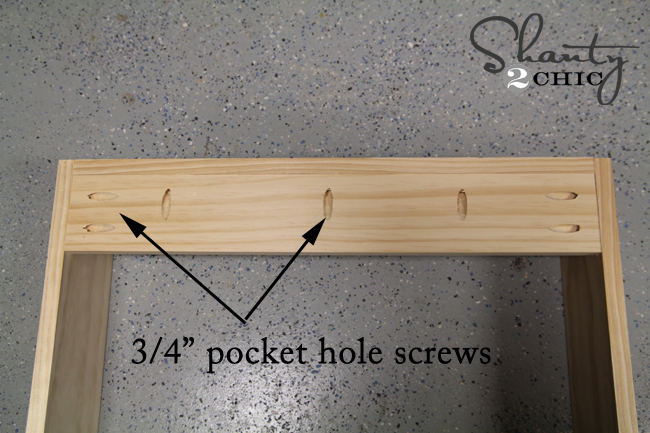
Next, I used my Kreg Jig to make 3/4″ pocket holes in each end of my 16″ pieces.
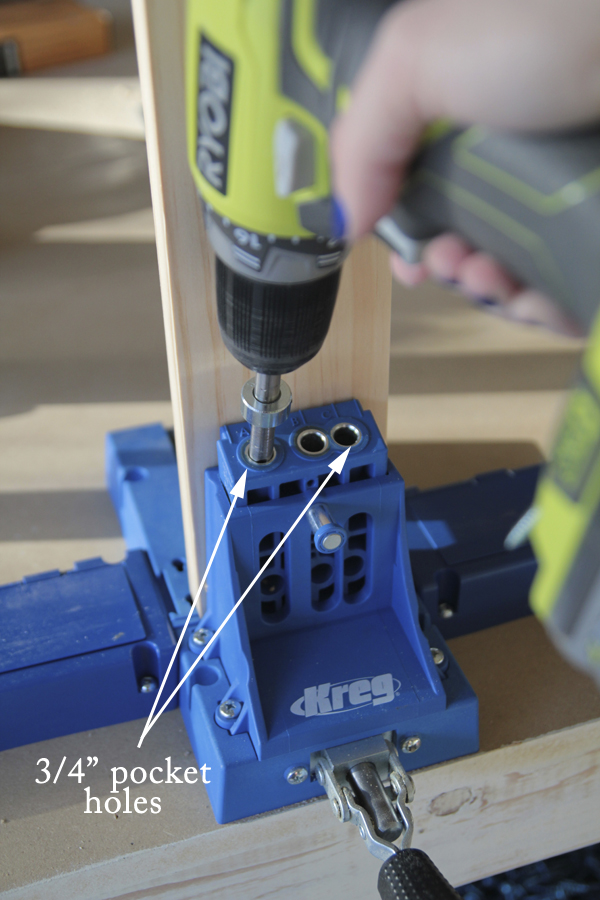

Check out our How to Use a Kreg Jig Video HERE
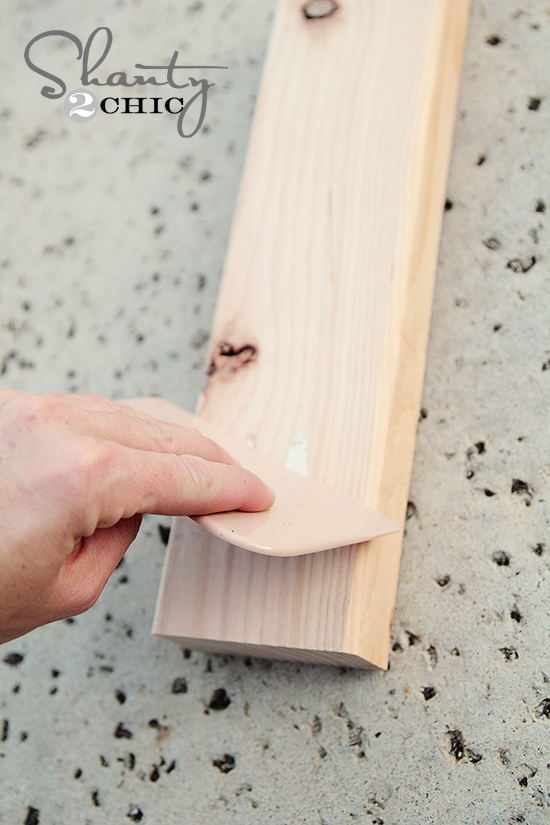
DIY Bathroom Mirror Storage Case – Sanding
Before attaching all of my pieces I like to use a sanding pad to quickly remove the splinters on the edges. This paper works great because I can keep it in my pocket and pull it out as I need it quickly… Perfect before attaching your boards!

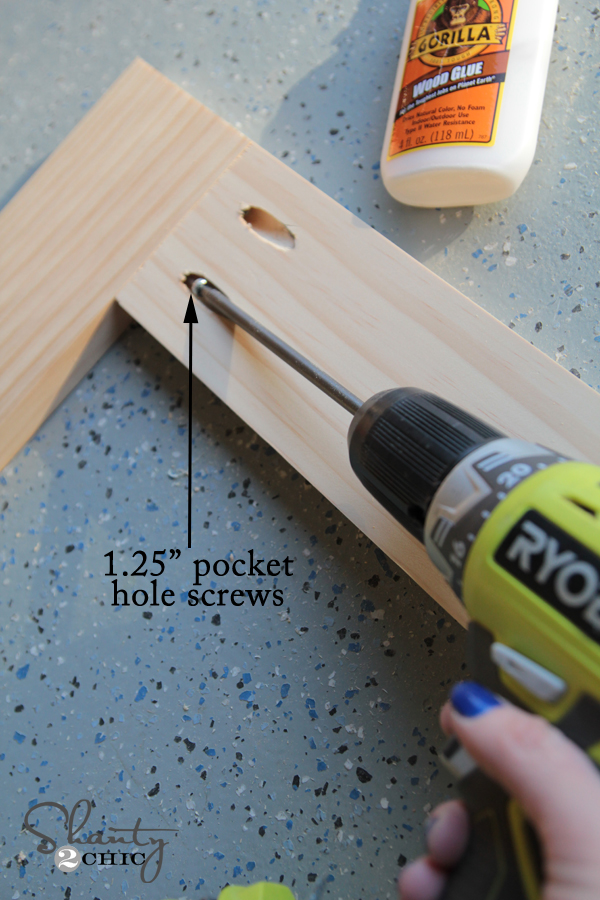
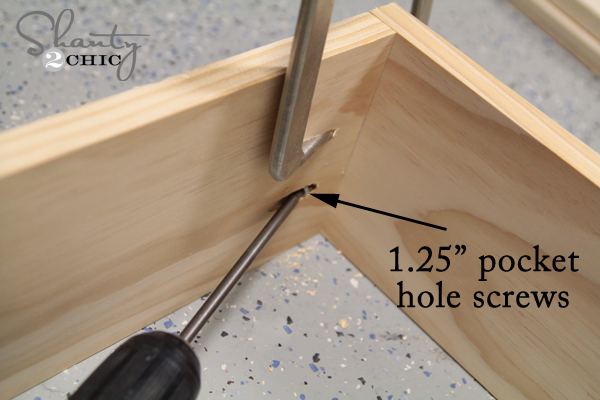
I attached my 16″ pieces to my 67″ pieces using 1.25″ pocket hole screws.
After attaching both ends, my frame looked like this…

Next, I added some wood glue to the frame and attached it down on my 1/4″ hardwood plywood.

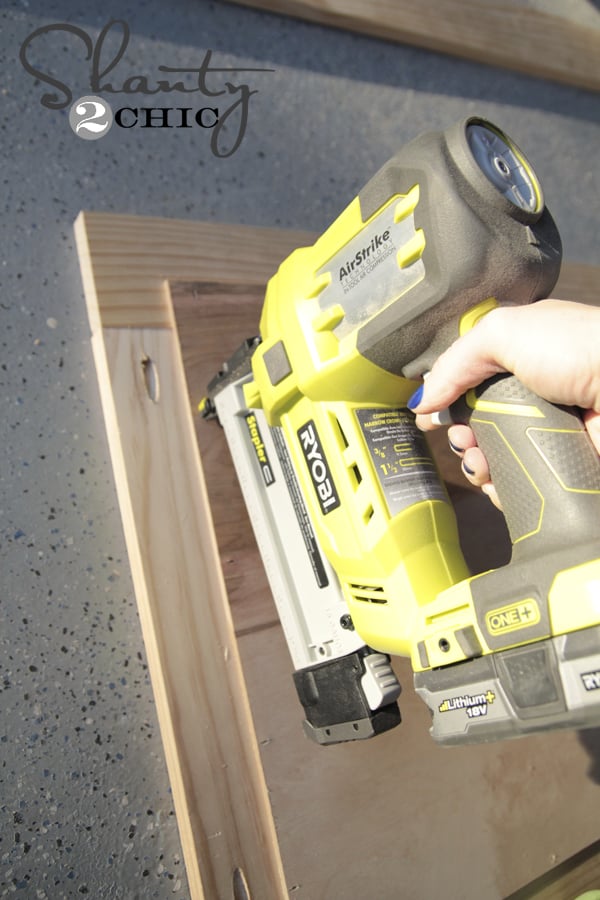
I used my Ryobi cordless stapler to attach it from the back.
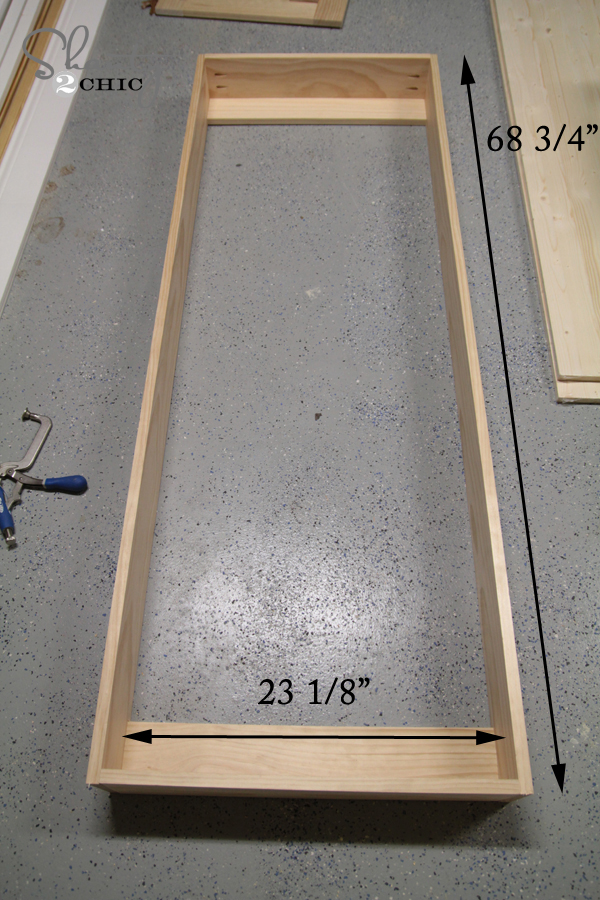
After building out the door, I moved onto the frame of the case.
For this part, I used 1×6 pine boards. I cut two pieces at 23 1/8″ and two pieces at 68 3/4″. Again, I added 3/4″ pocket holes to my shorter boards.
I used my Kreg Right Angle Clamp to hold everything together while I attached it using 1.25″ pocket hole screws.

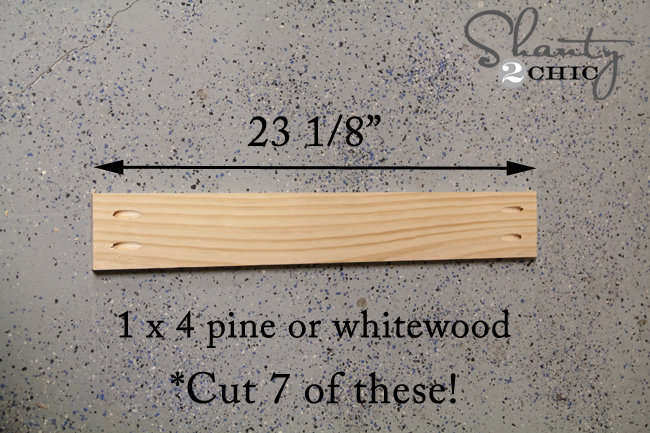
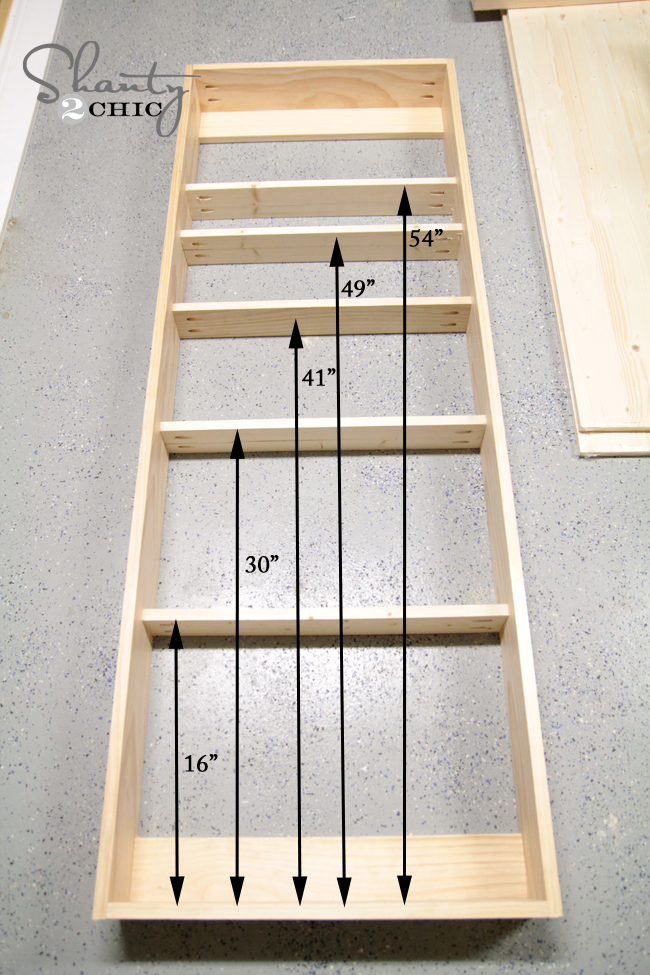
Next, I added my top and bottom braces. These were the same length as my shelf pieces, so I cut seven 1×4 pieces at 23 1/8″ each.
These will be used to attach the cabinet to the wall. You can see here where I added pocket holes to these boards before I attached them. This is a shot of the back. These brace pieces will sit flush with the back of the cabinet.
Now, it should look a bit like this…
DIY Bathroom Mirror Storage Case – Time for the shelves!
I added 3/4″ pocket holes to each piece. You can attach yours wherever you would like, but here is where I attached mine for your reference.
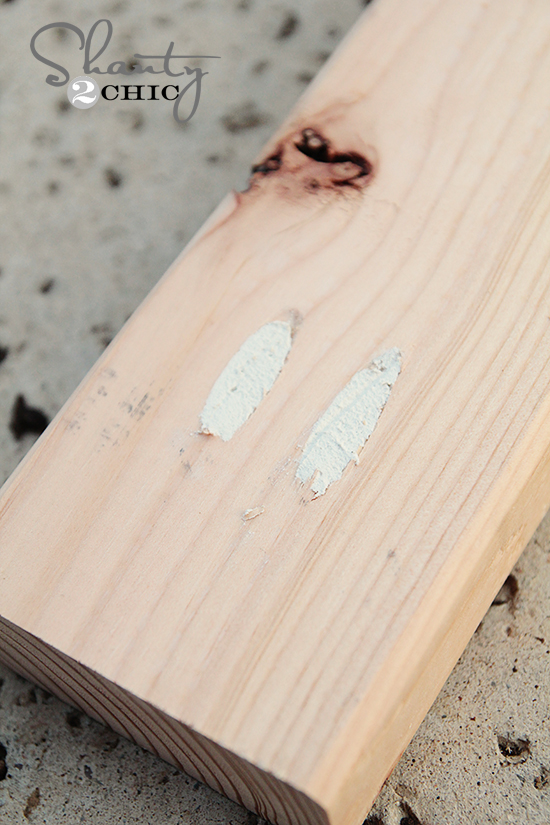
Before moving on, I filled all of my pocket holes with wood filler.
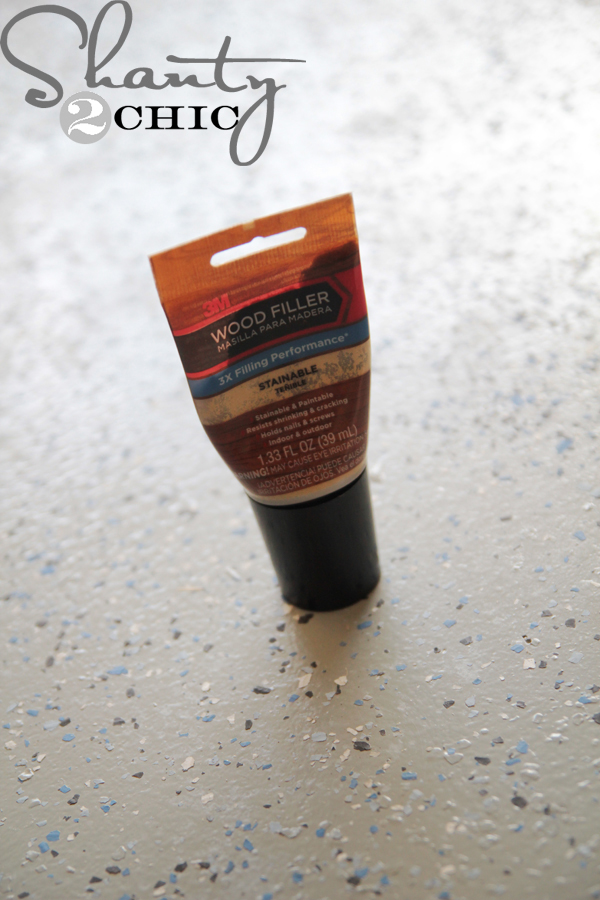
I filled each hole and then used a scraper to flatten it out.
This wood filler is stainable, and I prefer using it over the plugs on holes like these. This covers them well enough, and it’s also very easy to do. Once the putty dries, I use the sanding pad to go back over it again.
That’s it for the build!
I stopped here and stained everything using Varathane stain from Home Depot in Dark Walnut. I love this stuff!
After the stain completely dried, I attached my mirror to the door. I used this mirror adhesive I found at Home Depot to attach it. I just ran a thin bead on the back side of the mirror all around. Then, I laid it on the door and used tape to hold everything in place.

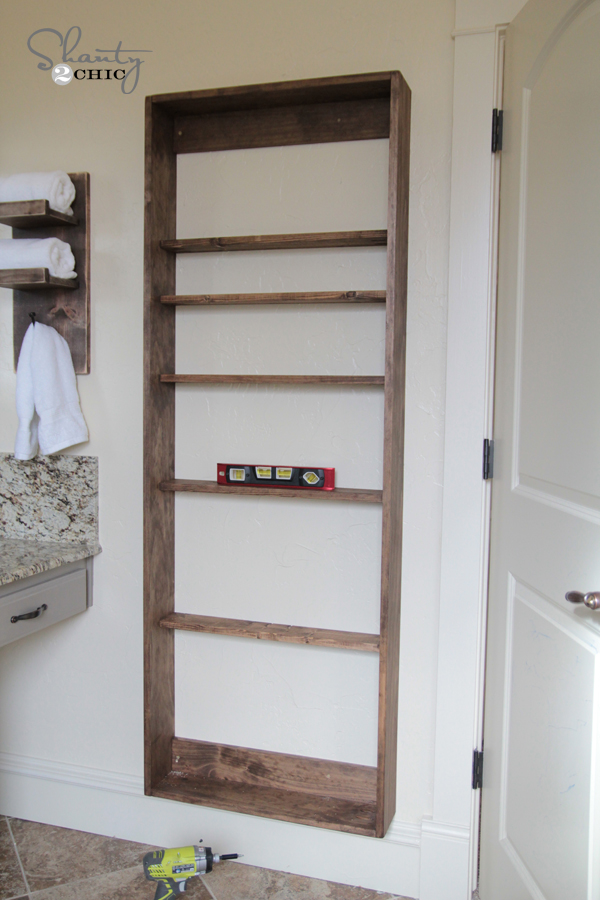
My final step was attaching it to the wall. I used a stud finder to find my studs in the wall and marked on my frame where the studs would be. I then used 3″ torx or wood screws to go through my braces and into the wall attaching to the stud. I did pre drill before going through the brace pieces to keep the wood from splitting.
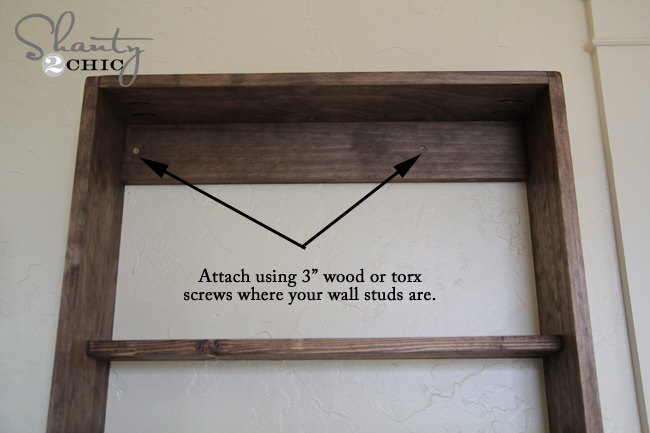
I also added 2 to the bottom brace piece.

I made sure everything was level before attaching the door…
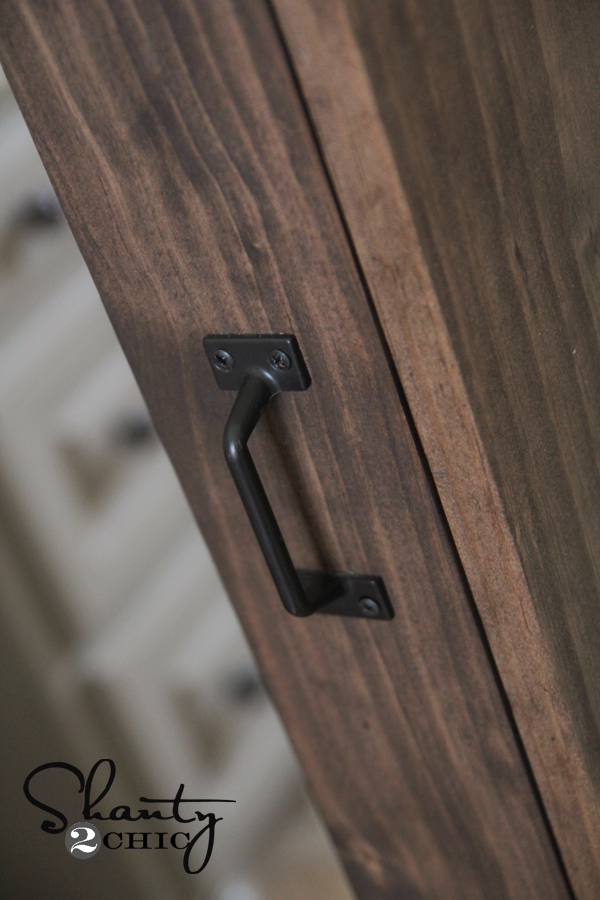
To attach my door, I used two clamps to hold the door in place while I added my hinges. I attached the hinges to the door first and then the frame.

DIY Bathroom Mirror Storage Case – Hinges
How cute are these hinges I found at Home Depot!

My final step was adding some magnet closures and my pull to the front. These just screw into place… Super easy!

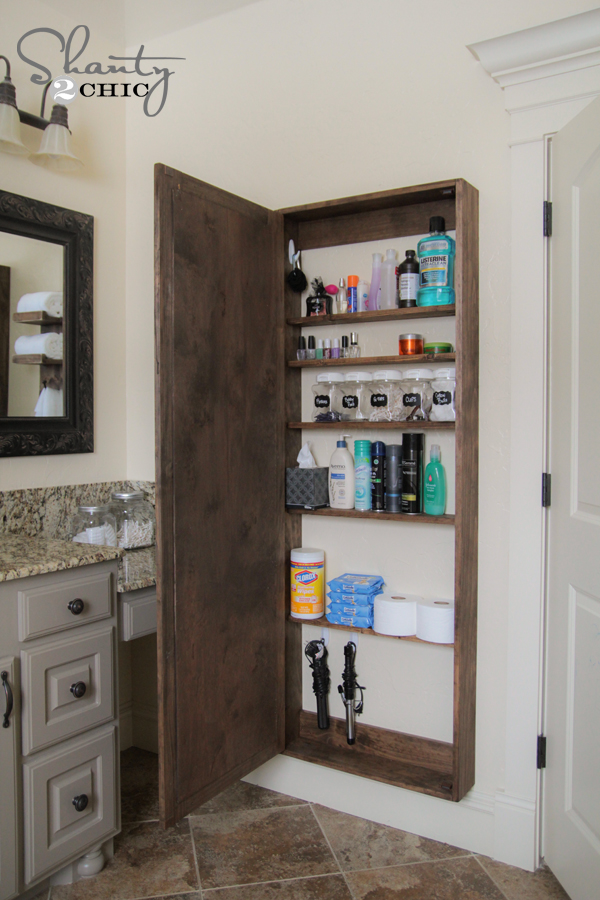
And here she is all finished up!

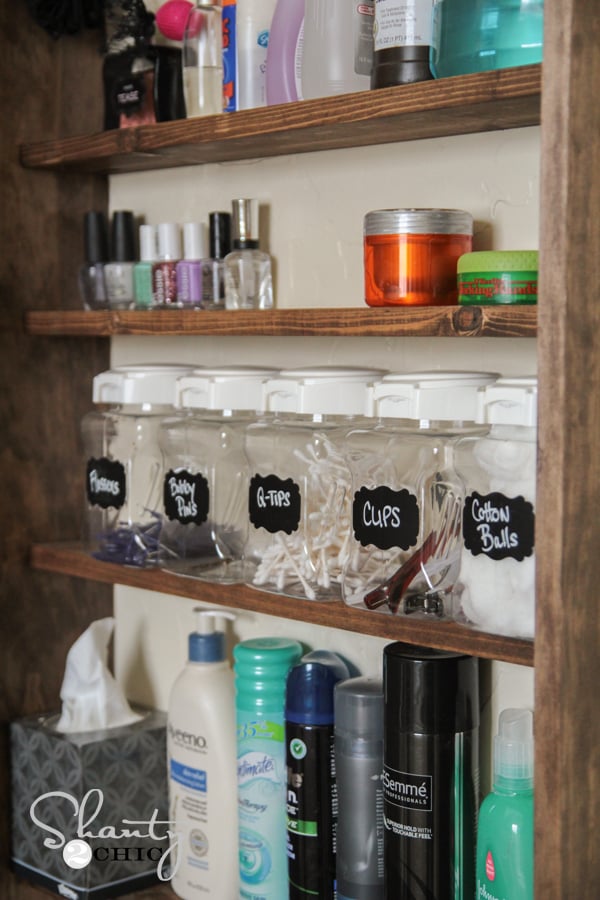
A little shot of the goodness inside…

I used 3m Command strip hooks to hold my rubber bands and also for my curling and flat iron below.

And these are those great SnapWare containers I use in my pantry for this shelf! These are great because they won’t break if they ever do get dropped. 5 kids… It could happen 😉
What do you think??
I personally LOVE everything about it! I finally have a full length mirror, and a ton of storage at the same time. Can’t beat it! I would LOVE for you to share and PIN my storage case with all your friends!
Happy Building!


I am unable to find the blog on the containers that you buy. Can you please help
This is what I was wanting to do!!!! Thanks for the awesome plans! Mine will be for a mirror I already have that is 34×24.
un projet qui peut s’adapter dans toutes les pièces de la maison. très sympa cette armoire murale. merci.
where did u buy the transparent boxes with white lids (that contain Bobby pins, Q tips)
I’ve always loved this project of yours! I would love to feature it on a blog post I’m planning on Small Bathroom Ideas. Do you mind if I use a photo and link back to think post? Let me know.
Ok… big problem with the measurement on the door. The sides should be at least an inch longer for the size of mirror suggested. So instead of being 67 (on the pattern) It should be 68 inches.
I am working on adding a bathroom downstairs in my home and I chose not to add a door but found clear organizers that I could fit between the studs (I actually bought those before I built the cubby) I backed my cubby with pretty tiles and it is right beside the sink in this small bathroom so it works nicely to store essentials. Thanks for the inspiration that you give us all!
Wow, great instructions. It’s nice that 3m cares enough to give you items to try as well as sponsoring real people.
I am in the process of making this cabinet! I am just waiting on the mirror to be delivered because all the Home Depots in my area are sold out of it. I want to make the shelf too… do you have the plans for how you made that?
Great jobb, thanks for sharing!
Where do you get the snapware?
Thanks for the awesome instructions! Just hung mine last night. My tiny bathroom is all done in weathered barn wood decor from families 100+ year old farm, so i attempted to artificially age/weather the wood using the vinegar/steel wool technique over top of a dry brushed white coat. pretty happy with results!
Hello, where did you get the mirrors? Are the precut? What size did you get?
Thank you for sharing! Such a great idea!
I would love to have one of these made for me by someone who is more handy than I am :(. I live in Northern California so if anyone is near and wants to make this please contact me at mianno@yahoo.com.
Hi. I’d love to make this but I’m a little confused about the measurements. Is the door 24″ wide? Two 4″ pieces on either side at 16″ horizontal piece, top and bottom? If this is correct, shouldn’t the top and bottom of the frame, the back support pieces and all the shelves be 24″ as well? I think I’m missing something. Thank you!
Actually just answered my own question. A 1 x 4 is actually a 3/4 x 3 1/2. Thanks.