Make your own Easy DIY Floating Shelves in about an hour! This simple woodworking project includes Free plans and a video tutorial.
This easy tutorial will show you how to build these easy DIY floating shelves. Just follow the free printable plans and how-to video by www.shanty-2-chic.com! I finally put use to a blank wall I have been staring at in my bathroom for far too long. I am LOVING how it turned out! Check out our How to Build a Floating Shelf Video! Just click the play button below!
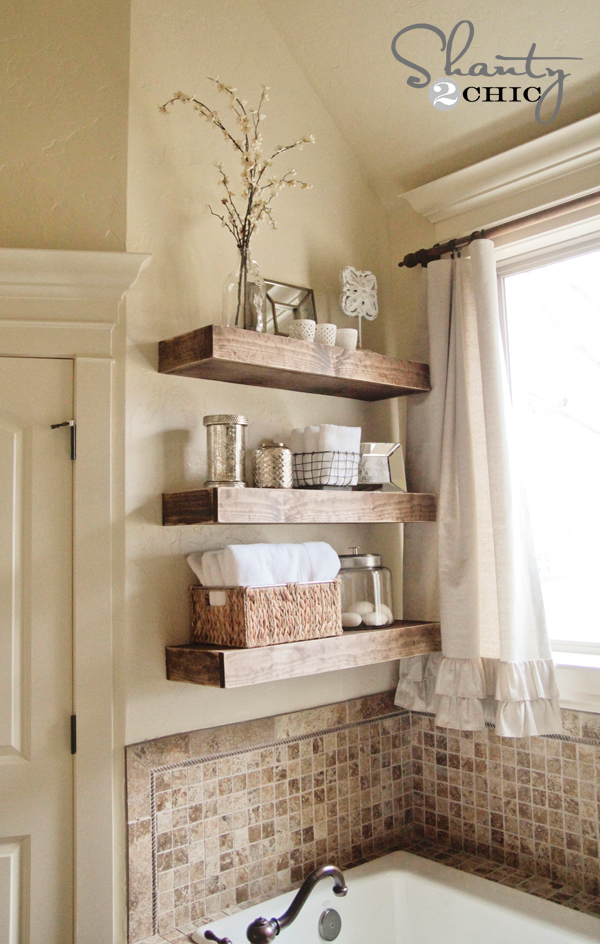
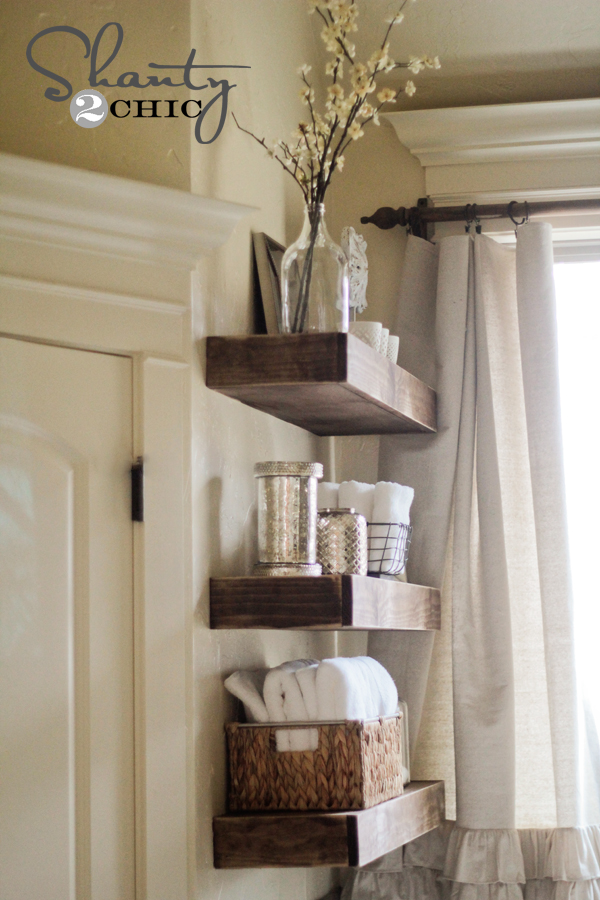
How fun are those?? I really wanted my shelves to be thick and beefy looking. I also wanted them to be super sturdy in case a certain 2 year old decides to use them as a ladder. It will happen. This design does both!
Table of Contents
Easy DIY Floating Shelves Tutorial and Plans
This is a great beginner project… Very simple cuts and assembly! Let’s get started!
Supplies
Supply List for 3 Shelves
- 1 – 1″ x 10″ x 8′ pine boards or common boards
- 2 – 2″ x 3″ x 8′ pine boards or common boards
- 1/4″ hardwood plywood material – I bought a 4′ x 4′ sheet and had Home Depot rip mine into 9.25″ strips.
- 3 – 1″ x 4″ x 6′ pine boards or common boards
- brad nailer
- Kreg Jig
- 2.5″ pocket hole screws
- 3.5″ torx or wood screws
- Gorilla Wood Glue
Tools:
- Miter Saw
- Drill
- Kreg Jig
The cost of wood for all 3 shelves was around $45 making these bad boys $15 a piece for wood… Yup. I love them even more now.
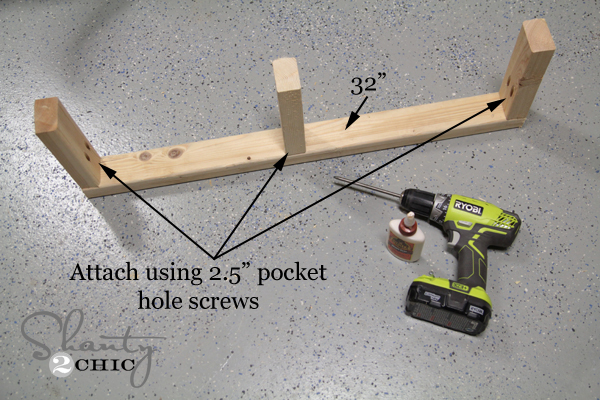
Step 1: Cut the Lumber
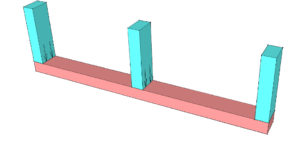
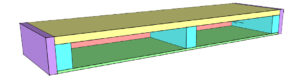
Start by making your cuts. (Watch our How to Use a Miter Saw video HERE) Each shelf will have a frame that you will build first. The back of the frame that is attached to your wall will be a 2×3 cut at 32″. Then, each shelf will have 3 brackets that are each 7.75″ long.
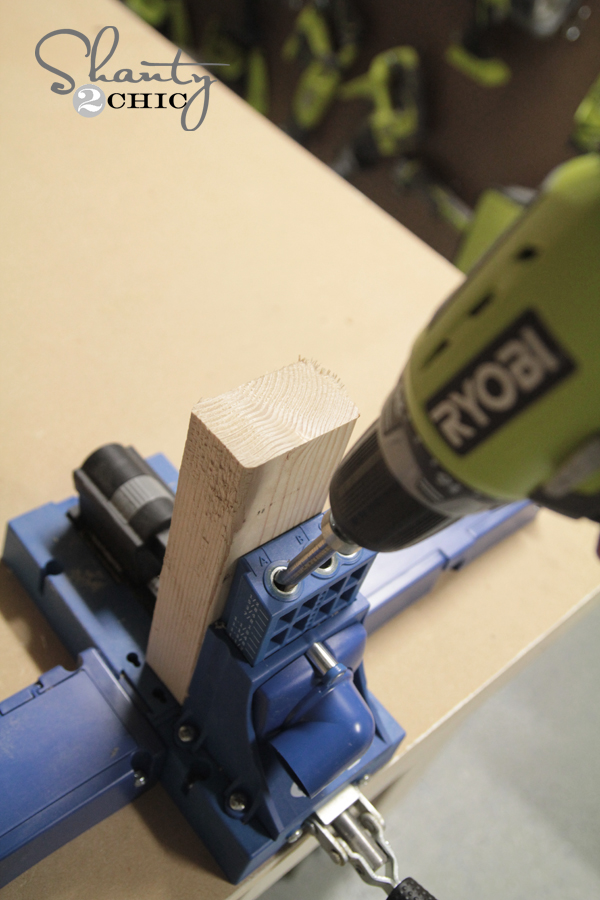
Step 2: Drill Pocket Holes
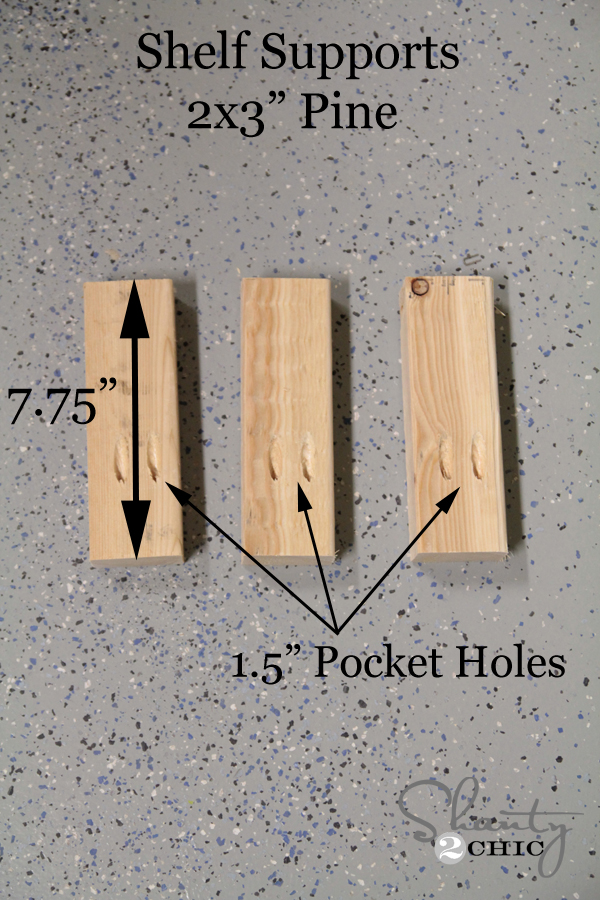
I used my Kreg Jig pocket hole jig to add 1.5″ pocket holes on one end of each of the brackets. This tool is the bomb. It will make your projects so much easier to assemble and also make them much stronger. If you are using the K3 or K4 model right now, I totally suggest checking out the K5. I just upgraded to that one and LOVE every little thing about it! Best thing ever.
And watch our How to Use a Kreg Jig video HERE!
This is how I lined up the brackets to make the two pocket holes…
Step 3: Attach the Brackets
Next I attached my brackets using 2.5″ pocket hole screws. I did add some Gorilla wood glue to each of the pieces of wood as well to make it extra sturdy.
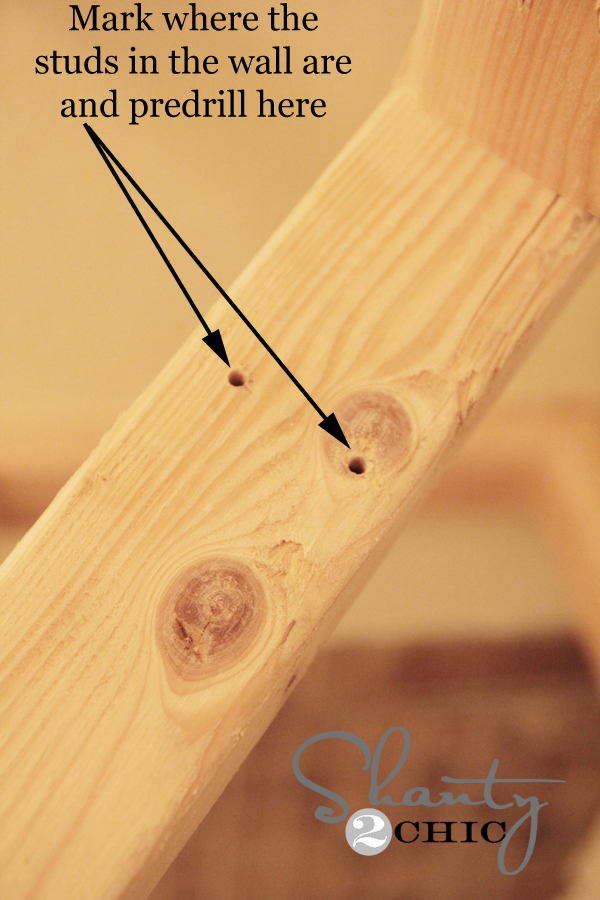
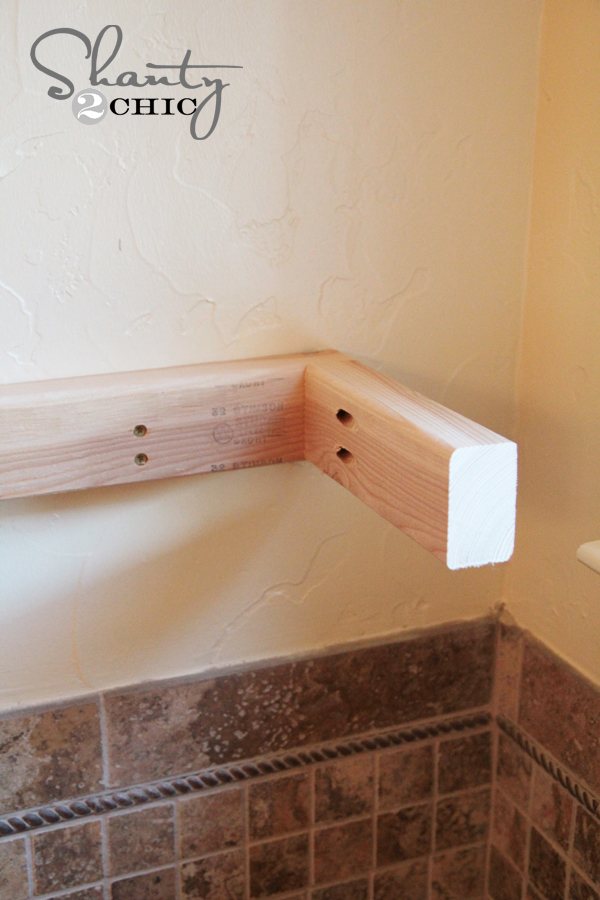
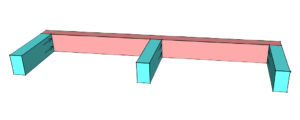
Step 4: Mounting the Shelf Support to the Wall
That’s it for the frames! Now to bring them inside and attach them to your wall. The first thing you will want to do is mark where your studs are. The easiest way to do this is by using a stud finder. This is the stud finder I use.
It’s a simple little tool that you run along the wall and it beeps when it finds a stud.
I held each frame up to the wall and marked on the frame where my studs would be. Then I used my Ryobi drill to pre drill 2 holes where each stud lined up. This keeps the wood from splitting when you attach it.
You can use your drill on this next part, but I chose to use my impact driver. Guys… This is like a drill that does all the work for you. If you have a battery, the tool only costs $69 and you will be amazed at how often you use it over your drill for driving.
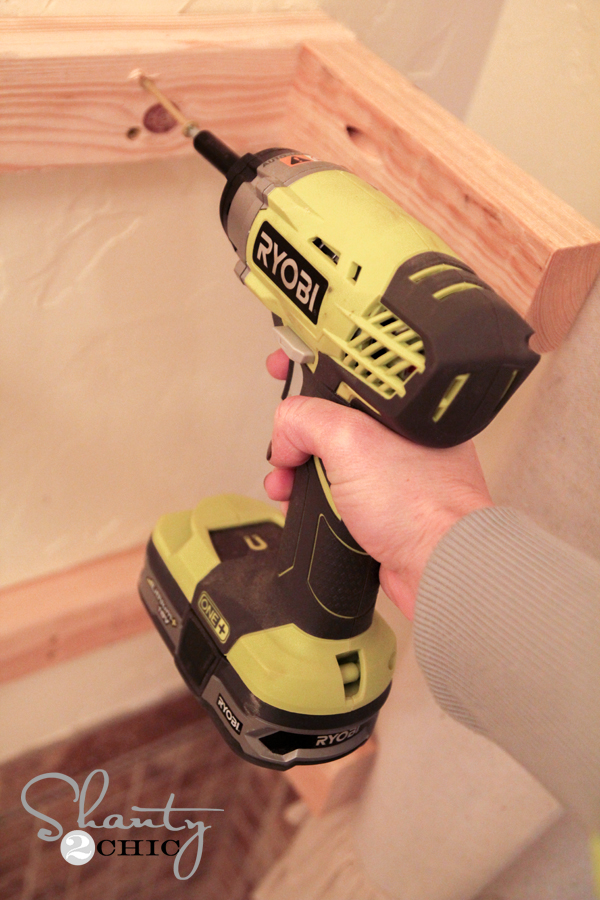
I chose to use 3 1/2″ torx screws to attach each of my frames. You can also use wood screws. Here it is after I attached it to the wall…
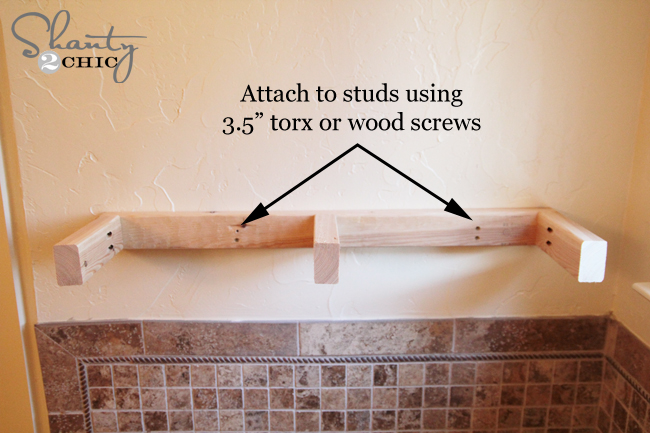
You can see where I drilled straight through the back of the frame and into the wall.
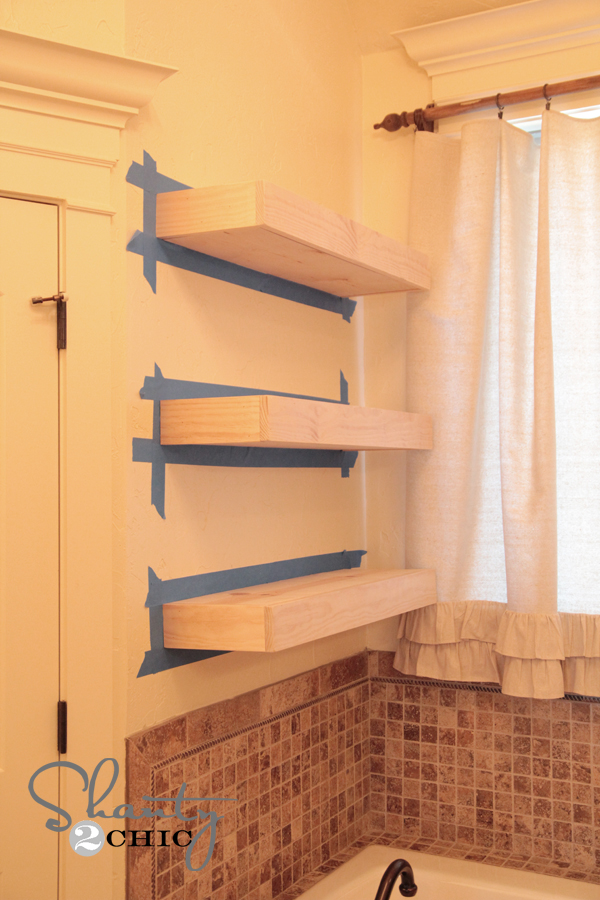
Here they are all 3 up and ready to go!

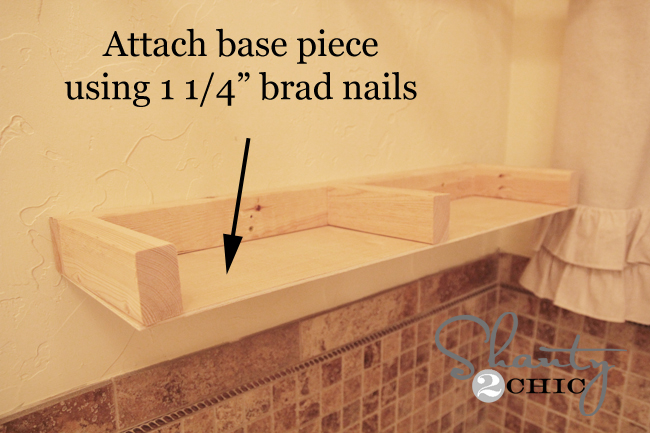
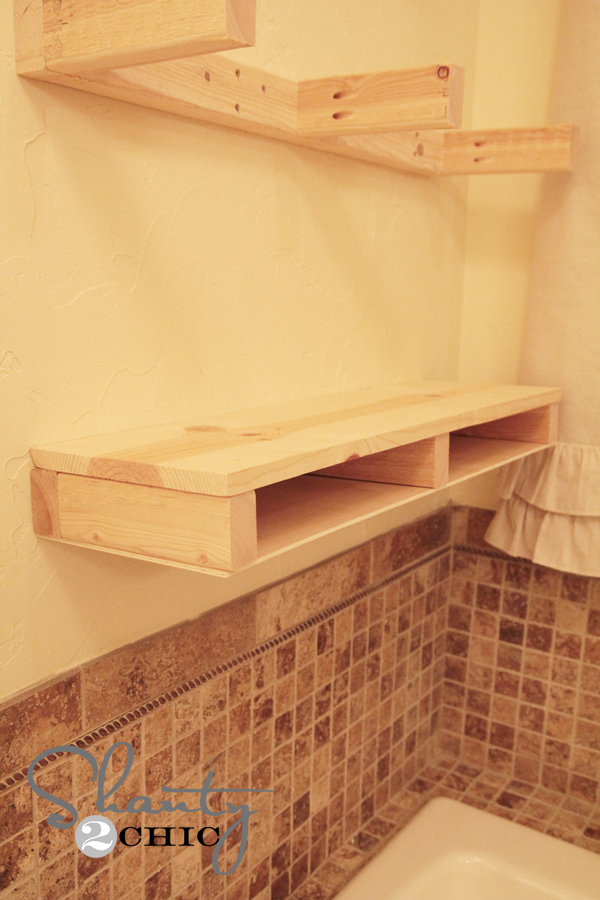
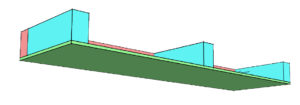
Step 5: Attaching the Top and Bottom Pieces
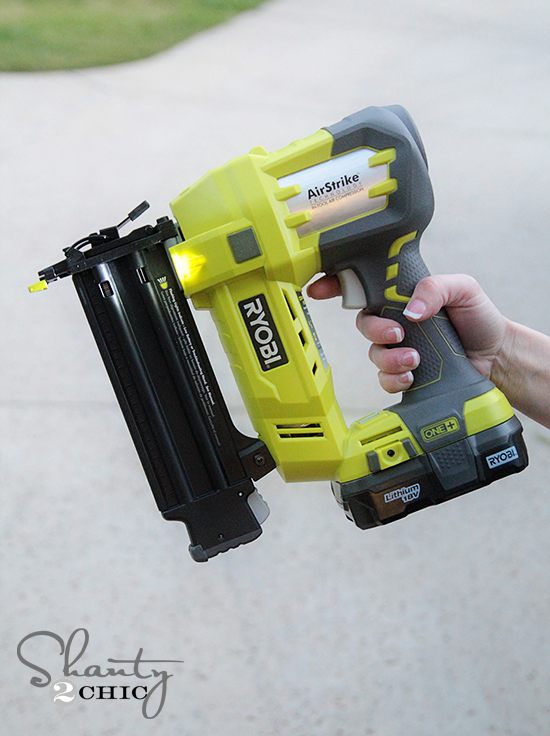
Next, I added my bottom 1/4″ hardwood plywood. I had Home Depot rip my sheet down to 9.25″ strips and I cut each one at 32″. I attached them to the base of the frame using wood glue and 1 1/4″ brad nails. I used my cordless Ryobi AirStrike nailer on this part. Can I tell you how awesome cordless tools are… Especially for indoor projects like this one! Saved me a ton of time and hassle.
After adding that I moved to my top piece. I used 1×10 board on this part. Each one was cut 32″ long and I attached them using wood glue and 1 1/4″ brad nails with my nail gun.
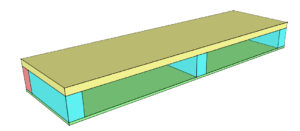
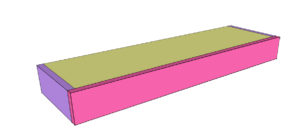
Step 6: Adding Trim to the DIY Floating Shelf
Your final step will be trimming it all out! I used 1 x 4″ select pine on this part, but you can also use whitewood. I love using whitewood because it is cheaper, but I had a hard time finding enough straight ones that day, so I went for the select.
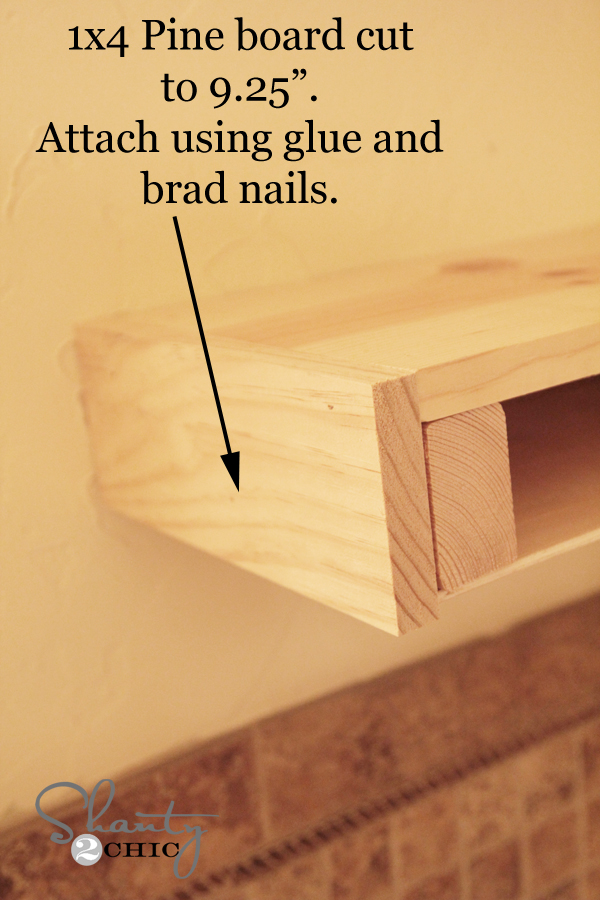
Start by cutting your side pieces. Mine were each 9 1/4″ long. I attached them using 1 1/4″ brad nails and glue.
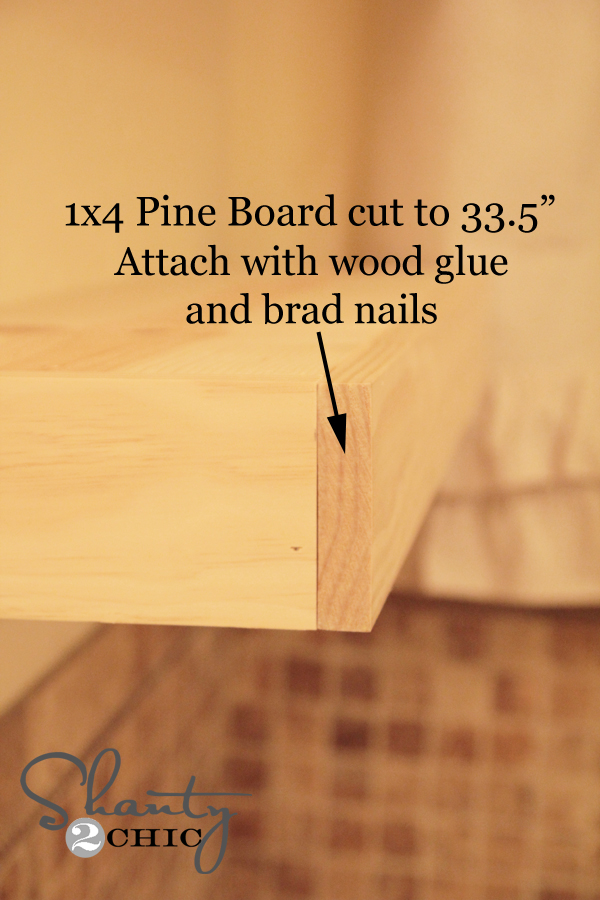
And now for the front of the shelf! You will want to measure for exact on yours, but it will be somewhere around 33.5″ long. I attached mine the same way using glue and brad nails.
Step 7: Finishing the Floating Shelves
Once I had all 3 done I taped them off with painter’s tape and used wood filler to fill all of my nail holes.
I used this wood stain to stain mine. You can find this at Home Depot and I love it! 1 hour dry time just like Rust-Oleum that is carried elsewhere. I actually find that it dries even faster than that.
Here they are drying!
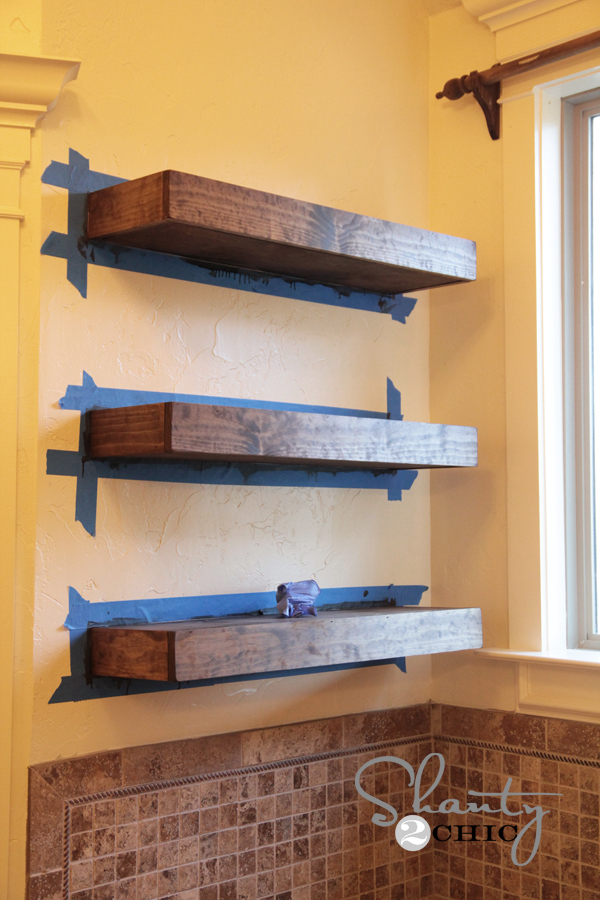
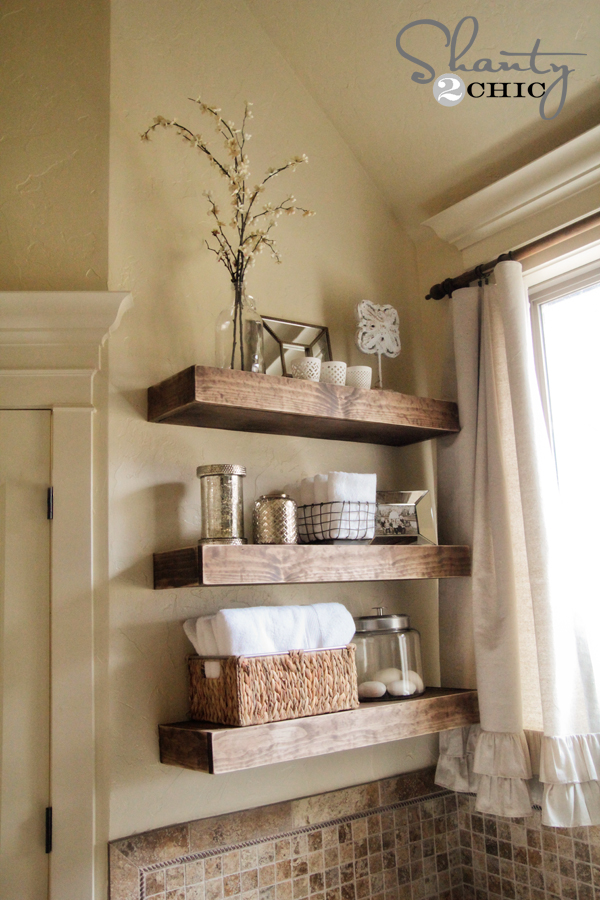
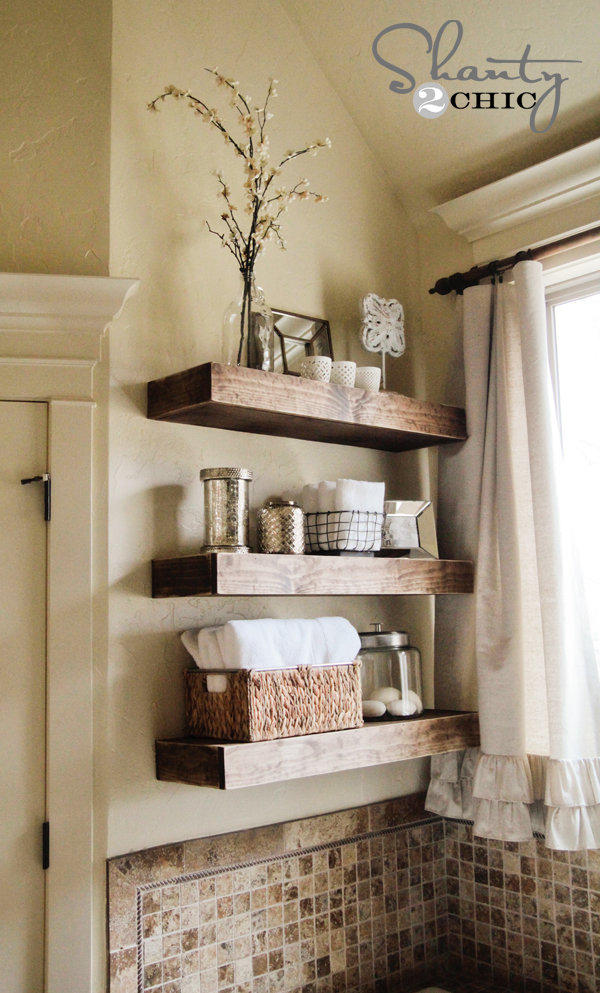
You can keep them like this or distress yours like I did! I used my Ryobi Corner Cat sander with, 120-grit sandpaper, to go over all my edges and corners. This gives it a fun, vintage look. I followed up with one coat of polyurethane to protect the finish. I like to say they look ‘shanty’ 😉
Step 8: How to Decorate Floating Shelves
I found all the cute baskets, towels and decor at HomeGoods! LOVE that place… I always walk in for one thing, and out with many more.

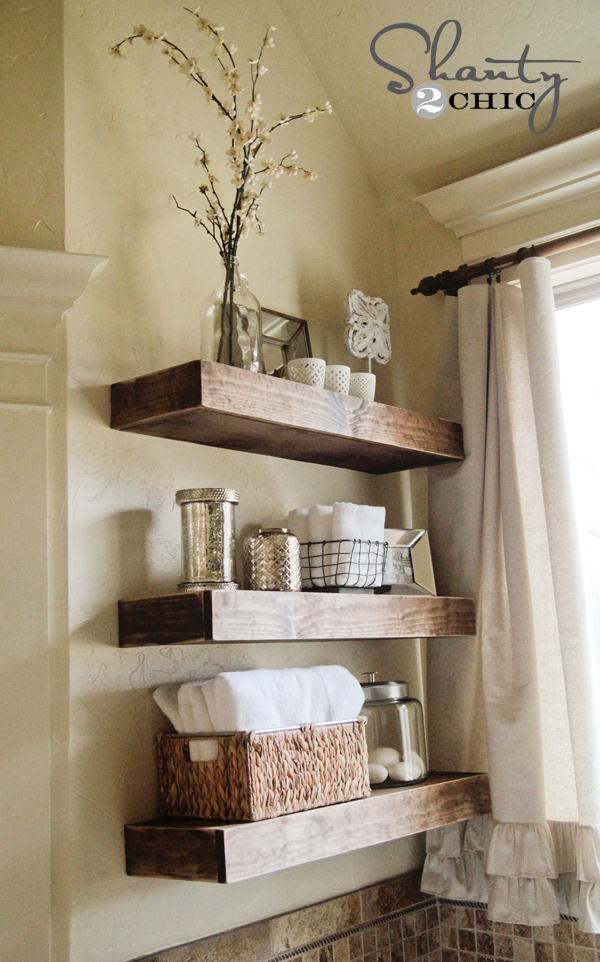
What do you think?? I love them! I may make some for every room now 😉
I would LOVE for you to pin these Easy DIY Floating Shelves and share them with all your friends! You guys are awesome!
Thanks so much!
~Whitney
Check Out Our Other Free DIY Floating Shelf Plans!
We have a ton of free shelf project plans! Which one will you build next?
- DIY Floating Shelves with Hardware
- DIY Floating Shelves with Pipe
- DIY Floating Shelves with Pulleys
- DIY Floating Corner Shelves
DIY Floating Shelves
Supply List
- 1 1x10x8 Pine or Whitewood
- 2 2x3x8 Framing Lumber
- 1 4’x4’x1/4″ Hardwood Plywood
- 3 1x4x6′ Pine or Whitewood
- 1 1/4″ Brad Nails
- 2 1/2″ Pocket Hole Screws
- 3 1/2″ Wood Screws
- Wood Glue
Instructions
- Cut List

- Screw the three 7 3/4″ pieces to the back 32″ piece.

- Locate your wall studs and transfer the locations to the back piece. Predrill two holes at each stud location and use 3 1/2″ wood screws to attach the shelf to the wall.

- Add the bottom 1/4″ plywood. this piece and the rest of the project will be attached with wood glue and brad nails.

- Attach the top 1×10 shelf.

- Attach the side 1×4 trim.

- Attach the 1×4 front trim. Now you’re ready to tape off the walls, sand and finish.


Is there a way to remove them without having to destroy them?
I was wondering the same thing….Id rather attach the bottom with small head countersunk screws to be able to more easily remove the bottom to take them down or move them.
After screwing the base piece with its supports to the wall, the rest of the shelf should be built as one piece and slid over the supports. I built myself a similar shelf but with crown moulding and it just covers and sits on the wall supports.
I really don’t think it’s a good idea to build the entire piece to the wall. It should be easily removable without destroying the piece or the wall. It looks beautiful though and I’ll be using this as a template to make my own.
I really want to do something like this in my kitchen. I have a huge, long blank wall, and very little storage. My problem is I don’t have all these tools. Does anyone know how much of this can be done by Lowe’s/Home Depot? I have a drill, but no Jig and no staple gun.
Love what you’ve done and it’s inspired me to do something similar in my closets. My question is how did you deal with seams and nail/screw holes? I’ve been testing with various “stainable” wood filers and the results have been pretty “meh.” Would love to know what worked for you.
How much weight do you think these can hold? I modified the design a bit and instead of doing the toe screwing I countersunk some holes and put 3 inch long deck screws through the backing that attaches to the wall.
Could you do this with 2×2’s and 3/4 plywood. I have a hard time finding 2×3’s and was thinking of doing a narrower profile for the shelf?
same here, however you can find regular old 2×3 framing studs for 1.50 at home depot. biggest problem i had was finding some that were in good condition. 2×2 are a good idea too. was going to try that. that will allow a thicker bottom to be attached too.
I don’t want to attach it directly to the wall so I might try using a french cleat system. Thanks for the great ideas!
Ack! Just built these and got to the part where I put the trim pieces on and realized you used 2×3’s and I used 2×4’s…didn’t read the plans close enough… Now I have to figure out how to finish them since nobody makes 1×5’s and I hate ripping wood… Any suggestions? Is there some kind of trim I could add to fill in the extra space? I had planned on doing. A vinegar/steel wool finish on them, but now I don’t know what to do..
Ack! Loved these, but started building them before reading the instructions closely. I assumed you used 2×4’s for the frame, not 2×3’s. I don’t even think I have ever seen 2×3’s anywhere around here… I got to the part where you attach the trim on the edge and realized my trim was too small… Hope I can find some 1×5’s around here somewhere so I can finish this 🙁 might just finish with some pallet wood…
I loved the shelves and knew I needed some for myself! I ripped out some ugly, old cabinets in my laundry room and built these (in 14* temps with snow on the workbench)! I absolutely love them and they are so much prettier than what I had before. Thanks for the great plans!
I was inspired. This is the first actual building project I have done. It was extremely trying as our house is over 60 years old and was moved from one lot to another. Plumb, level and square are not really on the menu around here. LOL!
That looks awesome! Great job!
This is great! I was looking for something just like this, a simple, DIY floating shelve idea. The price is great too! Thanks!
I am putting some floating shelves up for someone that has a bay square window from kitchen to living. Should I put up shelves to surround on both sides or should I do shelves like yours on one side and then something else like pictures on the other. The couches will sit below the left side of the window. Please help. Thank you. Love all you guys do!
I LOVE these shelves. They are perfect for the space above the jacuzzi in my bathroom. Unlike your bathroom however, my shower is on the other side of my jacuzzi separated by a small wall. Am I in danger of hitting any pipes for the shower if I attempt to put these on that wall?
Thanks!
How would any of us know?
Depends. You are anchoring these into studs. If you have plumbing that runs through the studs, then I guess you could hit a pipe. However, I don’t know how often plumbing runs through studs it at all.
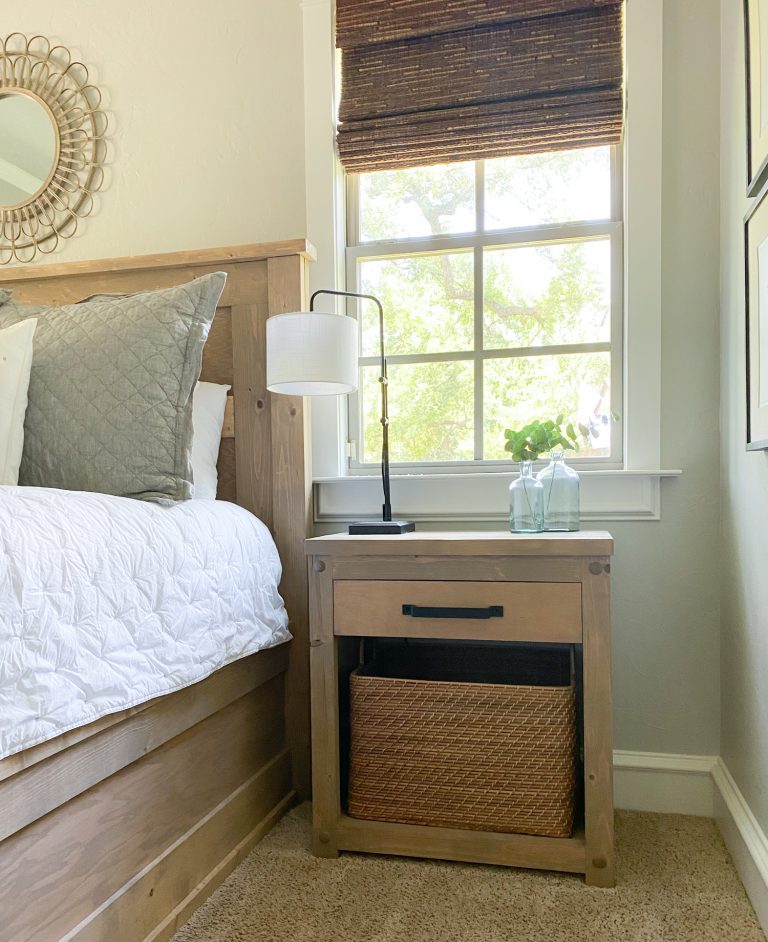
I absolutely love this room! Can I ask if you homeade your curtains or if you purchased them at a store?
Great to see that woodprix has new instructions to save my money and energy to build it.
I agree with you.
THANK you so much for this! This is exactly what I have been looking for! I just bought the Kreg Jig and can’t wait to get started. This will be my first project and if all goes well the Pottery Barn inspired console is next! My husband thinks I’m crazy!
Haha! Mine did too at first… Now he knows better! He doesn’t complain that I am saving him a ton of money now 😉 Send pics when you get it all done!
Love the shelves! Now….what’s on the opposite wall? I also have two empty walls on either side of the tub with the big window across the back. I love the look of the shelves on the left so much, but don’t know what to do on the opposite wall, if anything. I’m a bit obsessive about the symmetry thing…..
Hey Barbera! It’s actually the glass wall of my shower… So, I don’t have the same issue as you. If you go with shelves on one wall, I would stick to something big and as flat as possible on the other. Like wall art, maybe a pallet sign. Just thinking out loud… Hope this helps!