Happy New Year friends!
I am SOOO excited to share this latest build with you! I decided to build a little something for myself this go around. I figured it was time to get a lot of my projects off the garage floor and onto a workable space. Check out my simple DIY workbench!
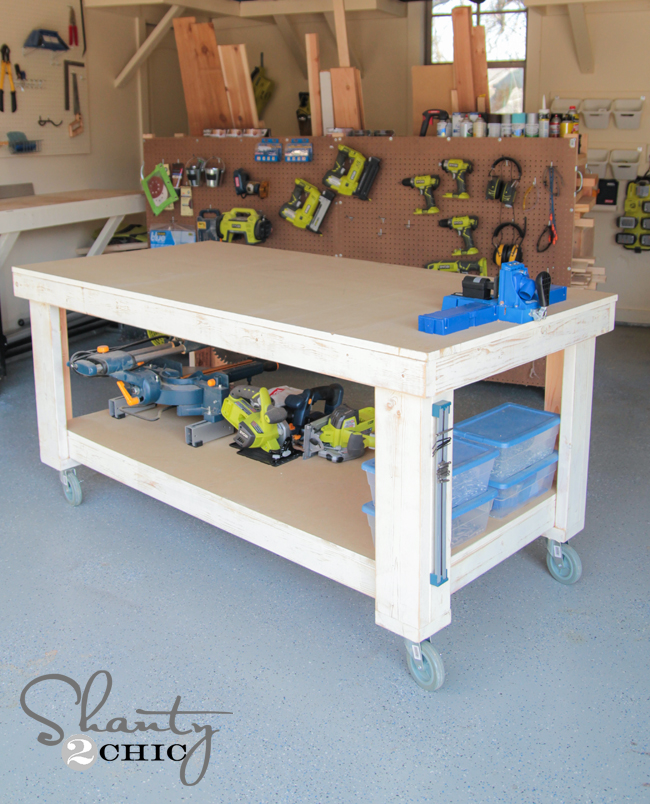

Ahhh… Isn’t it perfect?? I love everything about it! Ashley and I have been working with our friends at Ryobi Power Tools to create fun DIY videos for you guys. They always have the BEST workbenches for our shoots, and I come home feeling super inspired to build one for myself. Well… I finally did. This is a large workbench, but it really is a very simple build! I tried my best to break it down for you, but feel free to ask me anything!
CLICK HERE TO DOWNLOAD THE FREE PRINTABLE PLANS!!!!!
Here we go!
New Workbench Supply List
2 – 2x6x8
7 – 2x4x8
2 4×8 sheets of 3/4″ MDF
4 5″ locking rubber casters
2.5″ wood screws
Kreg Jig
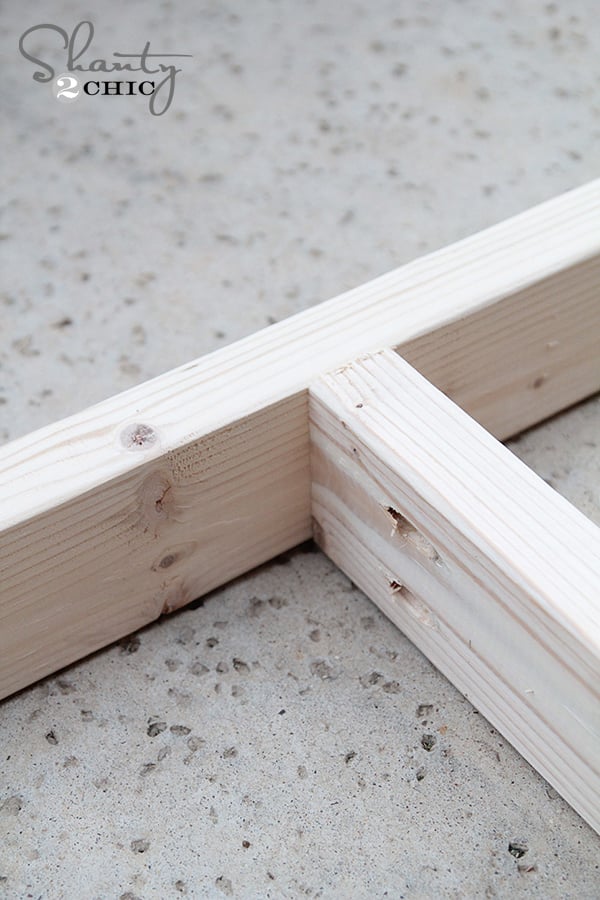
I started by building my frames. This workbench has two frames… A top frame, and a bottom shelf frame. Here are the measurements of both.
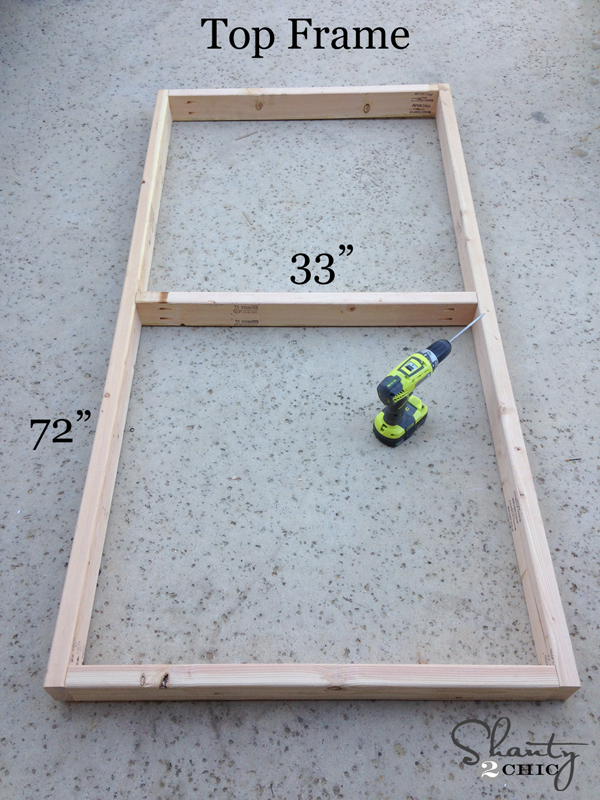
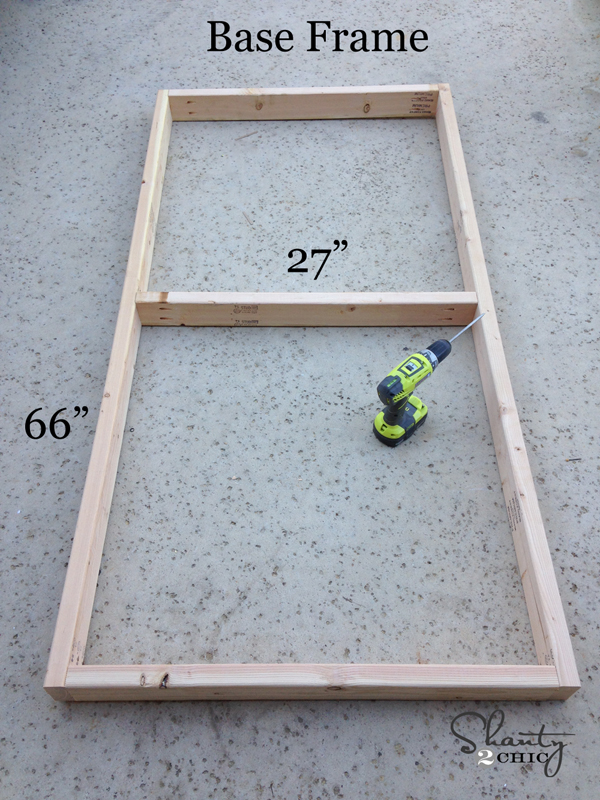
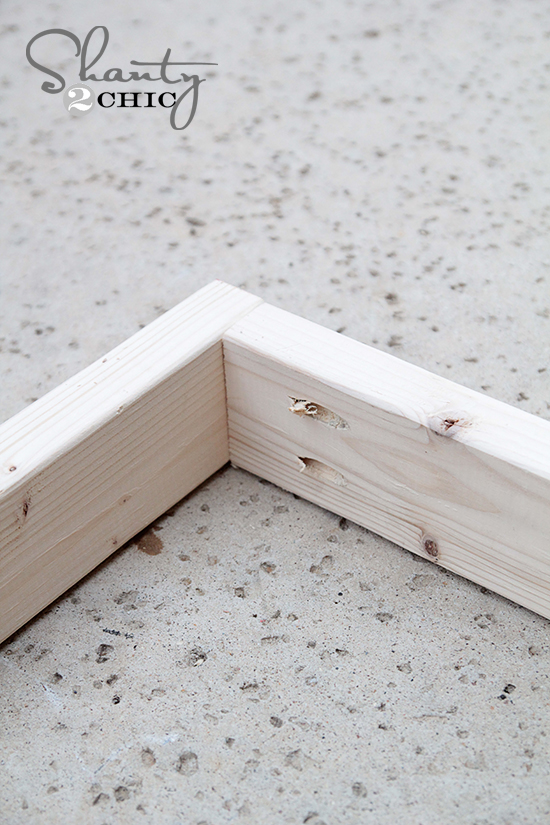
I used 2×4’s for both frames. I also used my crazy awesome Kreg Jig to put the whole thing together. If you don’t have a Kreg Jig, you can also predrill and attach all the pieces with 2.5″ wood screws. But, I totally suggest the Kreg Jig! Makes this part a breeze and you won’t have screws showing on the outside.
I used 1 1/2″ pocket holes and 2 1/2″ pocket hole screws to attach all my pieces. I did this because the width of the wood is 1.5″.
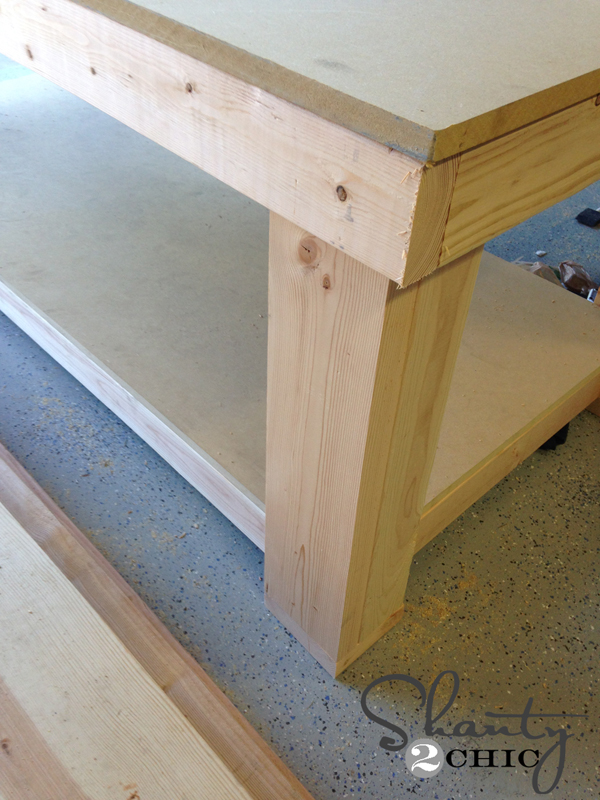
Now for the legs! Each leg is made from one 2×4 and one 2×6 piece. These measure 26.5″ long each. I attached the legs together first using my Kreg Jig. You can see where I put my pocket holes into my 2×4 pieces. I did 3 on each 2×4 piece. Then, I used Gorilla Wood Glue and 2.5″ screws to attach the legs together.
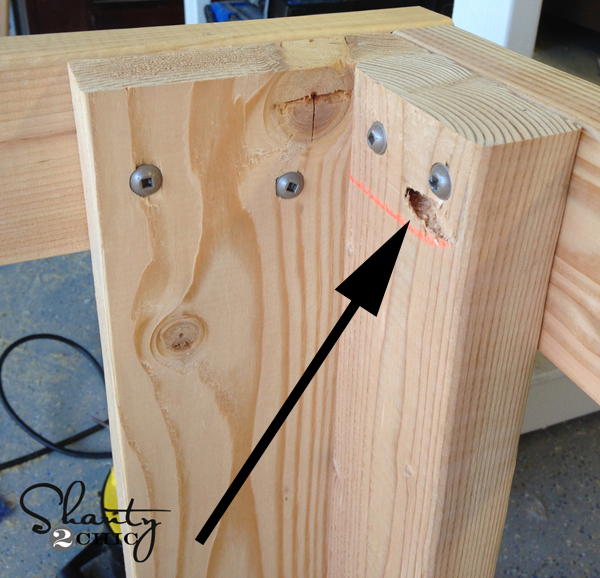
Here is another shot of the legs…
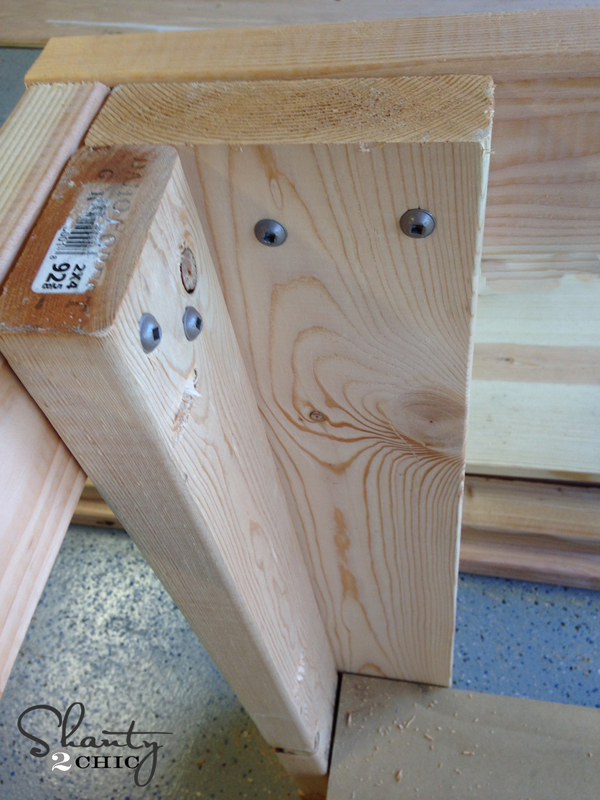
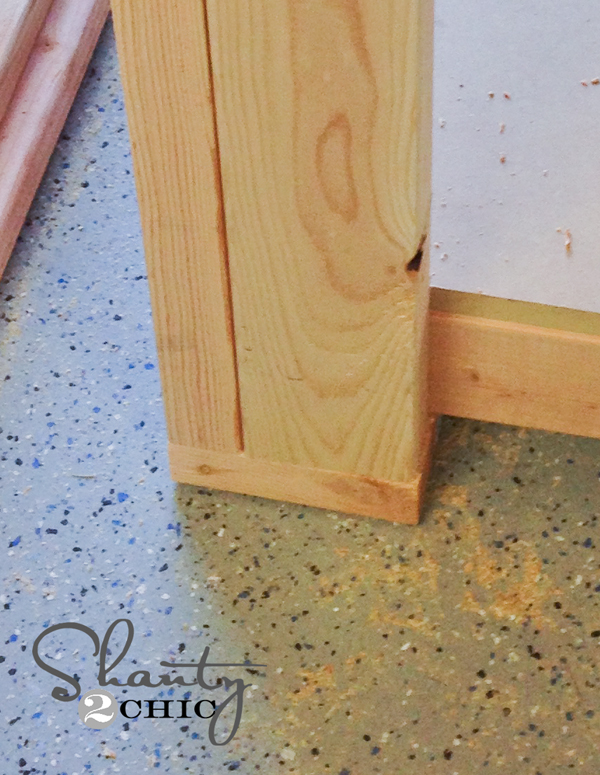
Each leg will also have a 5″ 2×6 piece on the bottom of each leg. These will hold the bottom shelf in place and hold the casters once it is all built. I used wood glue and 2 1/2″ wood screws to attach these to the bottom of each leg. Here it is after I attached the frames to it…
Once I had all the legs built, I attached them to my frames. The legs will line up on the outside of the bottom shelf frame, and on the inside of the top frame. I used heavy duty 2.5″ torx screws on this part. You can see them on the inside of my top frame. I also used my drill to pre drill before attaching.
Now for the shelves! This is the heavy part…So I got my hubby to help me lift them up. I used 3/4″ MDF for each shelf. I had the nice guys at Home Depot cut it down for me.
Here are those measurements…
Bottom Shelf – 30″ x 66″
Top Piece – 36″ x 72″
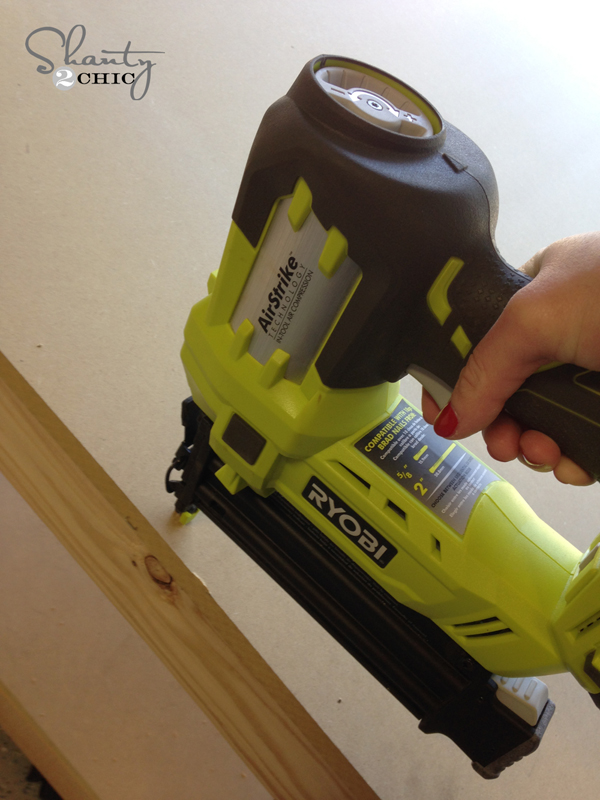
I used my Ryobi Airstrike Nailer to attach both pieces of MDF. I didn’t use glue on this part, because I want to be able to easily change out these pieces when they get too worn.
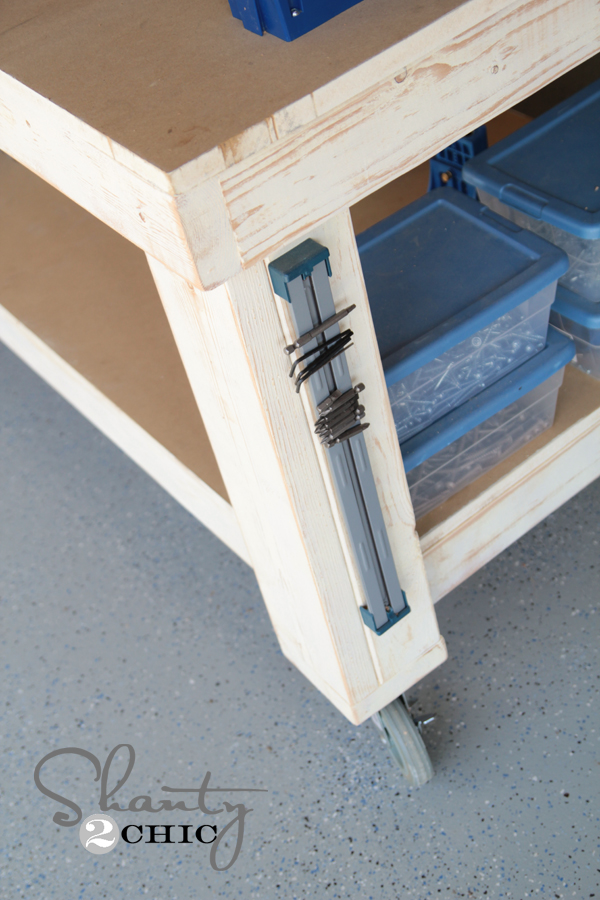
That’s it! My final step was adding the casters which I found at Northern Tool. These are 5″ rubber locking casters. I also gave the my frames and legs one fast coat of white paint and used my Corner Cat sander to distress them a bit… Every good workbench should be cute too, right??
Here’s the New Workbench all finished up!

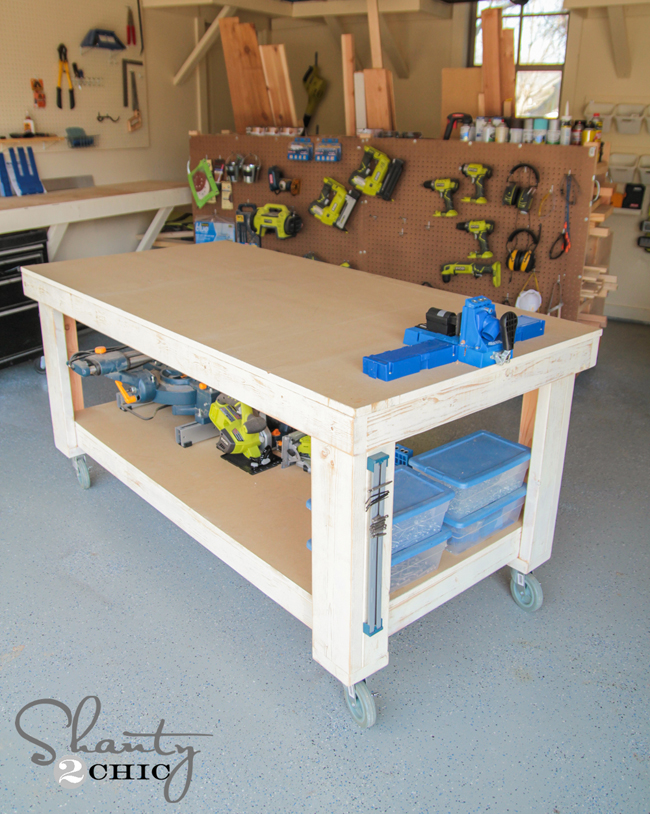
Did I mention I totally love it?? Just checking! I built the whole thing for under $130.
Thanks so much for stopping by! I would LOVE for you to pin and share my new workbench with all your friends! Let me know if you have any questions at all!
~Whitney


Please if you are going to make this – don’t rely on these measurements! Measurements in downloaded plan were wrong.
How can height of finished bench be 34″ when legs are 26.5 + 2 (feet) + 3/4 mdf???
How can bottom frame sit inside top frame and legs? – it doesn’t fit! Length of top frame should be cut to 74″ not 72″!
Design is ok but do your own math please! You cannot rely on these plans!
Yeah how does no one else realize this?? The measurements are way off!
Agreed! I wish they would address this! I thought I was going crazy!
2×4’s are not two inches thick, they are 1.5 inches thick. The measurements for the length of the bottom and top frames are correct with a length of 72″.
Height, however, looks incorrect based on the schematics. It appears they included the casters in their final measurement without making it look like they did. Either way, you should probably be custom measuring the height of a bench like this anyhow.
The measurements are fine. You didn’t account for the height of the wheels.
Well I like your plan so well I when ahead and built one. Then I have radial arm saw, so I built a small unit of it and but a cabinet under it, like every thing about it. Like to send picture, but see where I can
Nice workbench. I started building mine today. I’ll let you know how It turn out. Thanks for sharing your plan.
I just finished my workbench using your plans. Thanks so much. The instructions were easy to follow and the project was simple and turned out great. The bench is perfect for my needs. Having in on rollers is great because I have limited space in the garage and I can roll it outside to have more workspace and enjoy the outdoors while I work. It also allows me to prevent messes in the garage and work in a ventilated space.
Couple of notes;
The total cost of the project was $200.
Required tools were minimal.
Be cautious of using lumber that has not been dried out. The small 5″ pieces the rollers attach to the legs with split initially and had to be replaced before final assembly.
It easy to find ways to add on to the project – attaching power strips, additional shelving underneath, etc.
I was going to attach a pic but didn’t see that option.
Thanks again.
Hi could I please have the plans for this workbench
Kind regards
Gary
It would be handy if you could down load the plans, so you could take out to the shop with you .
You can download them from this page. That’s what I did.
I have made a few similar work benches. One I made the top and bottom hinged and used 2×6 in the framework. That way I had tons of storage for hardware like screws, nails and other items. In another bench I drilled a couple of 3 inch holes with a hole saw in strategic places in the top surface, so I could use wood clamps down through the top. I always include the mounting of at least one 2 foot long magnetic holder for some tools and a good quality power bar. On one bench I bought some plastic self contained drawer storage units that I mounted under the top giving me drawer space. The things you add help make it a total work center.
I have built two smaller versions of the work bench and love them, now I am going to build this size for an assembly table.
Looks great to me. I am going over measurements in my mind. I would have thought that the base would have been 4″ less at 29′ and not 27″ ?? I am going to have a go at this and see what eventuates. Like the ideas of the 2″ overhang and even a backboard to be added.
Is there a printable plan for this new workbench?
I have been looking for it too! If someone knows where we can get the PDF for this project please let me know.
I know this is an older post, but can someone describe how they mounted the 5″ block at the bottom of the bench and how the legs were attached at the bottom? Kind of wondering where I should be putting screws for the sturdiest design. Would love to see the bottom to see how these got mounted. And do the bottoms of the legs mount straight through same as the top in the picture?
Hi Shanty2Chic girls! Portuguese fan here! =) I’ve been following your work for a while now and I want to build this workbench to start my home woodshop. The problem is converting the US measurements into our metric system (cm or m), because I always end up with not even numbers (1 inch = 2,54 cm and so on..) and these doesn’t match with commercialy available wood sizes. Could you help me get the right measurements for this plans? Thank you so much and keep up inspiring us with your awesome works!!
Nice simple plans for a great workbench! I made mine a little taller to match my table saw and also added a 2″ overhang on three sides for clamping. The fourth side I left flush so it still fits in front of the truck in the garage 🙂
I’m about to start building mine tonight. Just got the lumber and the tools I need. Drafted up a quick model last night to make sure I’m all set.
Trying to find where you can print a copy of the plans.
Thank you,
Lavon