Hi guys!!
I hope you have all had a great week!
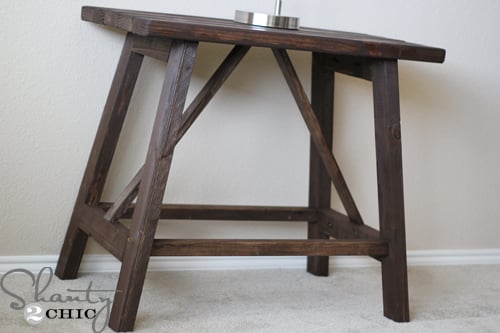
I am so excited to share my latest build with you guys. I think this might be the final piece for my oldest son’s room, and I am in LOVE. I might even steal it for my own room!
I wanted a desk that didn’t take up too much space, and that would also grow with him. Restoration Hardware has the perfect desk! The only problem is the $600 price tag. Ouch! That price is just a bit out of my shanty budget!
So… I hit up my sweet friend Ana White for some easy DIY plans to make my very own. She delivered! I was able to make a knock off version for just around $50! Yah. That’s right! 50 bucks.
Here is how it turned out…


This is a super easy build! I will show you a few of my steps here, and you can see the full set of plans over at Ana’s site!
I did use my very favorite tool on this build…
Love my Kreg Jig®. You don’t have to have one for this desk, BUT I would totally recommend it. The Kreg Jig® makes the build much easier, and so much sturdier in the end.
Here are my pocket holes for my bottom shelf supports.

And here they are attached to my legs…

I did a straight cut for both of my shelves.

I decided to countersink my screws at the top of the legs. I knew that the table top would cover them, and this seemed like the best route!

Here are the legs just before I added the top shelves.

For my table top I used this project panel from Lowe’s and I LOVE it!

I used Gorilla Glue Wood Glue on all of my joints, and I also use it to attach the legs to the top.


That is it!
To finish his desk I used my very favorite…
Rust-Oleum Ultimate Wood Stain in Dark Walnut

This stuff is great… Dries in less than an hour. Just make sure you wipe it off within 5 minutes or so!
We get LOTS of questions on what we choose to protect our finishes with.
This is my favorite. It really shows no brush strokes, and has a soft natural looking finish.
Rust-Oleum Ultimate Polyurethane with Soft Touch
You can find both of these at Lowe’s!!!

That is it. Such an easy build, and again… Did I mention it was only $50. Wow. Makes me love it even more! 😉
Here are just a few more pics…


I love it!
Want to build the whole room of furniture?? I’ve got you covered 😉 You can click on any picture below…


Restoration Hardware Nightstand


And if you missed my Easy Art Storage yesterday you can see that too!

There you go!
That should keep you busy for a bit! 😉
Remember you can get the full set of plans over at Ana’s site for this great desk!
Thank you SO much for stopping by! If you love this desk, I would LOVE some pins and shares below!
Thanks again!
Whitney


For the cuts…what does all this mean…Both ends beveled at 10 degrees off square,ends are parallel to each other, long point to short point measurement…Both ends beveled at 10 degrees off square, ends are NOT parallel to each other, long point to long point measurement…
Hi Jason!
Good questions!
Beveled 10 degrees off square is the angle cut on your saw. A miter cut is a cut along the width of your bird (for example a picture frame). A bevel cut is a cut in the thickness (like the edge of a table top frame). If you have a compound miter saw, the bevel can be made by adjusting the top of the saw to 10 degrees. The miter is made by adjusting the bottom swing arm of the saw.
Off square is just a reference to 0 degrees on your saw. So 10 degrees off square – set your saw to cut at 10 degrees.
The long point to long point/short to long references is how you measure the length. For example: 12″ long point to long point – the measurement from the longest point on one end of the board to the longest point on the other end will be 12″.
Not parallel the ends of the boards will look like this: / or / Cuts parallel the ends will look like this: / / or
Hope this makes sense 🙂 it’s just a code to tell you how the boards will be cut.
And by “bird” I meant board 😉 typo…
Wow. This is so pretty! Looks much more expensive than it is.
Do you know the name of the paint color above the blue? Looks like cream not white. I like these two colors for my sons room.
Did you use furring strips or a nicer wood?
I am in the process of making this desk and I am just wondering if you could give me an update on how the top is holding up? Do you think if I put more coats of polyurethane it wouldnt leave marks on the top while writing?
Your stuff is amazing!
Pine is a soft wood… I think if you are looking for no lines at all you would need to go with a harder wood. It’s pricier though!
What color is the blue on his wall?
It’s a Valspar color called Blue Twilight!
It’s very unique for the boy’s room. Probably i will put some beach decorations at my boy’s room as well. Love those art storages on the wall.
I love it! I just revamped my boys room and am looking for a lamp, where did you get yours?
Target!
Awesome, that’s easy, lol!